CalendarAnything LWC can be embedded within a Salesforce Home page or record detail page, as well as within a Visualforce page used in a public-facing Force.com site.
In this article, you will learn about:
- Embedding a calendar into a Salesforce home page
- Embedding a calendar into a Salesforce record page
- Setting CalendarAnything LWC properties
- Embedding a calendar into a Force.com site
- Configuring Guest User access, permissions, and sharing rules
Embedding a calendar into a Salesforce home page
This example embeds a calendar into a Salesforce home page, specifically the CALWC home page. To work through this example, follow these steps:
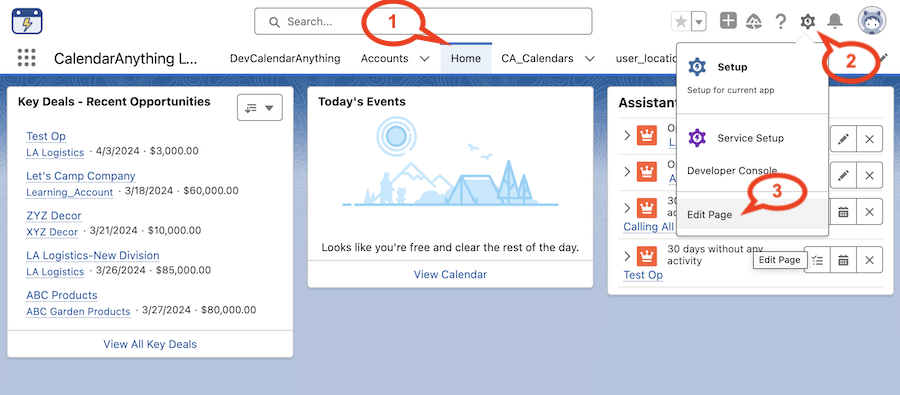
- Navigate to the CalendarAnything LWC homepage.
- Click the Salesforce gear icon.
- Select Edit Page from the context menu. Note: If you do not see the Edit Page option, you may need a permission assigned.
The Lightning App Builder appears.
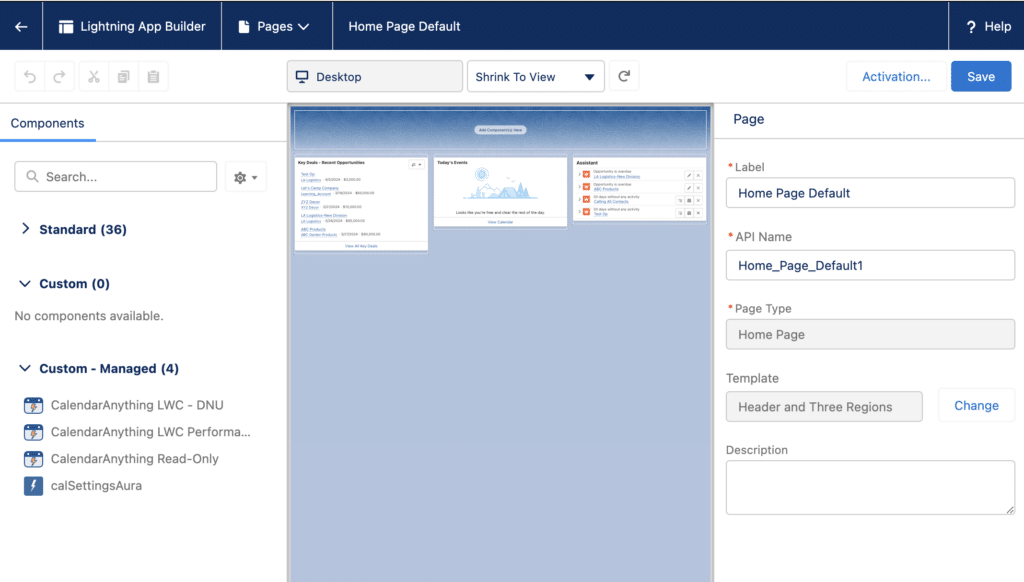
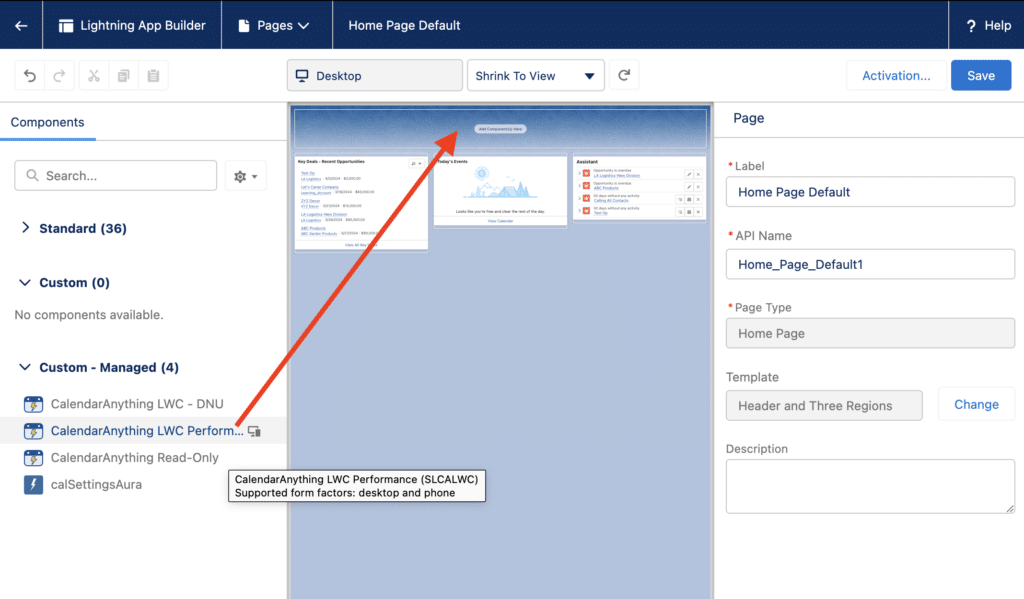
- In the left sidebar of the Lightning App Builder, find and drag the CalendarAnything LWC Performance component onto the section where you want the calendar to appear.
The component properties panel appears on the right side of the page.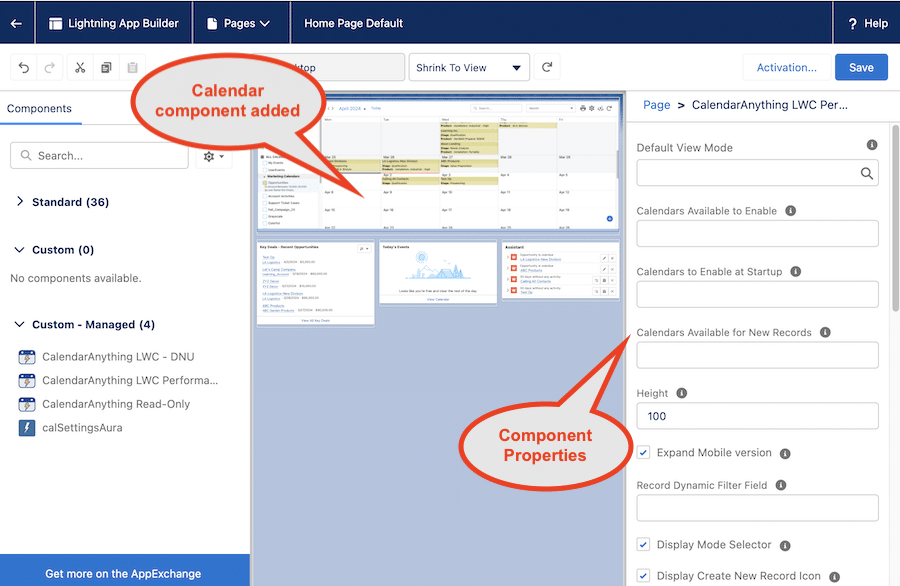
- Set calendar properties as needed, referring to the definitions in “CalendarAnything LWC Properties.”
- Click Save.


Embedding a calendar into a Salesforce record page
Salesforce record page calendars are context-sensitive in that they are filtered based on a selected record. These context-sensitive or record-specific calendars are known as “dynamic calendars” and must contain one or more filters flagged as dynamic.
Refer to “Creating and Embedding Dynamic Calendars – LWC” to learn how to create a dynamic calendar and embed it into a record page.
Setting CalendarAnything LWC Properties
In Lightning App Builder, you have the option to customize CalendarAnything LWC using properties. Refer to the list below.
- Default View Mode
Agenda is the default view. The system administrator can change the default to another option, such as Day, DayGrouping, or Week. - Calendars Available to Enable
Enter the calendar ID or calendar Name from the Name and Color page within calendar setup. Separate multiple calendars by commas. Leave blank to show user’s selected calendars and groups from General Settings > Display and Layout. This property supports using an expression to define its custom label. The correct format is {!$Label.customLabelName}. - Calendars to Enable at Startup
Enter the Name or ID of one or more calendars to be loaded by default when the page is loaded. Separate multiple calendars using commas. Any defaults entered here will override any user selection of calendars for this page. If no calendars are entered here, no calendars will be displayed the first time the user opens the page. Enabled calendars show records. To enable calendars, tap on the navigation icon and select calendars from the list. - Calendar Available for New Records
The system administrator can specify, and thus limit, the calendars that can be used to create new records. To do this, enter the Name or ID of the calendars that can be used to add records. To do this, enter the Name or ID from the Name and Color page within calendar setup for each calendar that you want to specify. - Height
Set component height. For mobile, the recommended height is 500. The value is interpreted as pixels. - Expand Mobile Version
When this check box is checked, the application uses all available space on a mobile device setting. - Record Dynamic Filter Field
Used to filter records when a component is placed on the record page.
Note: Dynamic Filter must be first filter within the Filter Criteria page within calendar setup. Only calendar events related to the current account will be displayed within the component.
Examples include:
* Add component on Account page
* Set Record Dynamic Filter Field = Id
* Add Dynamic filter on Calendar Edit Filter Criteria: Related To = DYN - Display Mode Selector
If checked, the application will display View Mode selector. - Display Create New Record Icon
If checked, the application will display + icon (Create New). - Display Calendar Selector
If checked, the application will display a Calendar Selector. - Display Refresh Icon
If checked, the application will display a refresh icon that, when clicked, will display the latest records for all enabled calendars. - Display Today Icon
If checked, the application will display Today icon. - Use CalendarAnything Create Forms
If checked, the application will use a custom record create form based on the Create and Edit Popup within calendar setup. Otherwise, it will use the standard new record layout for the selected record type. - Use CalendarAnything Event Detail Popup
If checked, the application will use a custom record detail popup based on the Details Popup within calendar setup. Otherwise, it will use the standard record layout for a selected event. - Enabled Calendars Only on Create
If checked, the application will display only the currently selected set of calendars when creating new records. Otherwise, it will display all Calendars Available to Enable. - Additional User Settings
The system administrator can specify default user settings in JSON format. For example: {“swimlaneEnableListViews”:false} - URL Parameters
This property supports using an expression to define its custom label. The correct format is {!$Label.customLabelName}. - Max Reference Options
The system administrator can define the number of related lookup objects to load on start. For optimal performance, we recommended to set Max Reference Options to 10 or less. - Static Caching Time (minutes)
Cache time limit for objects metadata and user’s permissions. Default is set to 60 min. When set to 0, caching is turned off. - Session Caching Time (minutes)
Cache time limit for Calendars information. Default is set to 60 min. When set to 0, caching is turned off. - CA Read-only Settings
Set “true” for enabling ReadOnly mode, or JSON with separate options This property supports using an expression to define its custom label. The correct format is {!$Label.customLabelName}.
Embedding a calendar into a Force.com site page
Available in: Developer, Enterprise, and Unlimited editions ONLY.
To embed a calendar into a Force.com site page, you must first create a Lightning application and a Visualforce page. On a new or existing Site page, you must change the Active Site Home Page to be the new Visualforce page.
Note: These instructions assume a new site page is being created.
| 
|
Create a Lightning Application
Follow these steps to create a Lightning application:
- Click the Salesforce gear icon.
- Select Developer Console from the context menu.
- In the Developer Console, Click File > New > Lightning Application.
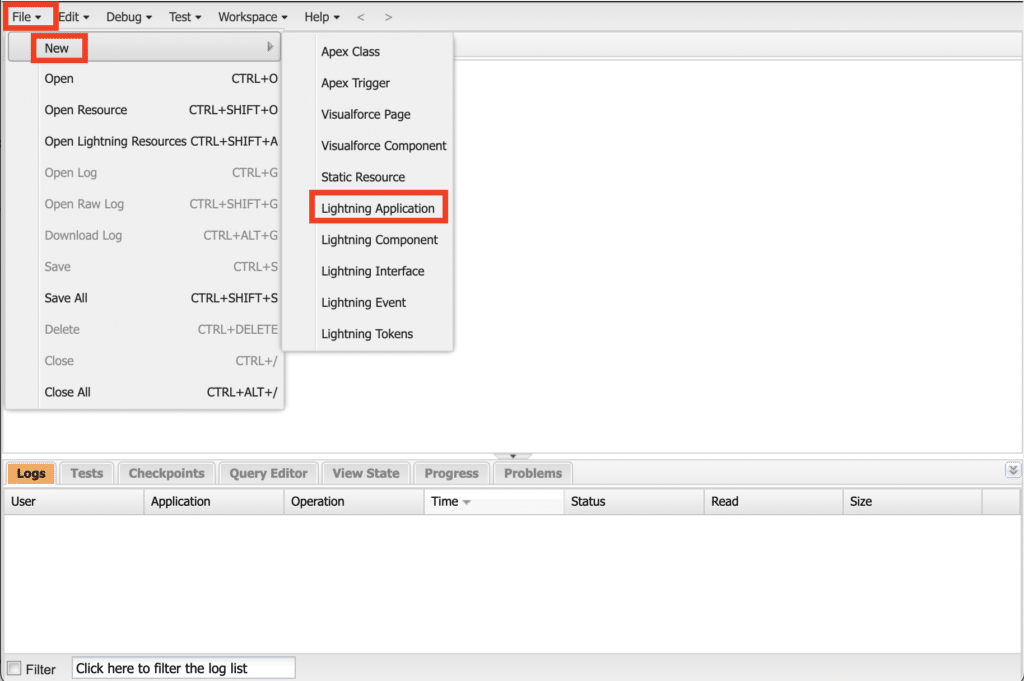
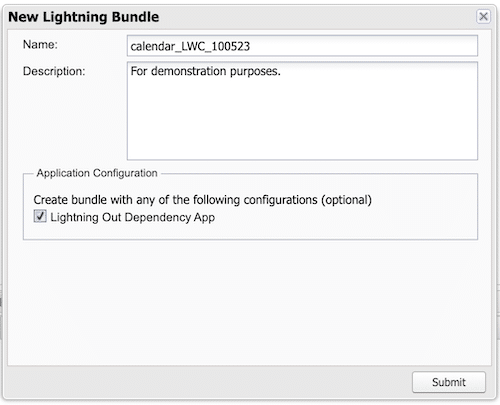
- On the New Lightning Bundle popup, enter a Name for the application and make sure to check the Lighting Out Dependency App checkbox.
A page similar to the one below appears. - Remove all of the highlighted code from the text area.
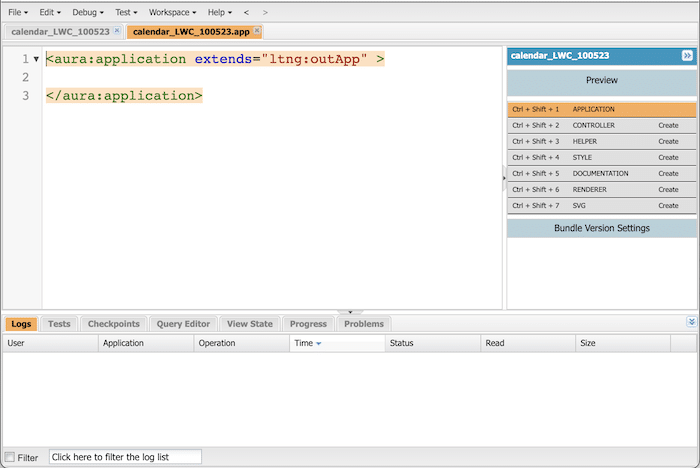
- Into the blank area, copy and past the following code:
<aura:application access="GLOBAL" extends="ltng:outApp" implements="ltng:allowGuestAccess" /> - Click File > Save.


Create a Visualforce Page
To create a Visualforce Page, follow these steps:
- Click the Salesforce gear icon.
- Enter Visualforce Pages in the Quick Find box.
- Select New.
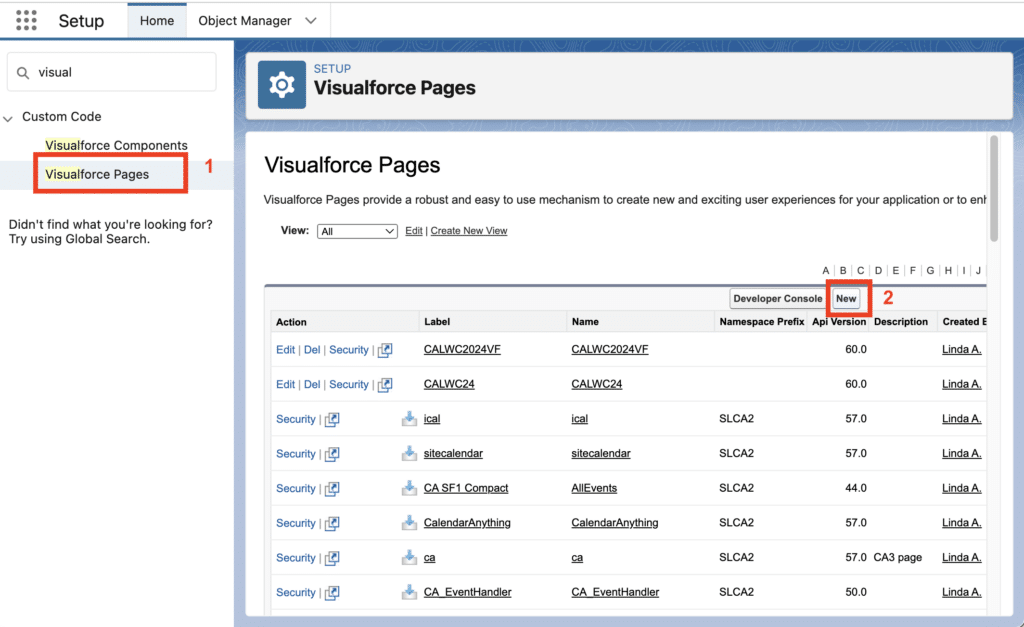
- Fill in the fields in the Page Information section.
- Make sure to check the box labeled Available for Lightning Experience, Lightning Communities and the mobile app.
- Remove the default Apex code from the new page.
- Copy the code below and paste it where the default Apex code had been. Make sure to change items shown in red below to what applies to you.


<apex:page >
  <apex:slds />
  <apex:includeLightning />
  <div id="calLightning" class="wrapper"></div>
  <script>
    var calendarApi = null;
    // Create custom app and expose it to VisualForce
    $Lightning.use("c:calendarLWC", function () {
      // add some settings
      let userAdditionalSettings = {
        displayTimeZone: true,
        dayModeArea: "0_1",
        readonly: {
          move: false
        },
      };
      $Lightning.createComponent(
        "slcalwc:calLoader",
      {
      //Replace the example ID with your CalendarID
      calendar:  "a024T00000257LDQAY",
      //Replace the example ID with your CalendarID
      enabled:  "a024T00000257LDQAY",
      // The default start view mode
      view: "Month",
      showModeSelector: true,
      userAdditionalSettings: JSON.stringify(userAdditionalSettings),
      height: "800px",
      //uncomment to hide sidebar or pass additional url params
      // urlparams: "sb=2",
        func: {
          ready: function (oApi) {
            calendarApi = oApi;
          },
        },
      },
      // id of div you want to put new Lightning element
      "calLightning",
      (cmp) => {
      // callback for create element
      //(NB calendar load event is not equal to this)
      // to execute something after calendar is loaded use ready
      console.info("created");
      }
    );
  });
</script>
</apex:page>
| Important! | Remember to replace the Lightning App name with your Lightning App name and the example calendar Ids with your calendar Ids. |
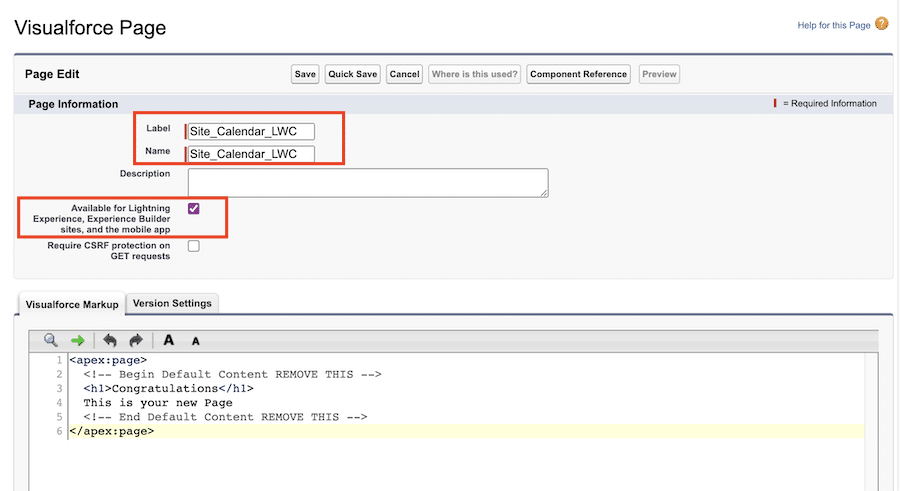
Create a Force.com site page (or choose an existing one)
You can choose to use an existing Force.com site page rather than create a new one. To create a new Force.com site page, refer to Salesforce’s Setting Up Salesforce Sites. Once the site page is ready, proceed with the next section Configure the Force.com site page.
Configure the Force.com site page
Once the Force.com page has been chosen or created, follow these steps:
- Click the Salesforce gear icon.
- Enter Sites in the Quick Find box. The Sites page appears.
- Select the site page from the list. The Site Details page appears.
- On the Active Site Home Page field, click the lookup icon. A popup appears for you to select a Visualforce page.
- Select the name of your new Visualforce page into the Active Site Home Page field.
- Click Save.

Configuring Guest User access, permissions, and sharing rules
If you are updating an existing Force.com site, some of these procedures can be skipped. For new Force.com sites, complete all of the procedures listed below.
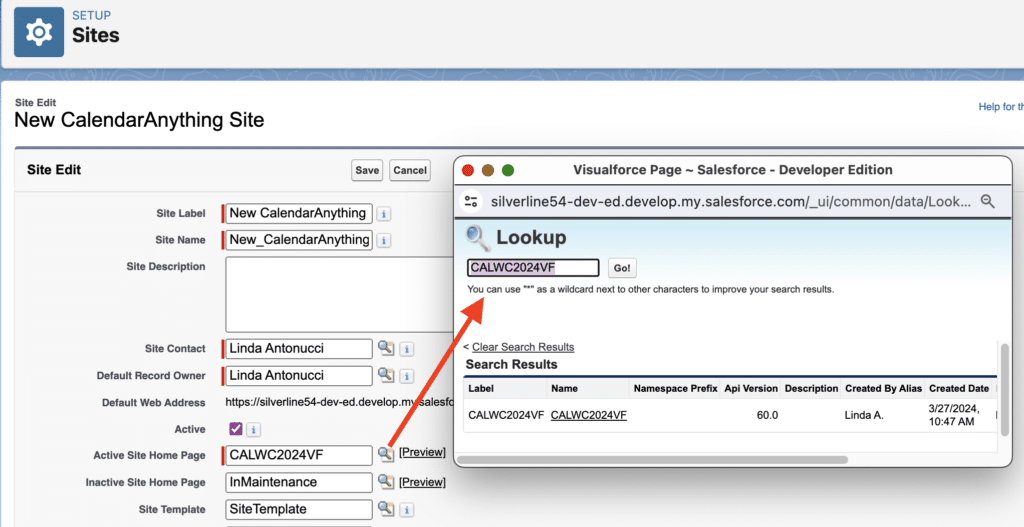
Configure Guest User Access
If your Force.com site is brand new, follow these steps:
- Click the Salesforce gear icon.
- Enter Sharing Settings in the Quick Find box.
- Click Edit in the Organization-Wide Defaults section.
- Scroll to the Other Settings section and make sure the Secure Guest User Record Access checkbox is checked.

- If the Secure Guest User Record Access checkbox is not checked, contact your system administrator.


Create and assign a custom CA LWC Permission Set for Guest Users.
In the Spring of 2021, Salesforce removed all View All, Modify All, Edit, and Delete guest user permissions on all custom and standard objects in new and existing orgs. This change gave guest users only Read and Create object permissions. Additionally, guest users were removed from permission sets and permission set groups that contained the View All, Modify All, Edit, and Delete object permissions. See SF SPRING 2021 RELEASE NOTES for details.
As of the Spring 2021 release, the following steps should be applied for your Salesforce organization:
- Click the Salesforce settings (gear) icon.
- Enter Permission Sets in the Quick Find box.
- Select Permission Sets. A list of permission sets appears.
- On the list of permission sets, click Clone on the CalendarAnything LWC Default Permission Set. The Permission Set detail page appears.
- On the detail page, change the new permission set’s Label, API Name, and Description.
- Click Save. The list of permission sets again appears.
- Select the newly created object to open it.
- In the Apps section, click Object Settings.
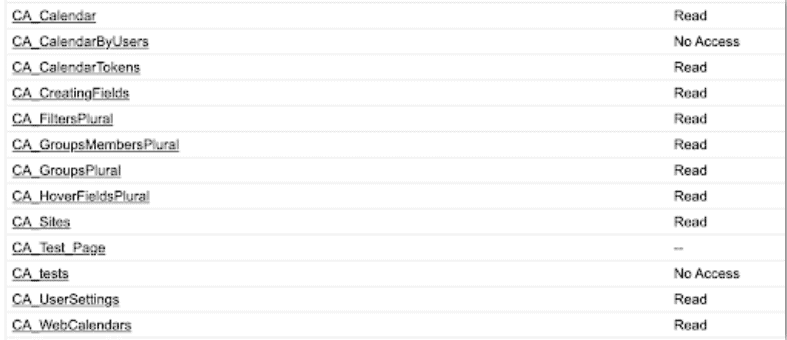
- Update object permissions for CalendarAnything LWC custom objects to Read access
- After the new permission set is ready, update Permission Set Assignments for all Site Guest Users, as follows:
- Click the Salesforce gear icon.
- Enter Sites in the Quick Find box.
- Select Sites. The Sites page shows a list of any existing sites.
- Click the Site Label of the site for which you must update permissions. The Site Details page appears.
- Click Public Access Settings. The Profile page for the selected site appears.
- Click View Users. A list of site users appears.
- Click the user’s Full Name. The User Detail page appears for the selected user.
- Click Permission Set Assignments. A page listing various categories of Permission Set Assignments appears.
- In the Permission Set Assignments category, click Edit Assignments. A page listing available and enabled assignments appears.
- Move the required permission or permissions from the Available Permission Sets panel to the Enabled Permission Sets panel.
- Click Save.

Create Sharing Rules for your Force.com site Guest Users
If your Force.com site is brand new, you must configure Sharing Rules as follows:
- Navigate to Setup > Sharing Settings.
- Click Edit.
- Scroll to the Other Settings section and make sure the Secure Guest User Record Access checkbox is checked.

- If the Secure Guest User Record Access checkbox is not checked, contact your system administrator.

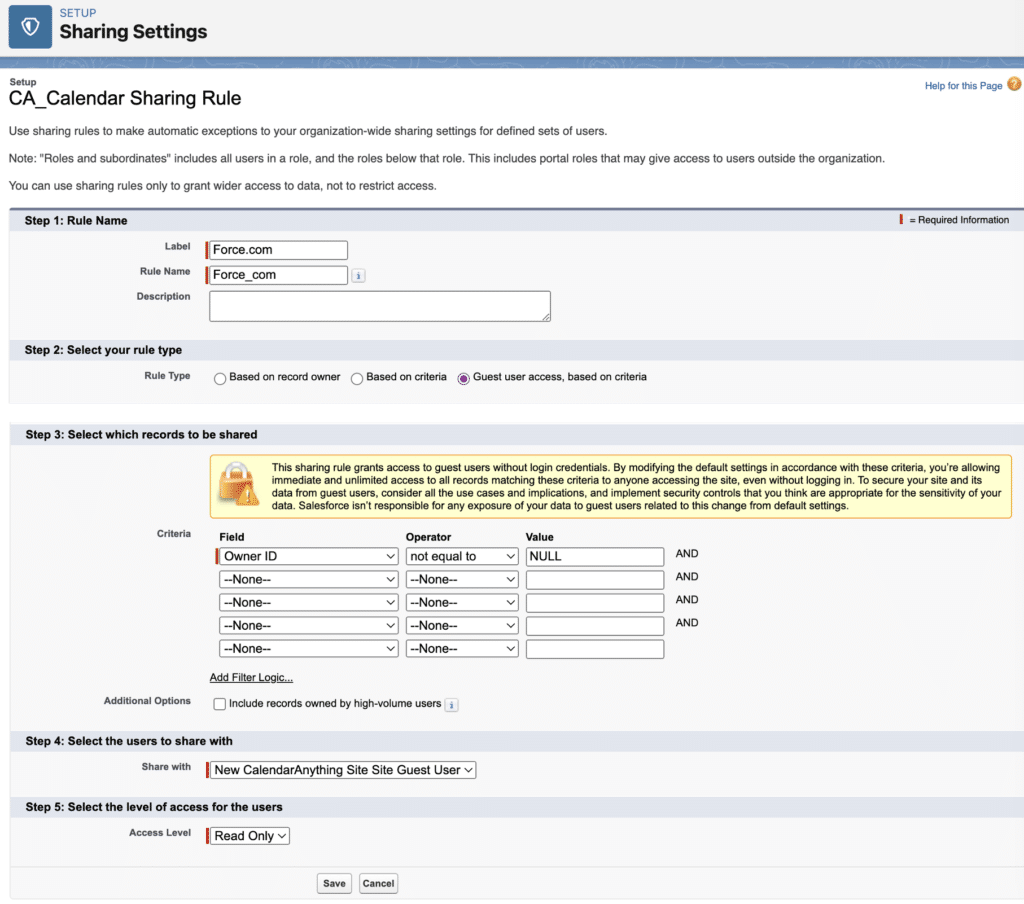
Create a Sharing Rule for the CA_Calendar Object
The Sharing Rule you create for the CA_Calendar object defines what will be shared with your site users and depends on your use case and organizational requirements. Follow these steps to create a sharing rule for the CA_Calendar object:
- Click the Salesforce gear icon.
- Enter Sharing Settings in the Quick Find box.
- Open the dropdown from the field labeled Manage sharing settings for. Scroll close to the bottom of the options and select CA_Calendar (Installed Package: CalendarAnything LWC).
- In Step 1: Rule Name section, enter the Label for the Sharing Rule.
- In Step 2: Select your rule type, select the radio button labeled Guess user access, based on criteria.
- In Step 3: Select which records to be shared, read the highlighted note on the page before deciding what, if any, criteria to configure. The criteria defines what will be shared with your site user and depends on your use case. In this example, the rule being created gives the Guest Site user access to all calendars. Please make sure you are sharing with the right Guest Site user.

| Important! | Once shared, the Guest Site user can access the calendars but not the records displayed on the calendar. You must replicate the process for each object that feeds into the calendar. |