Reading Time: 7 minutes
CalendarAnything is the #1 Salesforce calendar app on the AppExchange because we are always listening to our users and implementing new features that meet their most pressing needs. From new visualization options to make it easier than ever to see and understand your Salesforce data to integrating with Salesforce Flows to automatically update records directly from your calendar, these are four of the latest CalendarAnything features that are driving productivity and Salesforce adoption for our users.
Color legend as filter
Most users are already familiar with our filter panel and filter sets, allowing them to filter data on the calendar in various customizable ways. We have recently added the ability to interact with our color legend as a filter. This is a client-driven innovation, implemented as a direct response to feedback from CalendarAnything users who requested a more intuitive way to events and records without navigating to separate filter menus. The color legend filter is a powerful feature that streamlines calendar data management by allowing quick and easy filtering and improves user efficiency and overall user experience.
It’s very easy to enable at the user level:
- Click the CalendarAnything gear icon to navigate to “Settings”
- Navigate to “General Settings” and search for “Filter”
- We have added a display setting called “Filter Using Color Legend”, and there are several options that are available: “CTRL + Toggle”, “Toggle”, “CTRL + Toggle/Highlight”, and “Toggle/Highlight”
My favorite is just using “Toggle”, but there are other ways to interact with the color condition panel so definitely play around and see what works best for you and your users.

Color Filter setup
I have a lot of records in my opportunity calendar, but I really want to zero in on opportunities in the “Negotiation/Review” stage. I can select my “Negotiation/Review” color, and the calendar will refresh and only show those opportunities. If I also want to see all opportunities in the “Closed Won” stage, I can select that one as well and now I’m looking at both. It’s a very easy way to filter and zoom into data, and clicking on the color will uncheck that filter and show me everything. This also works on second and third-level fields. If I only want to see opportunities with amounts greater than $10,000, I can easily do that as well.
Start a Flow in CalendarAnything
Flows are very popular in Salesforce to create, edit, and delete records. A lot of our customers automate their processes using Flows, so we wanted to expand our application to allow them for seamless use of those Flows within the CalendarAnything UI.
Integrating with Flows enhances your overall user experience, adoption, and provides a more efficient approach to record management, reducing the need to navigate between different screens and Salesforce components. Each calendar can be set up to use different Flows depending on your processes or the business Flows within your organization, and you can have different calendars set up using different Flows.
Start by enabling the “Quick Creation Mode Select” display setting:
- Under “General Settings”, click “Advanced”
- Select the checkbox labeled “Quick Creation Mode Select” and set it to “TRUE”.
- Click “Save”
To create a Flow:
- Navigate to the “Calendar Criteria” on the “Edit Custom Calendar” sidebar
- Under the “Advanced” section, set the “Create Form” option to “Flow”
- Once you select this, three additional sections will be added to the “Create and Edit Pop Up” menu, where you can specify which Flows you want to use to create, edit, or delete
Here we have configured our calendar to use a create Flow. This is a very basic Flow to create new opportunities with start and end dates, but this can be very complex and you can pass additional parameters to your Flow. Depending on where you click on the calendar, we can gather information from the calendar UI and pass that to your Flow as well.

Create Flow
To create a new opportunity, simply click on the day, select your calendar, and the Flow will start. Add an “Opportunity Name”, select “Stage”, click “Next”, and the Flow will fire up a new opportunity record. CalendarAnything is automatically refreshed to display that data. It’s a very powerful tool — you can use different Flows to edit and delete and any calendar can be configured to use a Flow.
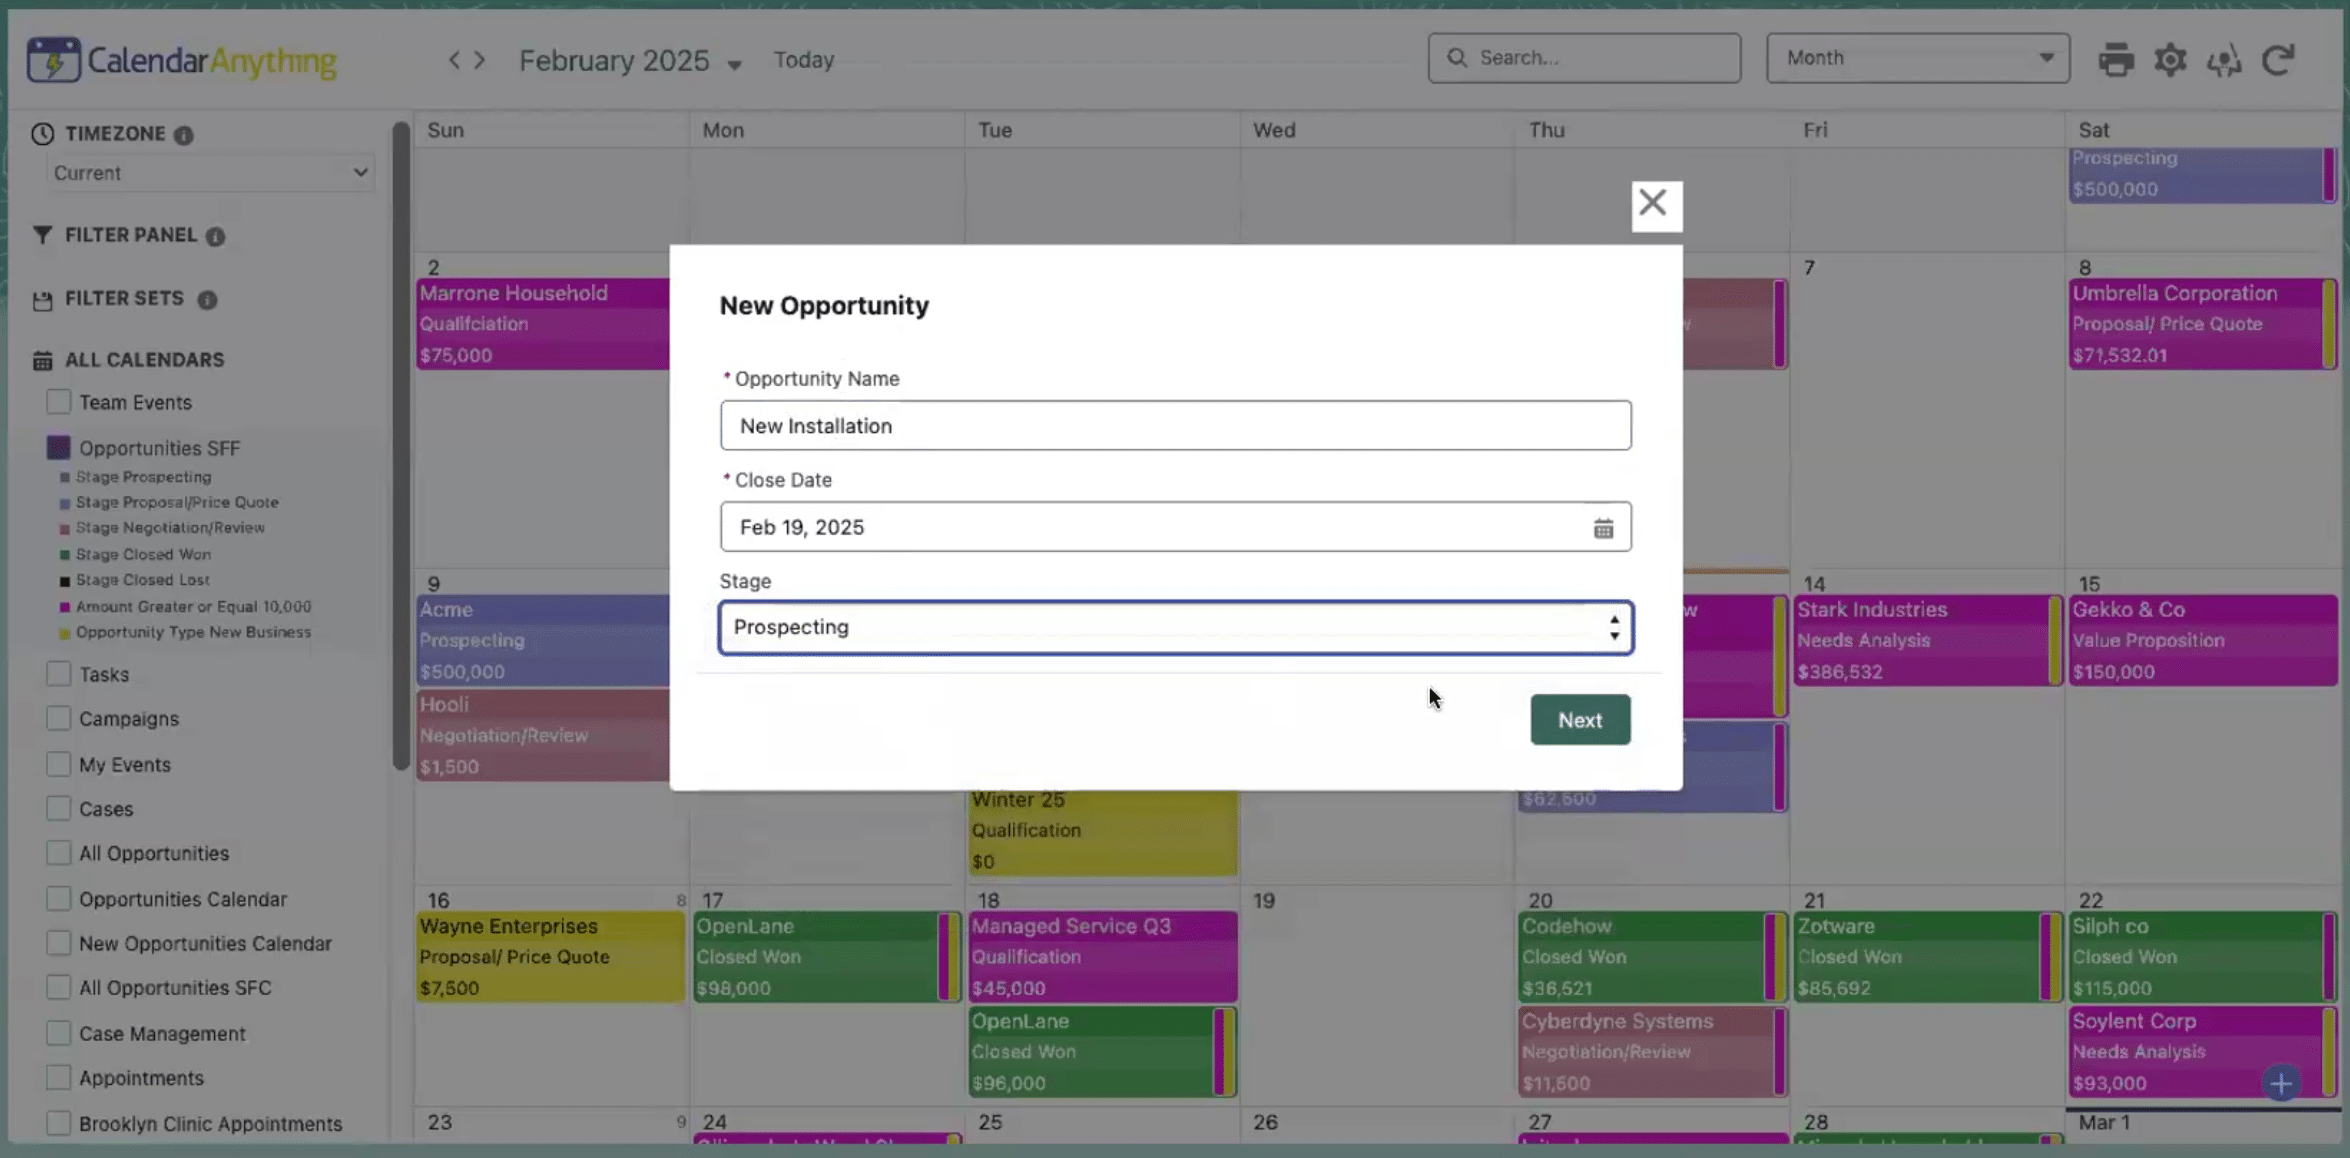
New Opportunity Flow
Custom buttons to detail popup
Now you can add custom buttons to your detail popup. In the first detail popup below, you’ll see that we only have one button, our preview button redirects to the record detail. We extended this option so CalendarAnything admins can now configure this detail pop up to add additional buttons. On the second detail popup, we have three additional buttons that we added.
What are some of the benefits of configuring your calendar to use custom buttons? You can perform key functions without leaving the calendar, quickly access external resources like Lightning Components or related records, and enhance the overall user experience. And it’s super easy to configure those buttons. Click on “Edit,” navigate to the “Detail Popup” section, and you’ll see we have a section added for “Custom Buttons”.

Edit Custom Buttons
This particular calendar is configured to open an external URL, navigate to an internal Salesforce URL, and use a Flow. In this case, we created a Flow so we can reassign events to a different user, and you can pass variables to your Flow and make it as complex as you need it to be. Another popular button is a “Closed Won” button that triggers a Flow to update the opportunity stage on your opportunity calendar.
Let’s say I’m preparing for an event with this account, and I want to quickly jump into ZoomInfo and learn a little bit more about this customer. From the detail popup, I can quickly click on “ZoomInfo” and it will redirect me to ZoomInfo website. Everything can be easily accessed from CalendarAnything UI. If I need to quickly reassign a record to another user, I can just click on reassign, select another user from the list, click the button, and it will be assigned to a different user. It’s simple to configure and very useful.
Kanban view
Last, but not least, is our new Kanban view. Some of the key features of the Kanban view:
- Very flexible grouping, allowing you to organize your data into rows and columns based on fields such as status, priority, or custom criteria
- Public groups list view and CalendarAnything custom grouping for organizing your data
- Various options for duration
- Drag-and-drop functionality and a contextual menu for intuitive sorting
Below we have configured our case management use case within Kanban view. We are grouping by queue, so you can select different queues for your grouping, as well as a priority field. I have selected a month’s view as my grouping duration. We have different options here, including a custom option where I can specify the number of days for which I want to view this data.
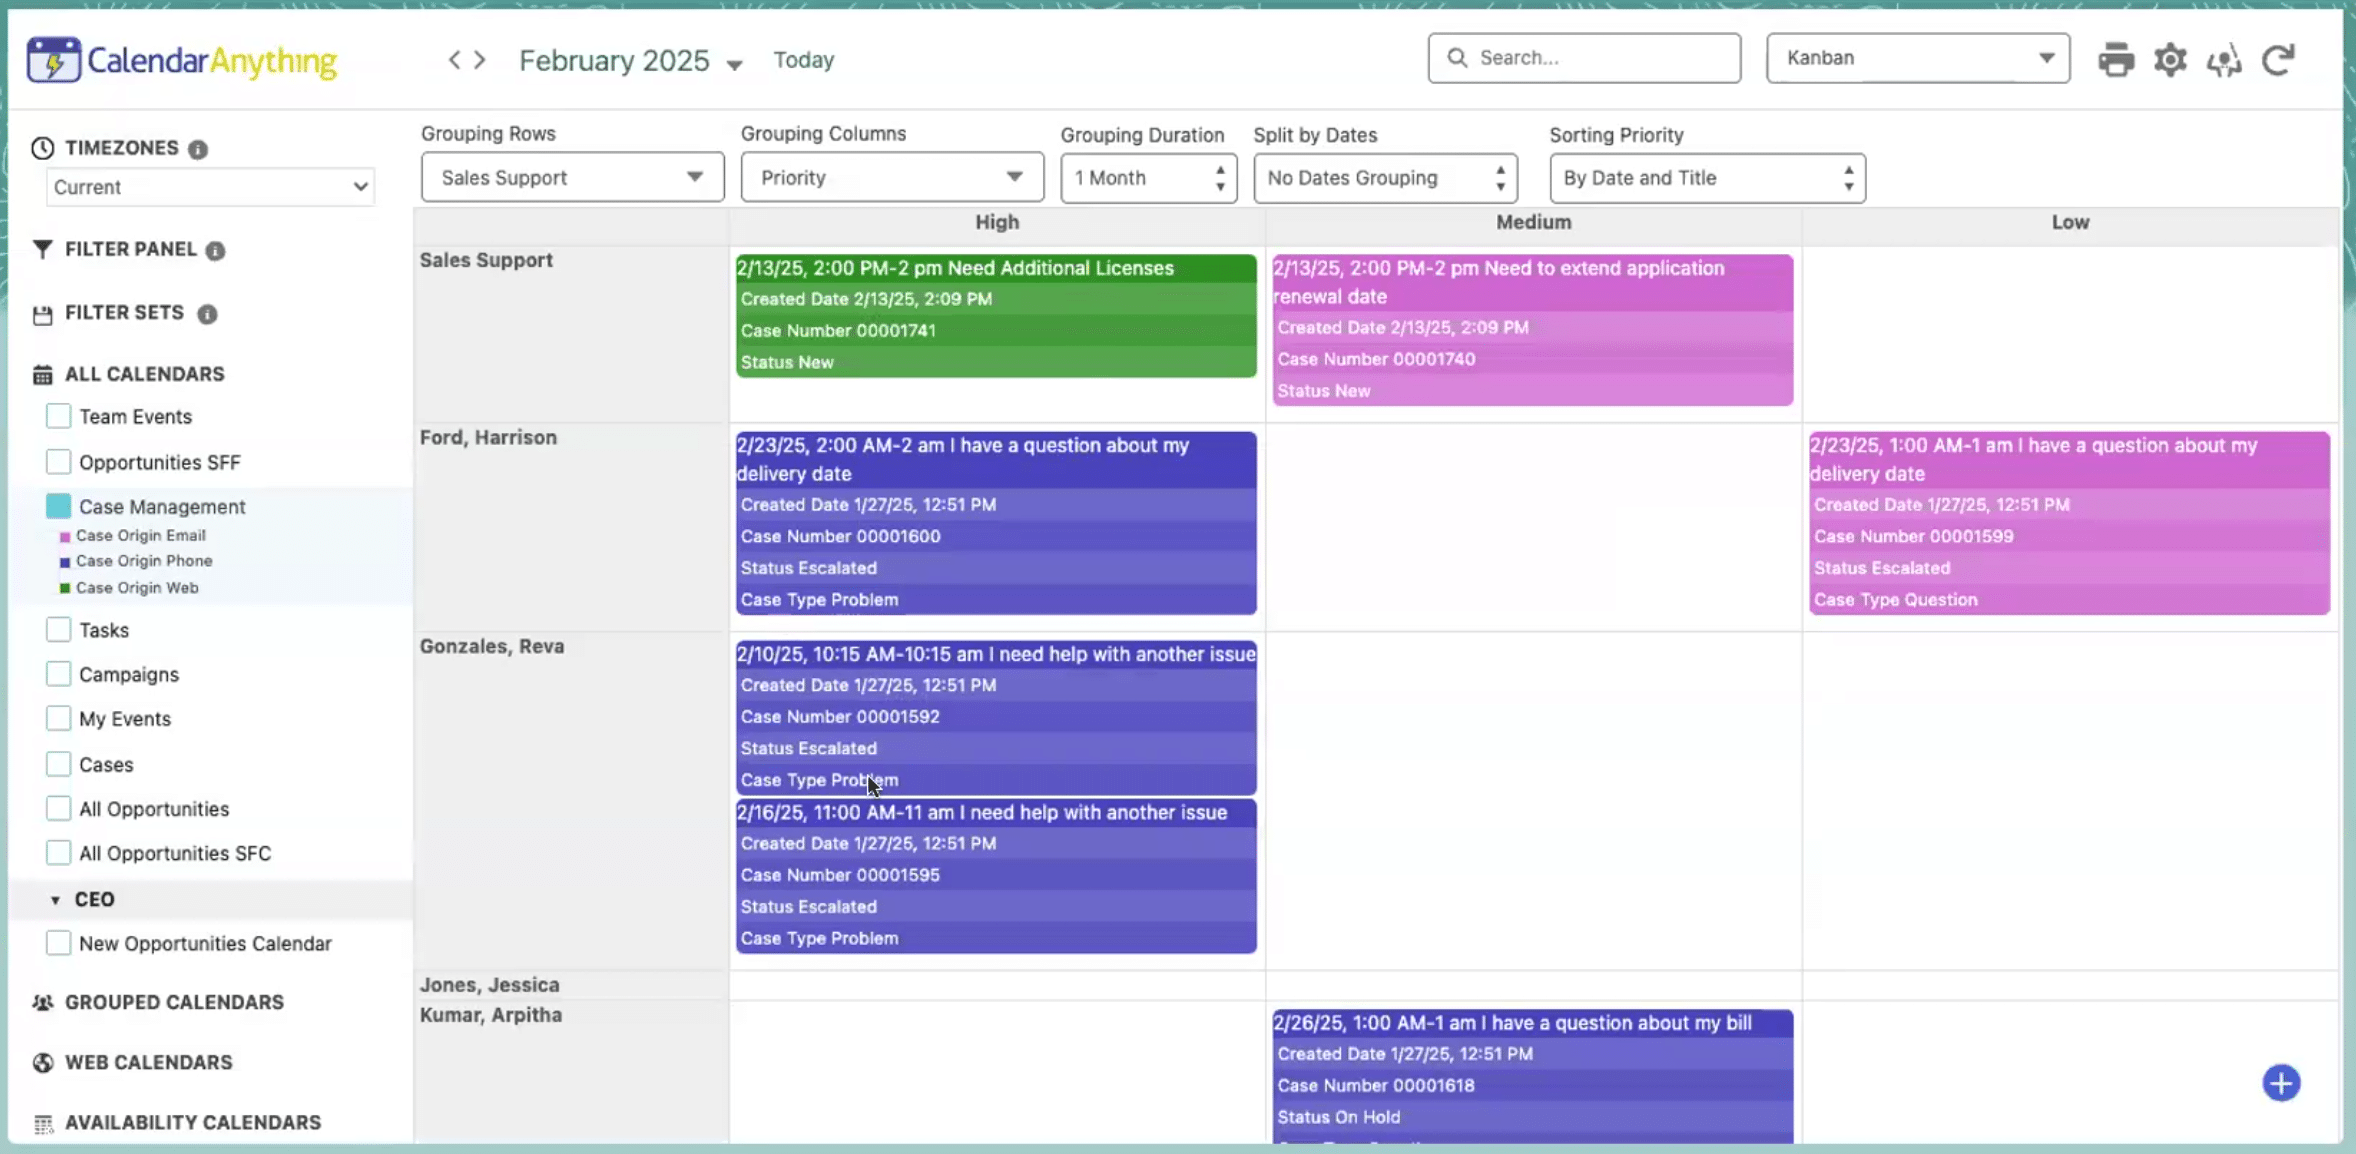
Kanban View
We can see there are a bunch of cases assigned to the Sales Support queue and I can also see every team member from my queue that has the skill set to work on this type of case. I’m viewing my cases by priority, and I can easily drag and drop each case to assign it to whoever I need or to change the priority of the case.
I can also enhance this view and add “Split By Dates”. So let’s say I’m looking at a month’s worth of data and I want to see this by week. I’m going to add my “Split By Dates” option, select my interval, and now I can see all the cases that either are due by a certain date or came in on a certain date, broken down into weekly intervals. It makes navigating the data really easy.

Kanban Split View
Kanban view makes it very easy to see at a glance who’s working on what, who’s behind, and who needs help. I can monitor my opportunities by close date and their prospective stages. So instead of showing priority for the case, I can group it by stage of the opportunity, and I can see all my opportunities that are currently in the sales cycle by stage, which significantly streamlines pipeline management.
Learn more at our regular CalendarAnything Office Hour
Optimizing the CalendarAnything platform is an ongoing process, and the best way to learn about new upgrades is to attend our CalendarAnything Office Hour. It’s your opportunity to get knowledgeable about CalendarAnything with open-office training sessions, and we can provide you with real-time answers to any questions you may have about CalendarAnything setup, features, and functionality. Each session lasts for one hour and is completely free!