CA LWC – Adding a Map to the Details Popup
If your business has requirements that go beyond our out-of-the-box features, reach out - we offer custom development services for CalendarAnything to meet your unique needs.
CalendarAnything LWC users can easily enable the Map Add-on and configure a calendar to display the Map tab on the Details Popup. A calendar user who clicks a Map tab will see a map representation of an address associated with the selected record.
In this article:
- How to enable the Map Add-on
- How to configure a calendar to include the Map tab
- How to see an address using the Map tab
How to enable the Map Add-on
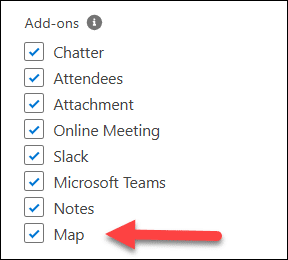 Follow these steps to enable the Map Add-on:
- Click the CalendarAnything gear icon to reach General Settings.
- On the Display and Layout section, scroll down to Add-ons.
- Click the Map checkbox (if not already selected).
- Click Save.
How to configure a calendar to include the Map tab
- On the calendar sidebar, right-click the name of the calendar to which you want to add a map.
- Click Edit.
- Go to the Calendar Criteria step and scroll down to the Add-ons section.
- From the Map Field, select the address to be shown graphically on the map.
- Click Save. Going forward, CalendarAnything will present the Map tab on the Detail Popup of the calendar.
To map an address not available on the Map Field drop-down list, ask the CalendarAnything administrator to add a custom address field.
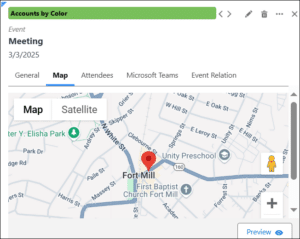
How to see an address using the Map tab
To see an address using the Map tab, follow these steps:
- While viewing a selected calendar record, bring up the Details Popup.
- On the Details Popup, click the Map tab. The application displays the address configured for the Map.