Dynamic Lists – Setup and Use
If your business has requirements that go beyond our out-of-the-box features, reach out - we offer custom development services for CalendarAnything to meet your unique needs.
A Dynamic List establishes a connection between two otherwise unconnected data objects. The connection makes it possible to use filter criteria that would otherwise be unavailable. The filter criteria can be of two types:
- Dynamic filter criteria: specified in calendar setup and can be changed as needed before viewing the calendar.
- Non-dynamic filter criteria: specified in the Dynamic List itself and can only be changed by an admin.
In this article:
- Example Use Case
- How to Create a Dynamic List (Admin)
- How to Configure a Calendar to Use a Dynamic List Filter
Example Use Case
A calendar user wants to see events assigned to members of specific public groups and wants the option to change the groups prior to loading the calendar.
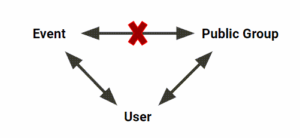 This diagram below shows the challenge in meeting the use case requirements given the existing data object relationships.
Notice the object relations. User relates to both Event and Public Group. However, no relationship exists between Event and Public Group. So how does the application determine whether a user on an Event record is a member of a specific public group? This issue can be resolved by a Dynamic List.
How to Create a Dynamic List (Admin)
Only admins can create Dynamic Lists.
These instructions are based on the example use case. Actual field selections will vary based upon your use case.
- In CalendarAnything, click the CalendarAnything Settings Gear.
- Select Admin Settings > Dynamic List.
- Click + Add. A new row becomes visible.
- Enter a Name for the Dynamic List, for this example, enter Public Group Member DL. The Edit pencil icon becomes enabled.
- Click Edit. A popup to add the Dynamic List details appears.
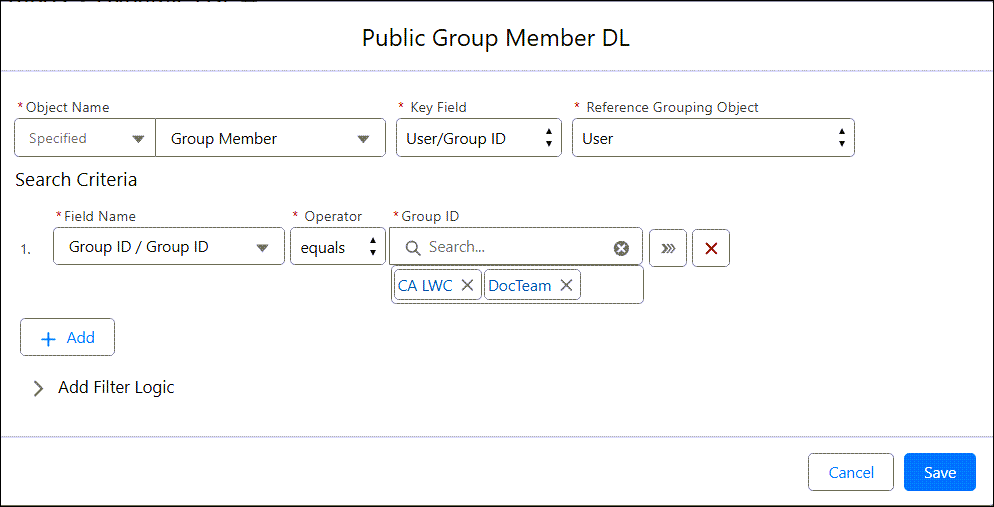
- Enter the field values shown below:
- Object Name: Group Member (second occurrence, as the dropdown has two options with this name). The Key Field becomes visible.
- Key Field: User/Group ID. The Reference Grouping Object field becomes visible.
- Reference Grouping Object: User

- Click +Add on the popup. The Search Criteria section becomes visible on the popup.
- Enter the field values shown below.
- Field Name: Group ID. The Operator field defaults to equals.
- Operator: equals
- Click the Dynamic icon (three right-facing arrows). The Search Criteria fields become grayed out.

-
If the list were being configuring with non-dynamic (built-in) search criteria, the admin would select each search value from the field to the right of the Operator.
-
- Click Save on the popup. The popup closes. The Admin Settings > Dynamic Lists page should now include the one you just created.
- Click Save.
How to Configure a Calendar to Use a Dynamic List Filter
These instructions are based on the Dynamic List created for the example use case.
- Right-click your calendar name on the CalendarAnything sidebar.
- Select Edit to bring up the Create Custom Calendar wizard (calendar setup).
- Select the Filter Criteria step.
- Click + Add.
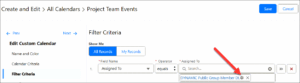
- Enter the three fields below:
- Field Name: Assigned to
- Operator: equals
- Assigned To: Name of newly created Dynamic List — in example, this is Public Group Member DL.
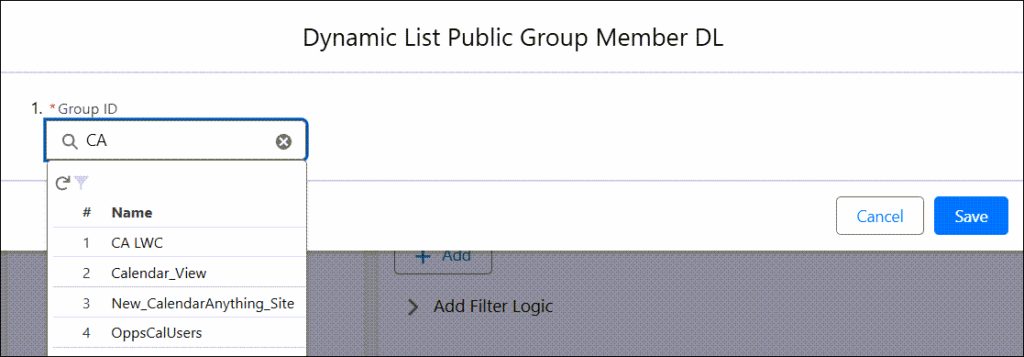
- Select the gear icon next to the selected Dynamic List name.
- A popup to select search criteria values is displayed. Select the criteria value or values and click Save.
Note: In cases where a Dynamic List is configured with non-dynamic (built-in) search criteria, a pop-up displays a read-only list of the criteria.
- Click Save to close the popup.
- Click Save to save the changes to your calendar setup.