CA Lite for Salesforce Field Service Mobile App – Install Guide
If your business has requirements that go beyond our out-of-the-box features, reach out - we offer custom development services for CalendarAnything to meet your unique needs.
Salesforce Field Service teams can access critical Salesforce data in a mobile-friendly calendar format with the Calendar Anything Lite for Salesforce Field Service Mobile App. This article explains the installation and setup process for this app.
In this guide:
Prerequisites
Before you begin installation, ensure that the following prerequisites are met:
- Salesforce Field Service installed and configures
- CalendarAnything LWC version 1.150 or higher installed (Can be downloaded from the App Exchange if you don’t have it installed)
- CalendarAnything Lite Field Service Mobile user licenses
- Installation links provided by Mphasis Silverline AppExchange Team:
- CalendarAnything Lite Version 1.16 – https://login.salesforce.com/packaging/installPackage.apexp?p0=04tfL000000RD61
- Calendar Anything Field Service Mobile (FSM) Version 1.0 – https://login.salesforce.com/packaging/installPackage.apexp?p0=04tfn000001deWT
Installations
-
CalendarAnything LWC 1.150 or higher must be installed and set up. If this is not the case, perform the following steps:
A) Install.
- Download CalendarAnything LWC 1.150 from the App Exchange.
- Log into your Salesforce org (the org into which you will be installing the packages).
- Install CalendarAnything LWC 1.150. Choose the option Install for All Users.
B) Assign licenses.
- Once the installation has finished, select the Salesforce gear icon.
- Select Setup.
- Enter Install in the Quick Find box.
- Select Installed Packages. The Installed Packages page appears.
- Select Manage Licenses on the row listing CalendarAnything LWC. The Package Manager page appears.
- In the Licensed Users section, click Add Users. A list of users is displayed.
- Select the checkbox for each user who is licensed for CalendarAnything LWC. Each selected user is copied to the Selected Users list.
- When finished selecting users, click Add. The Package Manager page appears with the list of CalendarAnything LWC licensed users.
C) Assign the CalendarAnything LWC Default Permission Set.
- On the Setup menu, enter Permission in the Quick Find box.
- Select Permission Sets.
- On the Permission Set page, select CalendarAnything LWC Default Permission Set.
- On the CalendarAnything LWC Default Permission Set details page, click Manage Assignments.
- On the Current Assignments page, click Add Assignment.
- On the All Users page, use the inner-most scrollbar to scroll through the grid and enter a checkmark into the checkbox of each user who needs the CalendarAnything LWC Default Permission Set.
- Click Next. A page appears for you to optionally select an expiration date for the permission.
- Click Assign. A status message is displayed.
- Click Done.
For knowledge articles on CalendarAnything LWC, refer to the CalendarAnything Help Center and select LWC.
-
A. Install
- While still logged in to your Salesforce org, copy the CalendarAnything Lite install link into your browser address bar. The Install CalendarAnything Lite page appears.
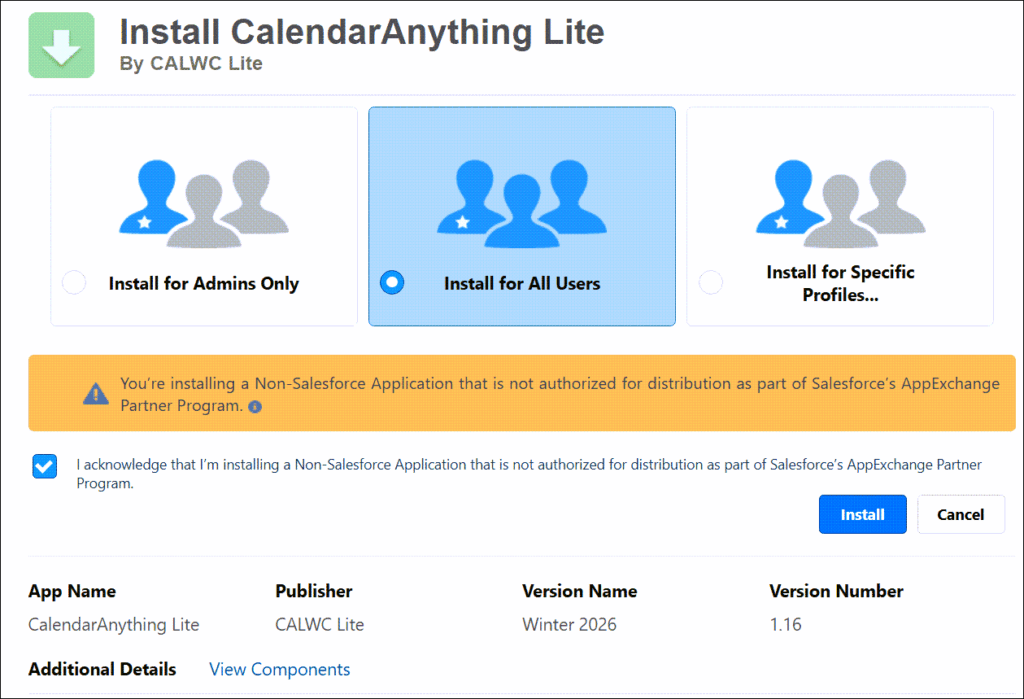
- Select Install for All Users.
- Read the acknowledgement and then click the checkbox to confirm that you’ve read it.
- Click Install.
- When the installation has finished, click Done.
B. Assign Licenses:
- In CalendarAnything, select the Salesforce gear icon.
- Select Setup.
- Enter Install in the Quick Find box.
- Select Installed Packages. The Installed Packages page appears.
- Select the Manage Licenses link for CalendarAnything Lite. The Package Manager page appears.
- In the Licensed Users section, click Add Users. A list of users is displayed.
- Select the checkbox for each user to be licensed for CalendarAnything Lite. Each selected user is copied to the Selected Users list.
- When finished selecting users, click Add. The Package Manager page appears with the list of CalendarAnything Lite licensed users.
- While still logged in to your Salesforce org, copy the CalendarAnything Lite install link into your browser address bar. The Install CalendarAnything Lite page appears.
-
A. Install
- While still logged in to your Salesforce org, copy the CalendarAnything FSM install link into your browser address bar. The Install CalendarAnything FSM page appears.
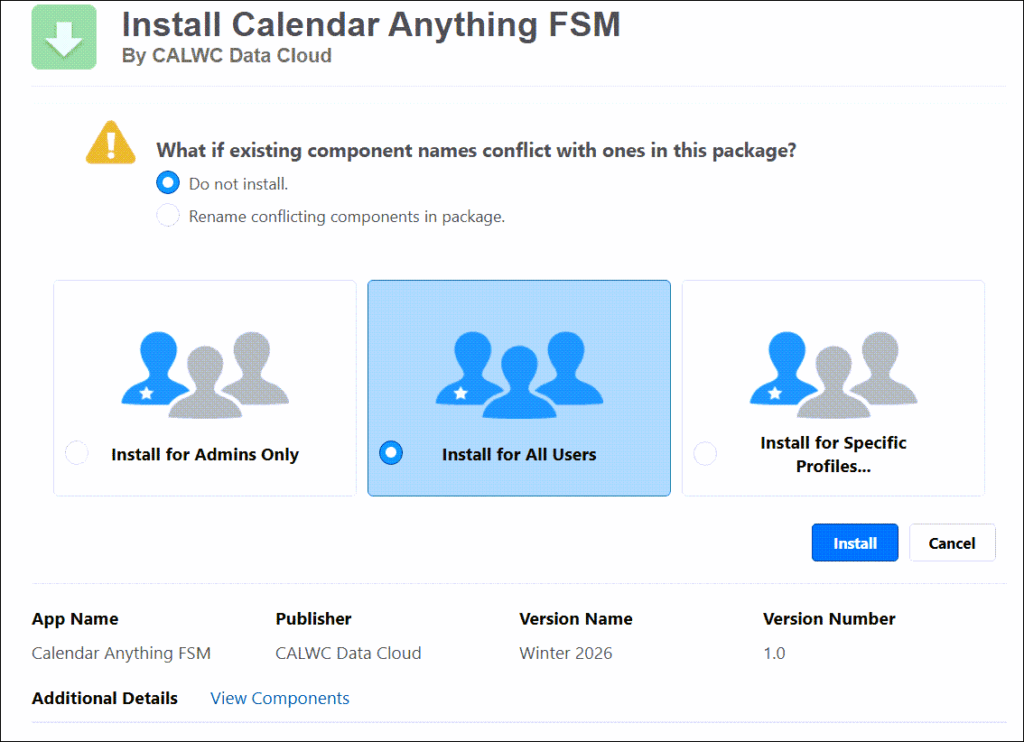
- We recommend you select Do not install for the question “What if existing component names conflict with ones in this package?” as there is a known issue with the second option.
- From the three “Install for” options, select Install for All Users.
- Read the acknowledgement and then click the checkbox to confirm.
- Click Install.
- When the installation has finished, click Done.
B. Assign the CalendarAnything Lite FSM Permission Set
- Select the Salesforce gear icon.
- From the context menu, select Setup.
- Enter Permission in the Quick Find box.
- Select Permission Sets.
- On the Permission Set page, select SL_FSM Permission Set.
- On the SL_FSM Permission Set details page, click Manage Assignments.
- On the Current Assignments page, click Add Assignment.
- On the All Users page, use the inner-most scrollbar to scroll through the grid and enter a checkmark into the checkbox of each user who needs to be given the SL_FSM Permission Set.
- Click Next. A page appears for you to optionally select an expiration date for the permission.
- Click Assign. A status message is displayed.
- Click Done.
C. Configure:
- Select the Salesforce gear icon.
- Select Setup.
- Enter Field Service Settings in the Quick Find box.
- Enable Field Service.
- Enter Custom Metadata Types in the Quick Find box.
- Click Manage SL_FSN_Configs.
- Create a new record with the following values:
- Name: Default
- urlparams: ca_mobile_debug=0
- userAdditionalSettings: {}
- Return to Setup and enter Global Actions in the Quick Find box.
- Select New Action.
- Create a new action record with the following values:
- Action Type: Lightning Web Component
- Component: slFsm
- Return to Setup and enter Field Service in the Quick Find box.
- Select Field Service Mobile App Builder.
- Add the LWC Web Component.
- Publish.
- While still logged in to your Salesforce org, copy the CalendarAnything FSM install link into your browser address bar. The Install CalendarAnything FSM page appears.