Creating an Availability Calendar for Booking Resources
If your business has requirements that go beyond our out-of-the-box features, reach out - we offer custom development services for CalendarAnything to meet your unique needs.
Availability Scheduling varies according to an organization’s resources and scheduling requirements. Setup can be simple or complex depending on the Availability use case which generally falls into one of two categories:
- Simple Availability Use Case
- Only standard Salesforce data objects are required
- Supports scheduling of one resource type only
- Complex Availability Use Case
- Custom objects are required in addition to standard Salesforce objects.
- Supports scheduling of combined resource types
Before creating the Availability calendar, you must know each data object and the corresponding field or fields where it will be used in calendar setup.
In this article:
Optional calendar functionality can be enabled when setting up an Availability calendar. Refer to Scheduling/Booking Available Resources.
Creating a New Availability Calendar
Follow these steps to create a new Availability calendar.
- Access CalendarAnything.
- Right-click Availability Calendars on the sidebar and select New Availability Calendar from the context menu. A popup is displayed for you to select an Availability calendar template.
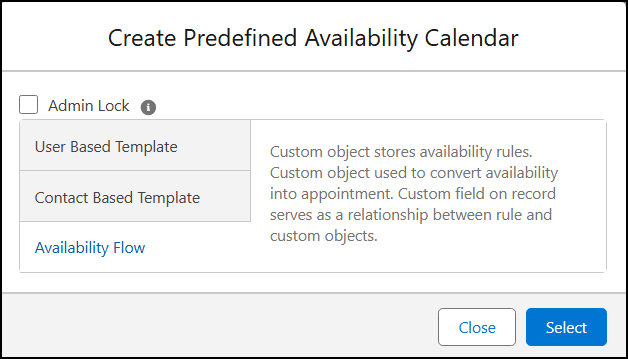
- On the popup, select one of the following:
- User Based Template: Availability Rules stored in User object.
- Contact Based Template: Availability Rules stored in Contact object.
- Availability Flow: Availability Rules stored in custom object.
- Click Select.
- If you select User Based Template or Contact Based Template, skip the rest of these steps and follow the instructions in Availability Calendar Setup Steps.
- If you select Availability Flow, the application displays the Availability Flow form.

- Complete each tab as necessary. Field definitions for each tab can be expanded as needed.
- When finished with a tab, click Next to go the next tab.
- When finished with the last tab, click Save. The application displays the Availability Calendar setup wizard.
- Follow the instructions in the Availability Calendar Setup Steps.
-
- Appointment Additional Before Time: Time added to the appointment for pre-appointment activities.
- Appointment Additional After Time: Time added to the appointment for post-appointment activities.
- Timeslot Duration: How long a slot can be.
- Timeslot Step Duration: Determines time block for availability display.
- Exception Periods: Set this checkbox to TRUE (checked) if you want to enable Availability exceptions, such as when people will be on vacation or out sick. Once enabled, additional fields related to Exception Periods will appear on the Rule Tab (such as Rule Exception Start, Rule Exception End, etc.).
- Type: Set this checkbox to TRUE (checked) if you want to configure settings specific to appointment type, for example time for pre-appointment and post-appointment activities.
Note: The Type tab only appears if this checkbox is selected. - Booking: Set this checkbox to TRUE (checked) if you want to manage details of booked appointments and allow for the tracking of important information related to booked appointments.
Note: The Booking tab only appears if this checkbox is selected. - Location: Set this checkbox to TRUE (checked) if you want to manage locations associated with resources and allow tracking of booked resources.
Note: The Location tab only appears if this checkbox is selected. - Timezone: Set this checkbox to TRUE (checked) if you require timezone support. Once enabled, the Timezone field will appear on the Rule tab. The Timezone field must be a text or picklist field. When this field is blank, the timezone of the current logged in user is applied.
-
- Resource: Corresponds to the Resource Object field on the Availability Template Objects step of the Availability Calendar setup wizard. It specifies the type of resource that will be booked, such as User, Contact, Account, and so on.
-
- Location: A field on the Resource object that stores information about the resource’s location.
- Additional Connection Between Locations and Resources: Checkbox that when selected establishes a join between location and resource. When you select this checkbox, additional fields are displayed.
- Resource Location: Field that limits resources for a location (and vice versa).
Note: This field only appears if the prior checkbox is selected. - Resource Location Junction Object: An object that serves as a cross-reference between the Resource and Location. It functions as a junction table, linking the two entities to manage and associate resources with their corresponding locations, allowing for better organization and tracking of where resources are booked.
Note: This field only appears if the prior checkbox is selected.
-
- Type: Object that stores the details of the appointment type, including default time slot length and the required before and after appointment times. If this field is left blank, the default values for duration and before/after times will be automatically populated based on the settings in the General Tab.
- Type Duration: This field functions the same as the Duration in the General tab, but its value is applied only when the corresponding appointment type is selected. It overrides the default Duration value for that specific appointment type.
- Type Before Time: This field functions the same as the Appointment Additional Before Time in the General tab, but its value is applied only when the corresponding appointment type is selected. It overrides the default ‘Before’ value for that specific appointment type.
Note: Time is added during calculation of the next available time slot. - Type After Time: This field functions the same as the Appointment Additional Before Time in the General tab, but its value is applied only when the corresponding appointment type is selected. It overrides the default ‘After’ value for that specific appointment type.
Note: Time is added during calculation of the next available time slot. - Type Step Duration: This field functions the same as the Timeslot Step Duration in the General tab, but its value is applied only when the corresponding appointment type is selected. It overrides the default ‘Step Duration’ value for that specific appointment type.
-
- Member: Represents who will be viewing Availability and booking appointments.
-
- Appointment Object: Data object that stores details of booked appointments.
- Appointment Start: Start date or date/time of a booked appointment.
- Appointment End: End date or date/time of a booked appointment.
- Appointment Resource: Associates a specific resource with a booked appointment.
- Appointment Member: Identifies the person or entity who booked the appointment.
-
- Booking Object: Relates to the Appointment object and stores the details of booked appointments. This field captures information about the appointment booking, including relevant scheduling and resource data.
- Booking Resource: Connects a resource to the booked appointment. This field associates a specific resource with the booked appointment, ensuring that the correct resource is allocated for the appointment. CalendarAnything allows you to book multiple resources with one appointment – records will be created as Booking Object.
- Booking Appointment: Lookup field to the parent Appointment Object.
- Booking Member: Connects the booked appointment to the person who booked it. This field identifies the individual or entity responsible for scheduling the appointment, ensuring proper tracking and management of who has booked the time slot. One Booking record will be created.
-
- Object Name: Data object where availability rules will be stored.
- Rule Label Field Name: Used to label availability time slots on the calendar.
Note: Options come from the Object Name. - Rule Template Field Name: Text Area (Long) field indicating the field where the availability rule will be stored.
Note: This MUST be a Text Area (Long) field—NOT Text Area (Rich). - Rule Exception Start: Indicates where availability exception start date/time is stored.
Note: This field only appears when the Exception Period checkbox was selected on the first tab. - Rule Exception End: Indicates where availability exception end date/time is stored.
Note: This field only appears when the Exception Period checkbox was selected on the first tab. - Timezone field: Text or picklist field indicating default availability timezone information.
Note: When blank, the timezone of the current logged-in user is applied. This field only appears when the Timezone checkbox was selected on the first tab. - Rule Resource Field: Applies when using a custom object to store availability rules. Specifies the field on the custom object that is a lookup to the base object.
- Rule Location Field: Applies if resources can be assigned to multiple locations. Specifies reference to the object that stores location information.
Availability Calendar Setup Steps
The Availability calendar setup wizard contains a step menu. When creating a calendar, you select each step and fill in the fields as needed. If no fields are required for a step, you can click Next to go to the next step. When updating an existing calendar, you can skip steps as needed.
Keep in mind that some fields are pre-populated if you completed the Availability Flow form.
Following is a list of Availability calendar setup steps and their field definitions. Refer to these definitions as needed. Steps or fields not specific to Availability Scheduling may be omitted from this guide but found in Create, Edit, and Share Calendars.
Name and Color
- Color: Color to associate with your calendar.
- Name: Calendar name (cannot contain +, &, / or = characters).
Note: This automatically populates the Site Calendar Name field, which is not editable and used when publishing public Site Calendars. - API Name: Application Programming Interface name.
Note: This is populated based on what you enter in the name field and vice versa. - ID: Unique identifier automatically populated by the application.
- Description: Description of the calendar.
- Display on Sidebar: When checked, the template appears on the user sidebars.
- Available for Booking: When checked, makes the template available for user booking.
- Admin Lock: When checked, prevents specific fields from being updated by end users.
Availability Template Objects
- Object Name: Where availability rules are stored.
- Appointment Object: Where to store booked availability time slots.
- Booking Object: An object that relates to the Appointment object and stores booked appointment information. This field becomes disabled when As Appointment is checked.
- As Appointment: When checked, the Booking Object is disabled, and all information is stored in the Appointment Object.
- Member Object: Represents who will be viewing availability and booking an appointment.
Note: This is a required field. Member can be a User, Contact, Lead, Account, or custom object. - Location Object: Required when location must be considered when booking appointments.
Note: When a Location Object is specified, the Availability template displays one picklist for the resource and one for the location. - Type Object: Object that stores appointment type details such as default time slot length and required before and after appointment time.
Note: If left blank, the default duration and before/after time is populated based on what is set in General section. - Resource Object: Required field that defines the type of resource that will be booked, such as User, Contact, Account, and so on.
General
- Period Type: Period of time in which duration is represented. Defaults to Minute.
- Period Duration: Determines which period will be displayed in the Availability Template.
- Joint Mode: Represents whether and how to join the same timeslots for different resources and/or locations into one timeslot. Options are:
- Not Jointed: Default value.
- Location: If one resource has availability at the same timeslot for multiple locations, one timeslot is shown for the resource.
- Resource: If one location has availability at the same timeslot for multiple resources, one timeslot without capacity is shown. Timeslot is no longer shown after all available resources are booked.
- Location and Resource: Multiple timeslots are joined into one regardless of location or resource.
- Intersection Mode: Options to specify a minimum number of resources that must meet availability criteria for a timeslot before any of those resources will be shown on timeslot. The selected Intersection Mode determines whether additional Intersection options will appear on the calendar options panel and, if so, what those options will be. Note: Labels for Intersection Mode options may vary.
- Timeslot Duration: How long a slot can be.
- Timeslot Step Duration: Determines time block for availability display.
- Appointment Additional Before Time: Time added to the appointment for pre-appointment activities.
Note: Time is added during calculation of the next available time slot. - Appointment Additional After Time: Time added to the appointment for post-appointment activities.
Note: Time is added during calculation of the next available time slot. - Actual Future Period (Days): Specifies how many days in the future availability is presented on the calendar.
- Allow Past Events: When checked, this enables users to schedule past events.
- Delay From Now: Determines the next available Availability time slot to be shown. The values are specified in minutes and are counted from the current time. For example, if the current time slot is 11:45 and Delay From Now is 60, the next available time slot will be 13:00 (11:45 + 60 minutes).
- Maximum Capacity: Determines capacity allowed for appointment.
Note: Currently not available when Additional Before and After time is defined. - Enable Capacity Filter: Adds a field to the left sidebar (under the calendar name) that allows you to filter available slots based on available Capacity.
- Calculate Capacity for Each Slot: When Join Mode is enabled, this option controls how available capacity is calculated and displayed for each time slot.
- Highlight Used Timeslots: Applies when resources can be available for multiple locations. Options are:
- Do not highlight: Permits the user to set resource availability for the same timeslot in multiple locations.
- Highlight without reuse: Prevents user from setting resource availability for the same timeslot in multiple locations and highlights used locations in red.
- Highlight and allow reuse: Permits the user to set resource availability for the same time in multiple locations but highlights used locations in red.
- Capacity Before / After Exclude Type: (Soft) This option controls how availability is handled for time slots before and after an existing booking.
- Soft (FALSE/not selected) is the default. This reduces the available capacity in the adjacent slots by one instead of blocking them entirely. The slots remain visible but with fewer available places.
- Hard (TRUE/selected): Completely blocks the slots before and after a booked slot. These slots will be hidden and unavailable for booking, even if there is remaining capacity.
- Reserve Before and After: Applies buffer time before and after each slot when calculating availability.
- TRUE: When selected (TRUE), each slot includes the defined “before” and “after” time, shifting available slots forward and enforcing full spacing between bookings.
- FALSE: When not selected (FALSE), slots are generated across the full availability range, but buffer time is only applied after a booking, allowing more flexible scheduling.
- Show Availability as a One Timeslot: If set to TRUE (selected), Availability slots with the same providers and resources that follow one another will be displayed in the calendar as a single slot. For example, three 30-minute slots —11:30-12:00, 12:00-12:30, 13:00-13:30—would be displayed as one slot labeled 11:00-13:30.
- Fixed Grid: Determines how time slots after a booked appointment are adjusted. If Fixed Grid is FALSE (not checked), the timeslot after the booked appointment is updated to start when the updated booked appointment ends. All timeslots after that are adjusted accordingly. If Fixed Grid is TRUE (checked), the application attempts to keep as many of the remaining timeslots as originally configured.
- Booking Slot Mode: Controls multiple timeslot selection and creation of extended appointment times. The setting contains these options:
- Current slot only: The application only processes one timeslot, the one on which the user right-clicks.
- Expanded current slot: Enables you to book multiple timeslots for the same location resulting in one longer appointment.
- Multiple slots: Enables you to book multiple separate appointments simultaneously.
- Multiple and expanded slots: Enables you to book both longer appointments and multiple separate appointments simultaneously.
- Booking Resource Mode: Provides options for resource booking, including the option to book multiple resources per appointment. The setting contains these options.
- One resource only: This option permits only one resource per appointment.
- Separate appointments for each resource: This option permits selection of multiple resources but automatically creates a separate appointment for each resource.
- Multiple resources for appointment: This option permits selection of multiple resources and enables multiple resources to be booked per appointment.
- Resource Usage:
- Maximum Booked Slots Difference Between Resources: Defines the maximum allowed difference in the number of booked slots between resources. If a resource exceeds this difference compared to others, its slots will be hidden until the gap falls below the defined limit.
- Default Maximum Resource Booking: Defines the maximum number of bookings allowed per resource per day. Once this limit is reached, all remaining available slots for that resource will be hidden.
- Add-ons: Add-on tabs can be shown or hidden when a record is displayed based on the Add-ons checkbox settings. Fields such as Notes, Map, and others are taken from the Rule record on which the virtual slot is based. This means you can display, for example, the Map related to the User defined in the Rule, or the Location associated with that Rule.
- Chatter
- Attachment
- Slack
- Microsoft
- Notes
- Map
- AgentForce (Beta)
- Map
- Chatter
- Attachment
- Notes
Availability Definition
- Rule Label Field Name: Used to label availability time slots on the calendar.
Note: Options come from the Object Name selected on the Availability Template Objects step. - Rule Template Field Name: Text Area (Long) field indicating the field where the availability rule will be stored.
Note: This MUST be a Text Area (Long) field—NOT Text Area (Rich). - Rule Exception Start: Indicates where availability exception start date/time is stored.
- Rule Exception End: Indicates where availability exception end date/time is stored.
- Timezone Field: Text or picklist field indicating default availability timezone information.
Note: When blank, the timezone of the current logged-in user is applied. - Rule Resource Field: Applies when using a custom object to store availability rules. Specifies the field on the custom object that is a lookup to the base object.
- Rule Location Field: Applies if resources can be assigned to multiple locations. Specifies reference to the object that stores location information.
Appointment
- Appointment Start: Start date or date/time of appointment.
- Appointment End: End date or date/time of appointment.
- Designate All Day: Checkbox used to indicate that the appointment is All Day. If appointment is all day, CalendarAnything tries to transform such apps into one long slot from 00:00:00 to 23:59:59 – and timezone is not taken into the place. But it is possible that Start End fields are DATETIME so timezone of the user (who is running the APEX) will make changes to the DATE part of the Datetime.
Example:
– Datetime is 23.02.2026 03:00 GMT
– for GMT + 2 (Kyiv TZ) it will be 23.02.2026 05:00
– for NY (Eastern TZ, GMT -5) – it will be 22.02.2026 22:00 - Appointment Capacity: Field in the Appointment object used for calculating the number of times left that a resource can be booked (if capacity is defined for availability rules).
- Appointment Timezone: Timezone selected for the booking.
- Appointment Resource: Fields that connect a booked resource to the appointment. Appointment Member: Field that connects the appointment to the person who booked it.
- Appointment Type Reference: Field to look up appointment type.
- Appointment Location Reference: This field is not currently used.
- Balance Usage Criteria Field: Allows the user to specify a boolean field (or boolean formula) that will be used as a criterion to mark an appointment as a “balance app.” Such appointments will be included in balancing calculations and maximum resource usage. If no field is specified, all internal and external appointments will be treated as “balance apps.”
- Additional Busy Appointments Flow
- Additional Busy Appointments Flow: The API name of the flow used to provide additional busy appointments.
- Start Variable Name: The Flow variable that will receive the appointment start date and time.
- End Variable Name: The Flow variable that will receive the appointment end date and time.
- Resource Variable Name (comma separated): The Flow variable(s) that will receive the selected resource IDs. If multiple values are needed, separate them with commas.
- Locations Variable Name: The Flow variable that will receive the selected location ID(s).
- Type Variable Name: The Flow variable that will receive the selected appointment type.
- Timezone Variable Name: The Flow variable that will receive the selected timezone. In JSON format.
- Filtering Panel Variable Name: The Flow variable that will receive filtering panel values.
- Result Variable Name: The Flow variable that will receive the result returned by the Flow.
- Appoint Records Filter Criteria: Typically, Availability slots are hidden when an appointment is created. Appointment Records Filter Criteria enables you to specify a condition an appointment must meet for the appointment time slot to be hidden.
Location
- Object: This field will be read only and pre-filled by the application if a object was selected as the Location Object in the Availability Template Objects step.
- Location State(Country): Field that will be used to determine the applicable State or Country of the selected location.
- Location Timezone: Field that will be used to determine the applicable timezone.
- Email Notification:
- Email Field: Field on the Location object that stores the email address associated with the location.
- Address Field: Field on the Location object that contains the location’s address details.
- Geo Location Field: Field on the Location object that stores geographical coordinates (e.g., latitude and longitude).
- Notification Email From Address: Text field used to specify the sender’s email address. This address will be used as the “From” address in outgoing emails.
- Notification Email Subject: Text field used to define the subject line of the notification email.
- Notification Email Text: Text field used to define the body content of the notification email.
- Add calendar ICS attachment: When set to TRUE (selected), an ICS calendar file will be included as an attachment in the email.
Resource
- Resource Timezone: Default timezone of resource. Must have a Text or Picklist field type.
- Resource External ICS Field: Field used to store the ICS link containing busy time slots.
- Resource Type Junction Object: Object that cross-references the resource with the Type object that stores information about various appointment types. It is used to filter availability by Type and limit the list of resources based on type.
- Resource Junction Type Field: Resource junction object field that stores appointment type lookup options.
- Resource Junction Resource Field: Resource Type junction object field that stores resource type lookup options.
- Resource State (Country) Field. This field is not currently used.
- Select a Resource Location.
Note: This is a field on the Resource object that hold information about resource’s location. - Resource Location Junction Object: Object that cross-references Resource with Location.
- Resource Location Junction Location Field: Field on the junction object that stores the Location lookup value.
- Resource Location Junction Resource Field: Field that points to the Resource object.
- Filter Criteria: Enables you to specify record filtering criteria.
- Add Filter Logic: Used to change default comparison logic from AND to OR when multiple filter criteria sets are configured.
Member
- Object: This field will be read only and pre-filled by the application if a object was selected as the Member Object in the Availability Template Objects step.
- Member State(Country): Field that will be used to determine the applicable state or country.
- Member Timezone: Field that will be used to determine the applicable timezone.
- Email Notification: Fields in this section are used for the Member Email configuration.
- Member Email Field: Field on the Member object that stores the email address associated with the member.
- Notification Email From Address: Text field used to specify the sender’s email address. This address will be used as the “From” address in outgoing emails.
- Notification Email Subject: Text field used to define the subject line of the notification email.
- Notification Email Text: Text field used to define the body content of the notification email.
- Add calendar ICS from attachment: When set to TRUE (selected), an ICS calendar file will be included as an attachment in the email.
Booking
Note: These fields do not need configuration unless you selected a Booking Object in the Availability Template Objects step.
- Booking Resource: Field on the Booking object that stores the related Resource.
- Booking Appointment: Field on the Booking object that stores the related Appointment.
- Booking Member: Field on the Booking object that stores the related Member.
- Booking Location: Field on the Booking object that stores the related Location.
Type
Note: Used to configure the Type Object selected in the Availability Template Objects step.
- Type Duration: This is the same as Timeslot Duration from the General step, but this value will only be applied when the corresponding type is selected.
- Type Before Time: Time added to the appointment for pre-appointment activities.
- Type After Time: Time added to the appointment for post-appointment activities.
- Type Step Duration: Determines time block for availability display.
- Filter Criteria: Enables you to specify record filtering criteria.
- Add Filter Logic: Used to change default comparison logic from AND to OR when multiple filter criteria sets are configured.
Important: You cannot save a new calendar unless you've reached and selected the Sharing step and clicked Save. This article focuses primarily on Availability Calendar setup steps and fields. For general calendar steps and fields that are also on Availability calendars, refer to Create, Edit, and Share Calendars | LWC.