Create, Edit, and Share Calendars | LWC
If your business has requirements that go beyond our out-of-the-box features, reach out - we offer custom development services for CalendarAnything to meet your unique needs.
In this article:
- Creating a custom calendar (Calendar setup steps)
- Edit an Existing Calendar
- Create and Edit Entries
- Drag and Drop Entries
Related Articles:
- CalendarAnything Features
- CA LWC Availability Scheduling Admin Guide (To create or edit an Availability calendar)
Related Demo:
![]()
Troubleshooting:
Creating a custom calendar (Calendar setup steps)
To create or update Availability calendars, refer to CA LWC Availability Scheduling Admin Guide.
Begin by accessing the Create Custom Calendar wizard, also known as Calendar Setup. On the CalendarAnything menu, right-click All Calendars then select New Calendar.
The setup wizard contains a step menu on the left panel. The right panel contains fields to configure the selected step.
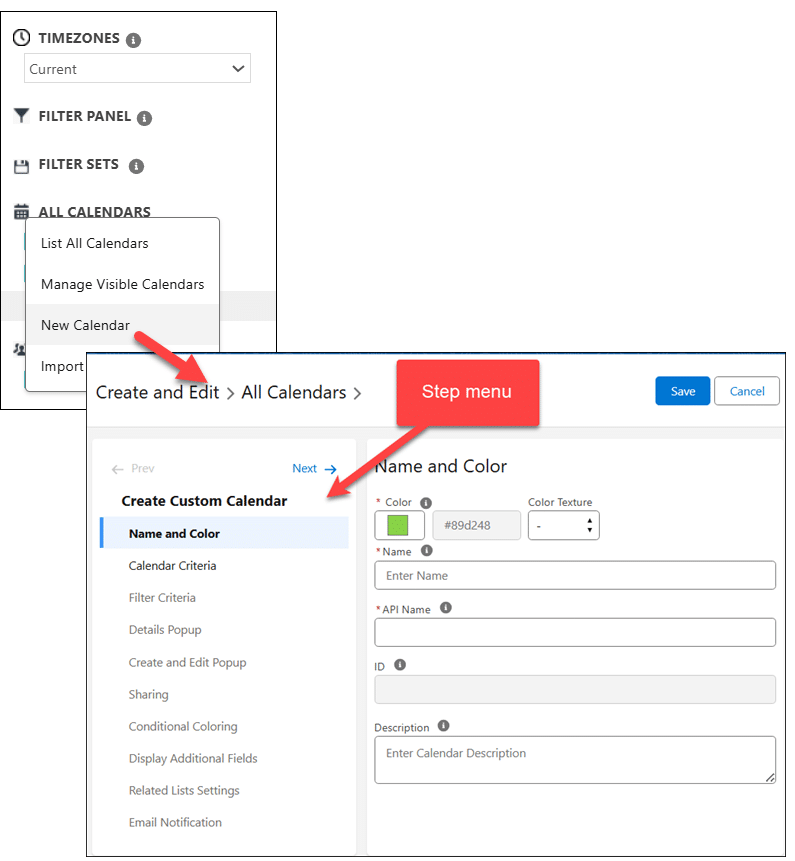
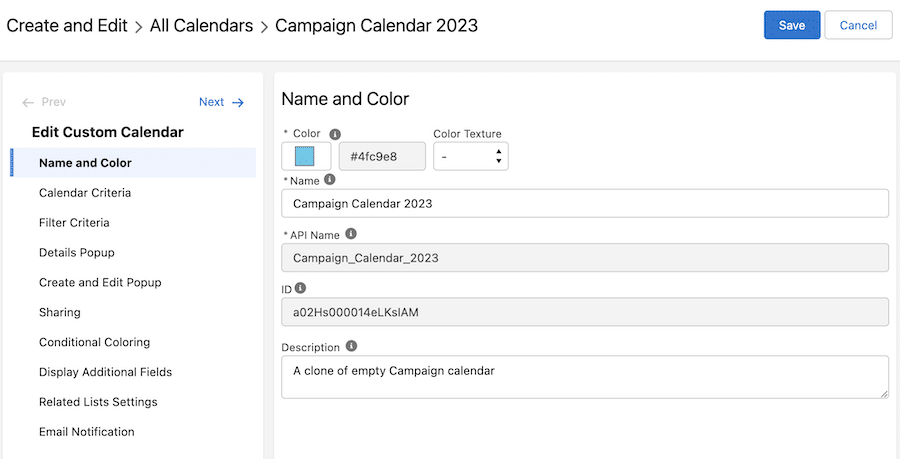
Name and Color
The first Create Custom Calendar step is Name and Color.
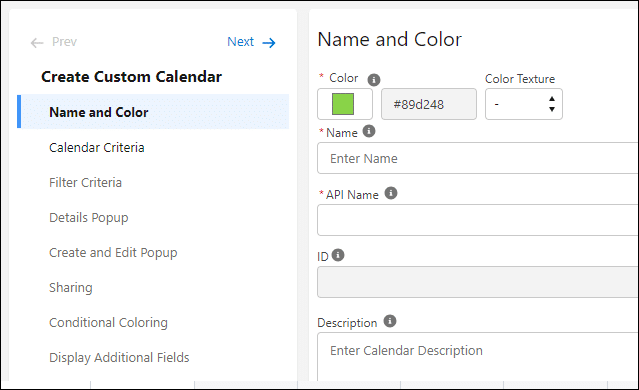
Follow these steps to provide Name and Color information for the calendar, referring to the field descriptions as needed.
- Enter a calendar name that does not contain +, &, / or = characters. This automatically populates The Site Calendar Name field, which is not editable and used when publishing public Site Calendars, discussed in the ADVANCED ADMIN GUIDE.
- Select a color from the available colors or create a color from the color wheel.
- Enter a calendar description.
- When finished, click Next.
Field descriptions:
- Color: Color to associate with your calendar.
- Name: Calendar name (cannot contain +, &, / or = characters).
Note: This automatically populates the Site Calendar Name field, which is not editable and used when publishing public Site Calendars. Refer to the ADVANCED ADMIN GUIDE. - API Name: Application Programming Interface name populated based on what you enter in the name field and vice versa.
- ID: Unique identifier automatically populated by the application.
- Description: Description of the calendar.
The next step is Calendar Criteria.
Calendar Criteria
The Calendar Criteria step enables you to specify a primary data object on which your calendar will be built. The configuration of this step determines how CalendarAnything LWC tracks your calendar.
Calendar Criteria contains expandable sections as shown in the image below.
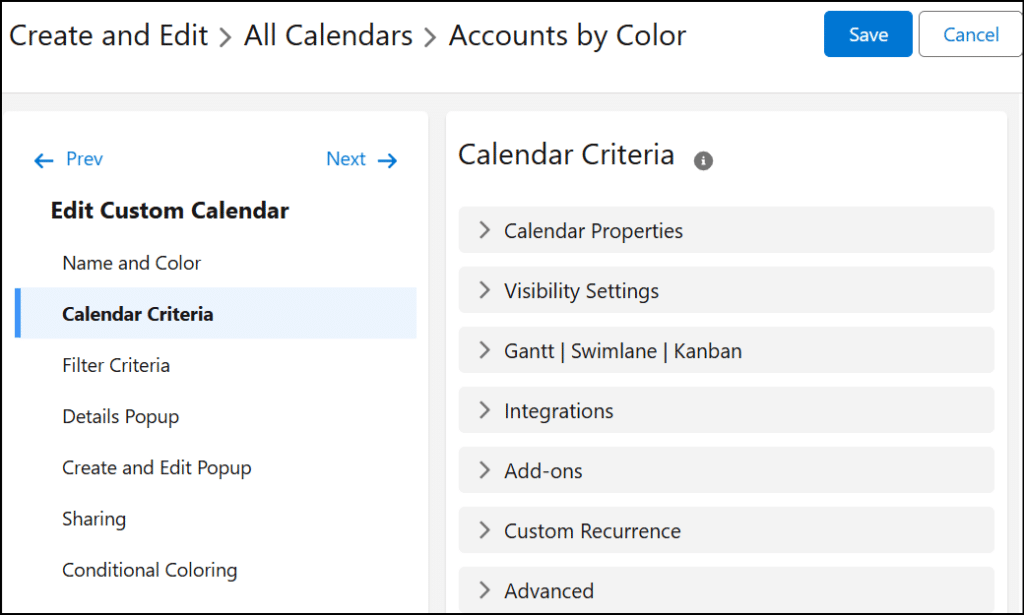
For each section in the Calendar Criteria step, expand the section and fill in the fields as needed. For definitions of fields within a section, expand the corresponding section below.
-
Expand the Calendar Properties section and fill in the fields as necessary, referring to the following field definitions.
- Object Name: Custom or Standard Salesforce data object that determines calendar fields and sources data records.
- Field Name: Main header for each entry in the calendar.
- StartDate/Time: Determines the start of each entry within the calendar.
- End Date/Time: Determines the end of each entry within the calendar.
- Designate All Day: Acts as a flag for the calendar to display a record with start date/time and end date/time as an All Day record.
Note: All field options must be checkbox field types. - Display on Sidebar: Determines whether the calendar will be available for other CalendarAnything LWC licensed users to display in their left panel. Leaving this box unchecked effectively marks the calendar as private.
- Allow Editing: Selecting this checkbox automatically selects the Add, Edit, Delete, and Move checkboxes giving the calendar’s users all of these permissions. However, you can clear the Add, Edit, Delete, or Move checkbox to remove the corresponding permission from the group.
Note: Selecting Move enables authorized users to drag and drop Salesforce records on the CalendarAnything LWC interface, thus changing the dates on those records. - Auto Toggle: Determines whether new entries will automatically enable the calendar, even if it is currently disabled.
-
The Visibility Settings section determines which “categories” of users will automatically see the calendar on their CalendarAnything sidebar, without those users having to add it.
Expand the Visibility Settings section.
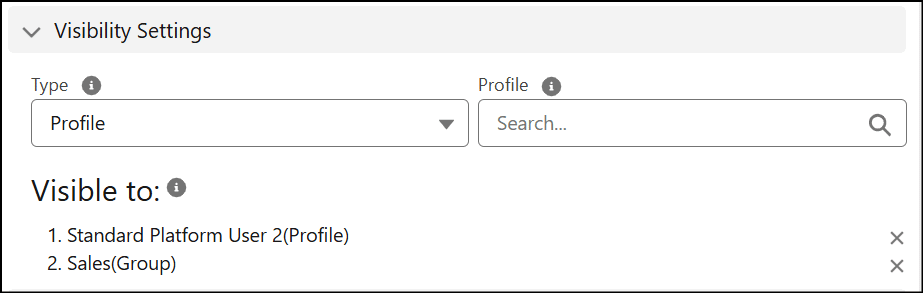
Fill in the fields as necessary, referring to the following field definitions.- From the Type field options, select Profile, Role, or Group to indicate the basis on which the user will be able to see the calendar. The label and options of the adjacent field change based on your selection from the Type field.
- Select the specific Profile, Role, or Group. Refer to Shared Calendar Visibility Settings for additional details. The selection appears in the “Visible to” area.
- Repeat steps 1 and 2 for any additional visibility that you want to make available.
- Click Save.
-
Expand the Gantt | Swimlane | Kanban section and fill in the fields as necessary, referring to the following field definitions.
- Gantt Sort Levels: If grouping is enabled, the level determines the field by which events will be sorted by date.
- Gantt Grouping Default: Field to be used by default to group data in the calendar’s Gantt View.
- Gantt SubGrouping Default: Field to be used by default to sub-group data within the primary group in the calendar’s Gantt View.
- Gantt Summary Field: Field to be used by default to summarize the grouped data in Gantt View.
- Swimlane Grouping Default: Options for default Swimlane grouping.
- Swimlane Sort Default: Field to use as the default sorting field when displaying records in Swimlane View.
Note: This applies when grouped data is viewed in User List View or Public Group. Options are limited to lookup fields related to User, such as: Assigned To, Owner ID, and Last Modified By. - Kanban Row Grouping Default: Options for default row-level grouping in Kanban View.
- Kanban Column Grouping Default: Options for default column-level grouping in Kanban View.
-
Expand the Integrations section and fill in the fields as necessary, referring to the following field definitions.
- Zoom Field: Field you can zoom in on when viewing the calendar.
- Microsoft Teams Field: Field on the data object that will be used to hold Microsoft Teams meeting details.
-
Expand the Add-ons section and fill in the fields as necessary, referring to the following field definitions.
- Map Field: Field to be used on Map add-on.
- Chatter Field: Field to be used as Chatter parent.
- Attendees Field: Field to be used as Attendees parent.
- Attachments Field: Field to be used as Attachments parent.
- Notes Field: Field to be used as Notes parent.
-
Expand the Custom Recurrence section and fill in the fields as necessary, referring to the following field definitions.
- Recurrence Pattern: How to create recurrence.
IMPORTANT: Custom recurrence cannot be used for calendars built using the EVENT object. - Original Event Id: Lookup parent field.
- Recurrence Pattern: How to create recurrence.
-
Expand the Advanced section and fill in the fields as necessary, referring to the following field definitions.
- Scoping Rules: How to apply scoping rules to the calendar.
- Create Form: Contains several options for which form to use to create a record:
- Default: The form configured as the default will be used.
- CalendarAnything: The CalendarAnything form will be used.
- Salesforce: The Salesforce form will be used.
Important: You must also navigate to CalendarAnything Settings > Advanced and ensure that the Quick Creation Mode Select Option is selected. Refer also to Using the Salesforce form to Create and Edit Calendar Records. - Flow: A Salesforce Flow will be used.
Note: If you select Flow, the Details Popup step and the Create and Edit Popup step will also contain fields to configure Flow execution
- Data Loading Limit: Numeric field to specify the maximum number of records that should be loaded. For example, if you have 100 Events and set the Data Loading Limit to 50, only 50 records will be loaded.
- Continuous Data Loading: When this option is enabled and a Data Loading Limit is set, all available records will be loaded, but in multiple batches.
For example, if you have 100 Events, the Data Loading Limit is set to 20, and Continuous Data Loading is enabled, the system will make 5 requests to retrieve all records:
– Request 1: 20 records
– Request 2: 20 records
– Request 3: 20 records
– Request 4: 20 records
– Request 5: 20 records
As a result, all 100 records will be loaded.
This functionality helps overcome various data-loading limitations and allows large datasets to be retrieved without errors.
Watch this demo to see the form options available to create records.
The next step is Filter Criteria.
Filter Criteria
Specifying Filter Criteria enables users to omit records that do not meet criteria. You can specify a maximum of 29 filters per calendar using almost any field in your selected object as a filter.
You can choose the base against which your added filters will be applied using these buttons:
- All Records: Click if you want the filter or filters applied against all records in the organization that the logged in user has access to.
- My Records: Click if you want the filter or filters applied only against records owned by logged in user.
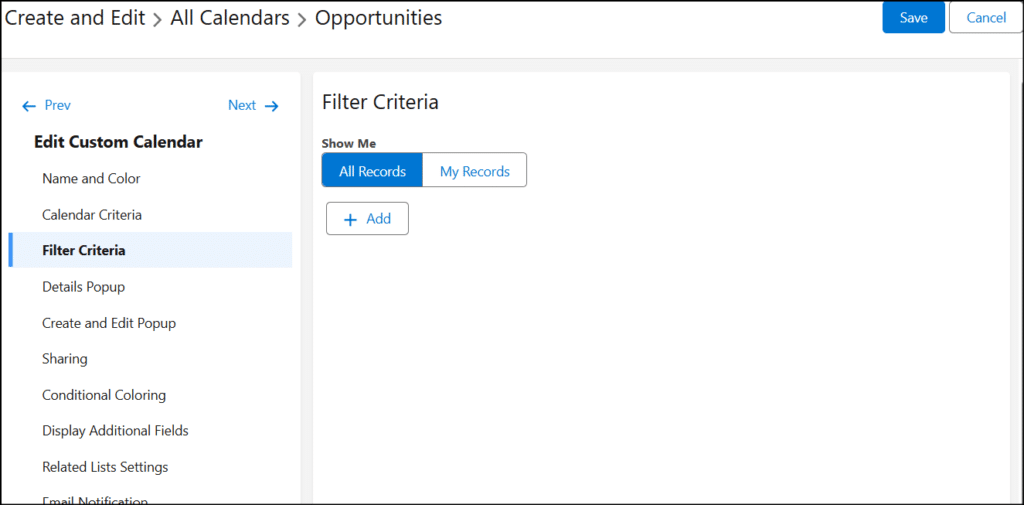
Each time you add a set of filter criteria, the application assumes that the new set of criteria must be met in addition to any previously added criteria. Step 10 in the Filter Criteria step instructions below show how to change this default “add” logic to “or” logic.
Follow these steps to add Filter Criteria, referring to the field descriptions as needed:
- Click All Records or My Records to establish the filter base.
- Click Add to create a set of filter criteria. A set of filter fields appears.
- Select a Field Name. Grouped fields appear with a + sign and can be expanded.
- Select an Operator indicating the type of comparison.
- After selecting a field name, the row contains a blank field followed by a chevron >> button and an X button. You can specify a value in the blank fields against which to apply the filter operator, or you can click the chevron to indicate that the filter is dynamic.
You do not preconfigure a value for a dynamic filter. Instead, the application determines the filter value dynamically (at run time) based on context. Assume, for example, that you are creating an Events calendar that you plan on embedding into an Opportunity detail page. You will want the embedded calendar to include only Events related to the currently displayed Opportunity. To accomplish this, you would select Related To from the Field Name and click the chevron.
- Either enter a field value for the comparison or click the chevron button to make the filter dynamic. You can enter additional values if the filter is not dynamic. Each value is displayed below the field.
- To remove a selected comparison value, click the chevron icon next to the criteria set.
- To remove the criteria set, click the red x next to the field.
- Repeat steps 2-8 for each additional filter.
- Click Add Filter Logic if you have multiple filters and want to change the default comparison logic from AND to OR. To specify an Or condition, change the And to Or as commented on the image below.
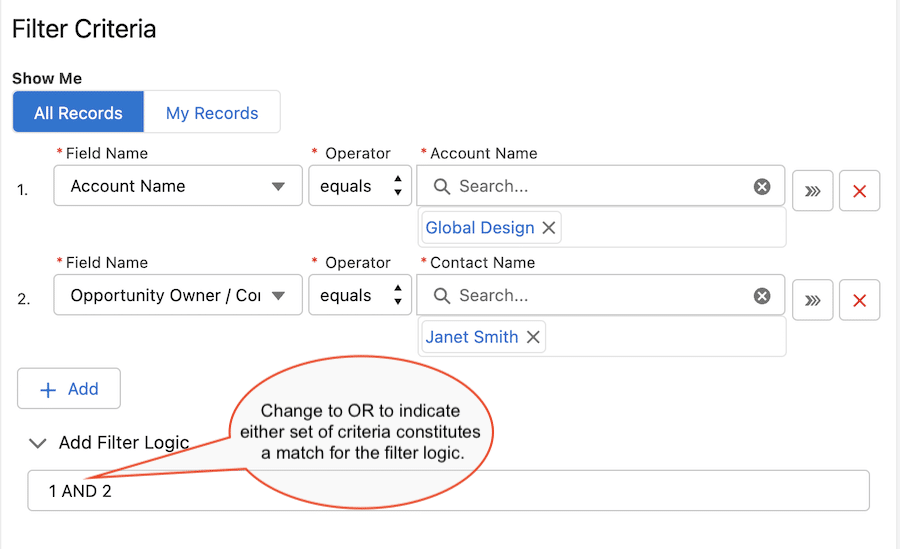
Note: You can create filter scenarios using operators and standard syntax, for example, (1 AND 2) OR 3. - When finished, click Next.
Field descriptions
- All Records: If selected, the filter or filters applies to all records in the organization to which the logged in user has access.
- My Records: If selected, the filter or filters applies against only those records owned by the logged-in user.
- Add button: Click to add a set of filter criteria.
- Popup fields:
- Field Name: Field for the filter logic to check for a “matching” value. After you choose a field name, the name is used to label the value field that appears after the Operator field.
- Operator: Type of comparison (equal, not equal, contains, and so on) performed when the application evaluates the value of the field.
- [Dynamically labeled field]: Field value used by the filter logic to determine whether the field meets the criteria specified.
- Chevron icon: This field has two purposes. It enables you to specify the filter as dynamic. It also removes data entered into the value field.
- Red X icon: Removes the criteria set.
The next step is the Details Popup.
Details Popup
The Details Popup step enables you to configure which fields, if any, display when a user clicks a record in CalendarAnything LWC. The step also contains sections to add custom tabs and custom buttons to the Details Popup.

Follow these steps to configure the Details Popup, referring to the field descriptions as needed:
- Enter a value or partial value in Search Fields to view matching available fields or scroll the Available panel directly. Grouped options appear with a + sign that can be clicked to view sub options.
- To select a field from the Available panel, either double click the field or click it once and then click the right arrow. The field appears in the Selected panel.
- If you want to add a custom tab to the Details Popup to execute a Salesforce Flow, expand Custom Tabs and refer to Adding Custom Tabs and Buttons to the Details Tab | LWC.
- If you want to add custom buttons to the Details Popup, expand Custom Buttons and refer to Adding Custom Tabs and Buttons to the Details Tab | LWC.
- When finished, click Next.
Field descriptions
- Search Fields: Field to enter a value to filter the panel of available fields.
- Available: List of fields available for display on the Details Popup.
- Selected: List of fields selected from the Available panel.
Create and Edit Popup
The Create and Edit Popup step enables you to choose fields to display on the Create and Edit calendar popups.
Some Salesforce objects have required fields that may not be removed from the Selected box.

Follow these steps to provide Create and Edit Popup information, referring to the field descriptions as needed:
- In Search Fields, enter a value or partial value to view matching available fields or scroll the Available panel directly.
- From the Available panel, select a field by clicking it and then clicking the right arrow. The field appears in the Selected panel.
- To configure the access level of a selected field, click the icon in the VISIBILITY column for that field. A popup appears for you to configure the field.
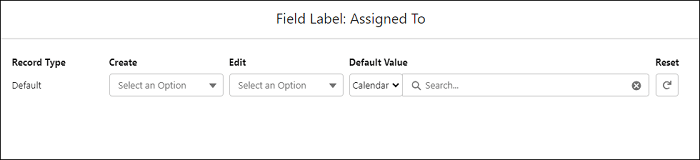
- On the popup:
- Select an option from the Create field.
- Select an option from the Edit field.
- Select the Default Value object.
- Choose a field for the default value.
- Close the popup. The application holds the data configured on the popup and will save it when you save the calendar you are creating.
- If the calendar is being configured to execute a Salesforce Flow (Calendar Criteria > Advanced > Create Form contains Flow), the Create and Edit Popup step will contain flow variable sections:

- If a flow to create a record will be available from the calendar, expand Create Flow Variables and add the Create Flow API Name.
- If a flow to update a record will be available from the calendar, expand Edit Flow Variables and add the Edit Flow API Name.
- If a flow to delete a record will be available from the calendar, expand Delete Flow Variables and add the Delete Flow API Name.
For more information on these sections, refer to Configuring a Calendar to Use a Salesforce Flow.
- When finished, click Next.
Field descriptions
- Search Fields: Field to enter a value to filter the panel of available fields.
- Available: List of fields available for display on the Details Popup.
- Selected: List of fields selected from the Available panel.
- Visibility popup fields:
- Create:
- Default: displays the field with a default value when in create mode.
- Hidden: hides the field when in create mode.
- Read-only: displays as a read-only field that cannot be edited when in create mode.
- Edit:
- Default: displays the field with a default value when in edit mode.
- Hidden: hides the field when in edit mode.
- Read-only: displays as a read-only field when in edit mode.
- Default Value: Value to display as the default.
- Reset icon: Clears out changes entered into the popup fields.
- Create:
- Create Flow Variables: Section to configure a flow for creating a record.
Note: This field only appears if the calendar is configured to execute a Salesforce Flow. - Edit Flow Variables: Section to configure a flow for editing a record.
Note: This field only appears if the calendar is configured to execute a Salesforce Flow. - Delete Flow Variables: Section to configure a flow for deleting a record.
Note: This field only appears if the calendar is configured to execute a Salesforce Flow.
The next step is Sharing.
Sharing
CalendarAnything LWC uses Salesforce’s Public Groups feature to make sharing possible. Your system administrator must first create public groups in Salesforce, configuring them by role, hierarchy, or other, criteria.
Once public groups are created, a user creating or editing a CalendarAnything LWC calendar uses the Sharing step of the Create Custom Calendar / Edit Custom Calendar wizard to specify which Salesforce Public Groups may access the calendar.
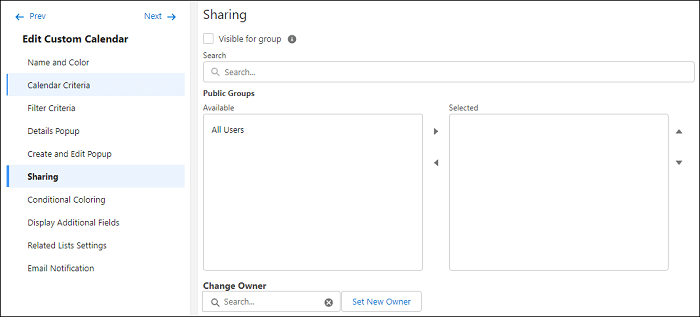
Follow these steps to specify which Public Groups may have access to your calendar, referring to the field descriptions as needed:
- Enter a value or partial value in Search area to view matching Public Groups in the Available panel or scroll the Available panel directly.
- Select a group from the Available panel by clicking it and then clicking the right arrow. The field appears in the Selected panel.
- To change the owner of the new calendar, select an owner from the Change Owner field list and click Set New Owner to confirm.
- When finished with the Sharing step, you can click Save in the upper right corner of the page, or you can click Next on the menu panel to continue with remaining steps.
Members of the selected Public Groups can go to CalendarAnything LWC Settings and move the calendar from Available to Selected to place the calendar on their sidebar.
- Search Fields: Field to enter a value to filter the panel of available public groups.
- Available: List of available public groups.
- Selected: List of public groups selected from the Available panel.
- Change Owner: Enables you to change the calendar owner.
- Set New Owner: Confirms owner selected in Change Owner field.
The next step is Conditional Coloring.
Conditional Coloring
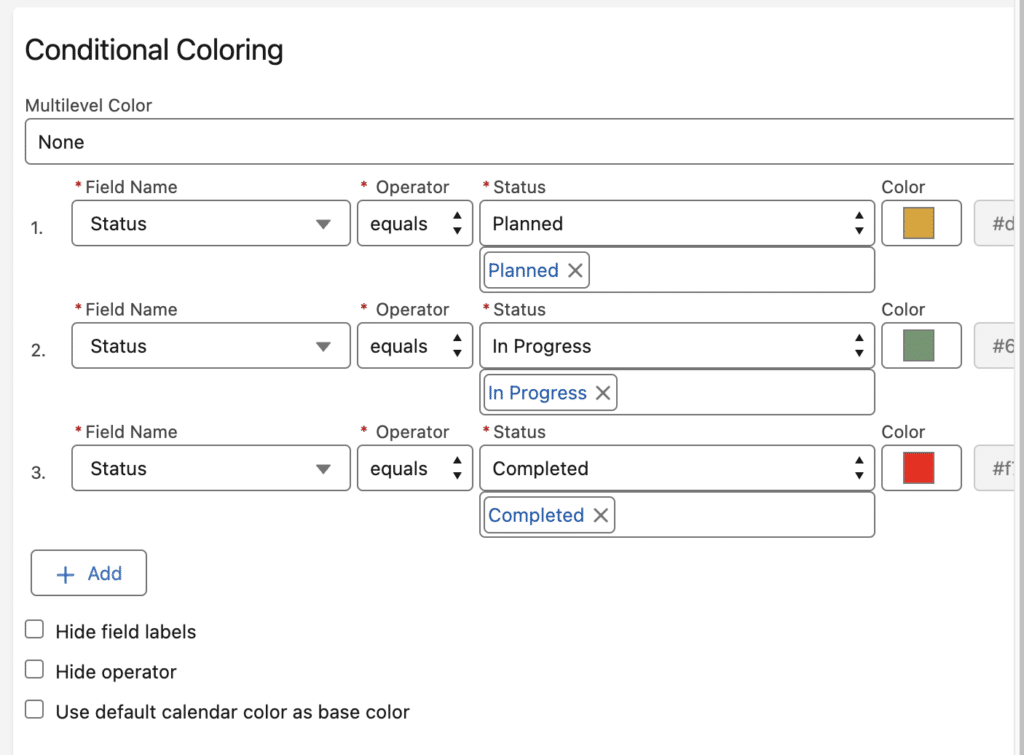
By default, calendar events or records appear in the default calendar color. The Conditional Coloring step enables you to color code by condition. You create each condition with an associated color. The color associated with the first condition that the record meets becomes the record display color.
This section explains basic conditional color coding. For information on extended color code options, refer to Multilevel Conditional Coloring.
The image below shows an example of color coding based on status.
- Green: Records for In Progress campaigns
- Red: Records for Completed campaigns
- Gold: Records for Planned campaigns
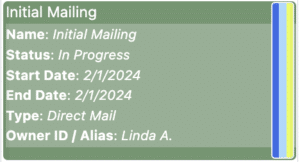
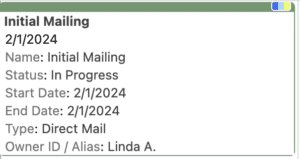
The image below shows an example of the resulting calendar display.

How to color code calendar records using Conditional Coloring
To color code calendar records using Conditional Coloring, follow these steps, referring to field definitions as needed:
- In the Conditional Coloring step, ensure the Multilevel Color field contains None.
- Click Add. A row appears for you to configure a condition.
- Select a Field Name and an Operator. Depending on the operator chosen, a field may appear for you to select a value.
- Select a field value if required.
- Click the default color square if you want to choose a color other than white. A popup appears for you to choose a color.
- Choose a color and click outside of the popup to close it.
- Click the custom label icon (next to the color fields) if you want to give the field a custom label on the calendar legend.
- Click the Color Texture field if you want to select a texture level.
- If needed, reprioritize multiple conditions using arrow keys on each row.
- Click X on a condition row if you want to delete it.
- Repeat steps 1 through 10 for each additional condition.
- Optionally select the Hide field labels, Hide operator, and Use default calendar color as base color checkboxes.
- When finished, click Save or Next.
Multilevel Conditional Coloring
Multilevel Conditional Coloring extends Conditional Coloring by enabling you to color code with up to three additional colors. Those colors appear in either Line or Corner format depending upon the Multilevel color display setting.
How to color code calendar records using Multilevel Conditional Coloring
Note: You can create new Multilevel Conditional Coloring or update existing Conditional Coloring to multilevel.
To color code calendar records using Multilevel Conditional Coloring, follow these steps, referring to field descriptions as needed:
- From the Multilevel Color field, select One, Two, or Three to choose the number of additional conditional colors per record.
- Click Add. A row appears for you to configure a condition.
- Select a Field Name and an Operator. Depending upon the operator chosen, a field may appear for you to select a value.
- Select a value if required.
- Click the default color square to choose a color for the condition. A color selection popup appears.
- Choose a color, making sure that the circle on the popup contains the selected color.
- Click the custom label icon (next to the color fields) if you want to give the field a custom label on the calendar legend.
- Click the Color Texture field if you want to select a texture level.
- If needed, reprioritize multiple conditions using arrow keys on each row.
- Click X on a condition row if you want to delete it.
- Repeat steps 1 through 10 for each additional condition to be created.
- Optionally select the Hide field labels, Hide operator, and Use default calendar color as base color checkboxes.
- When finished, click Save or Next.
Multilevel Color Display Formats
Multilevel colors appear on the right side of a calendar record, either in the upper corner or as a vertical line depending upon the Multilevel Color Display option selected
The first image shows Line format. The second image shows Corner format.
In Swimlane view, Multilevel Conditional Coloring always appears in Corner format.
How to format and enable Multilevel Conditional Coloring
Follow these steps to enable Multilevel Conditional Coloring and set the format for the additional colors:
- Click the CalendarAnything gear icon.
- Under General Settings,select Advanced.
- Find the Multilevel Color Display field and select either Line or Corner.
- Click Save.
Field descriptions
- Multilevel Color: Options for multilevel coloring on calendar records:
- None: Do not use multilevel coloring
- One: Allow up to one additional conditional color.
- Two: Allow up two additional conditional colors
- Three: Allow up to three additional conditional colors
- Add: Click to add and configure a color level.
- Field Name: Field for application to evaluate based on criteria to determine whether color should be applied.
- Color: Click to choose a color for the level. The HTML color code appears after you select a color.
- Custom Label icon: Click to provide a custom field name to use on calendar legend.
- Hide field labels: Checkbox to select if you want to hide field labels on the calendar.
- Hide operator: Checkbox to select if you want to hide the operator name on the calendar.
- Use default calendar color as base color: Determines the primary color of calendar records. When checked, the default calendar color serves as the primary color. When unchecked and using Multilevel Conditional Coloring, the first matching condition color serves as the primary color. Leaving this option unchecked, in effect, provides one more color-coded condition available—the base color condition plus up to three additional.
The next step is Display Additional Fields.
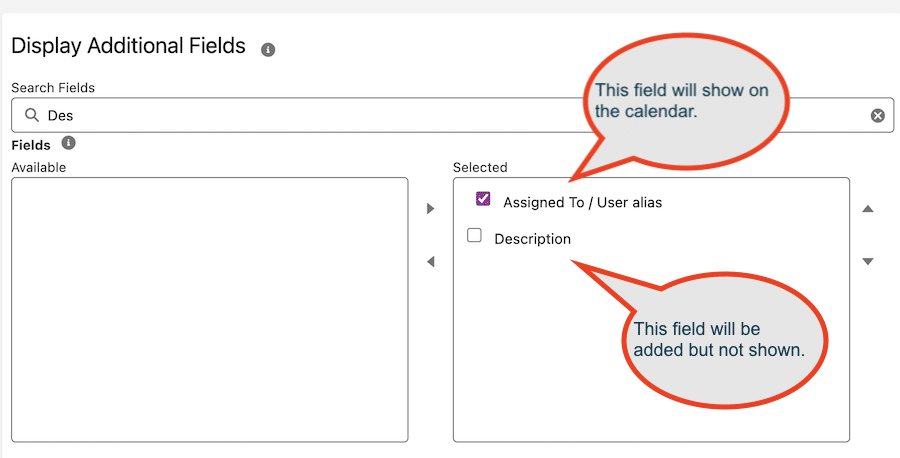
Display Additional Fields
The Display Additional Fields step enables you to show fields, including Related List child fields, that would otherwise not appear on calendar timeslots. You can also add fields for search purposes but not show them on the calendar timeslots.
For Additional Fields added in this step to show on the calendar, you must enable view-specific Display Additional Fields settings in CalendarAnything General Settings. Refer to Display Additional Fields.
To specify additional fields for a calendar, follow the procedure below, referring to the field descriptions as needed:
- Enter a value or partial value in Search Fields to filter the Available panel or scroll the Available panel directly.
- To select a field, click the field on the Available panel and then click the right arrow. The field appears in the Selected panel.
- To display an Additional Field on calendar timeslots, leave the check box selected. To add the field for search purposes but not show it on the timeslots, clear the check box.
In the Available panel, any fields available from a Related List are represented by a label configured in Admin Settings. The label represents a group of child fields that will appear side by side. If you don't know the label, ask a system administrator. If there are multiple related lists that can apply, check with your system administrator to ensure you choose the correct one.
Field descriptions
- Search Fields: Field to enter a value to filter the panel of available fields.
- Available: List of available fields.
- Selected: List of fields selected from the Available panel. If the check box preceding a field is selected, the field will appear on the calendar and can be used for search purposes. If the check box is not selected, the field will be hidden but can still be used for search purposes.
The next step is Related List Settings.
Related List Settings
The calendar’s primary object may have an associated child object known as a Related List. Related Lists are created by a system administrator and can be added to the Salesforce record page. A CalendarAnything administrator can expose one or more related lists, enabling you to display them as an additional Tab on the calendar Details Popup.
Follow these steps to show Related List fields on the Details popup, referring to the field descriptions as needed:
- Select the Related Lists Settings step from the setup menu. The Related List Settings page appears.
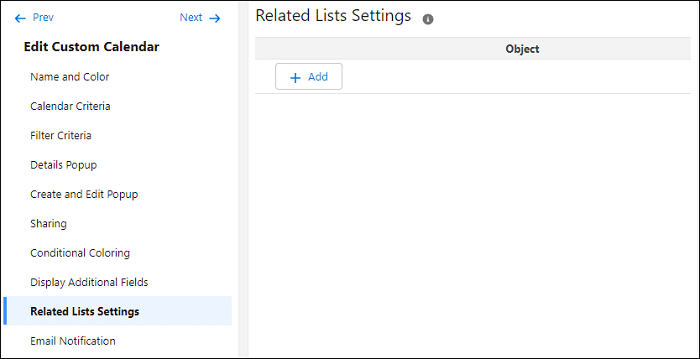
- Click + Add. A row appears to select a Related List object.

- From the Object field, select a Related List (child) object configured for the calendar’s primary object. The Edit icon becomes enabled.
- Click Edit. The Configure List View popup appears.
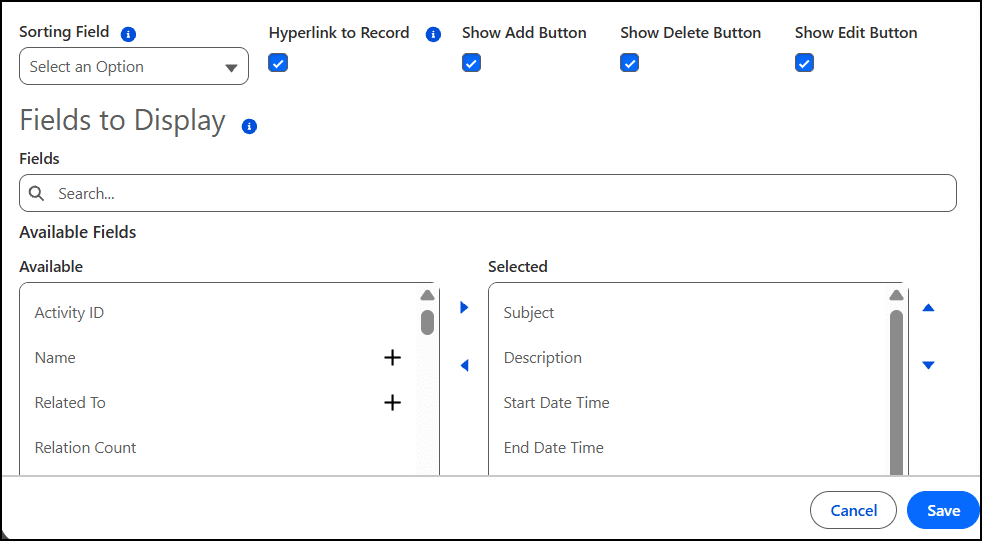
- Optionally, select a Sorting Field.
- Optionally, check Hyperlink to Record.
- To enable users of the calendar to add Related List items, ensure the checkbox labeled Show Add Button is enabled.
- To enable users of the calendar to delete Related List items, ensure the checkbox labeled Show Delete Button is enabled.
- To enable users of the calendar to update Related List items, ensure the checkbox labeled Show Edit Button is enabled.
- Enter a value or partial value in Fields search area to filter the Available panel or scroll the Available panel directly.
- Select a field from the Available panel by clicking it, and then click the right arrow. The field appears in the Selected panel
- Repeat step 6 and 7 for each additional field to be added.
- When finished, click Save.
- Sorting Field: Field within the object by which you want to sort.
- Hyperlink to Record: Check if you want the first field in the Selected panel to contain a hyperlink to the record.
- Show Add Button: When checked, calendar users will be able to add related list items while using the calendar.
- Show Delete Button: When checked, calendar users will be able to delete related list items while using the calendar.
- Show Edit Button: When checked, calendar users will be able to update related list items while using the calendar.
- Fields: Field to enter a value to filter the panel of available fields.
- Available: List of fields available for selection.
- Selected: List of fields selected from the Available panel.
The next step is Email Notification.
Email Notification
Email Notification enables you to specify which calendar events, if any, should generate an automatic email notification.
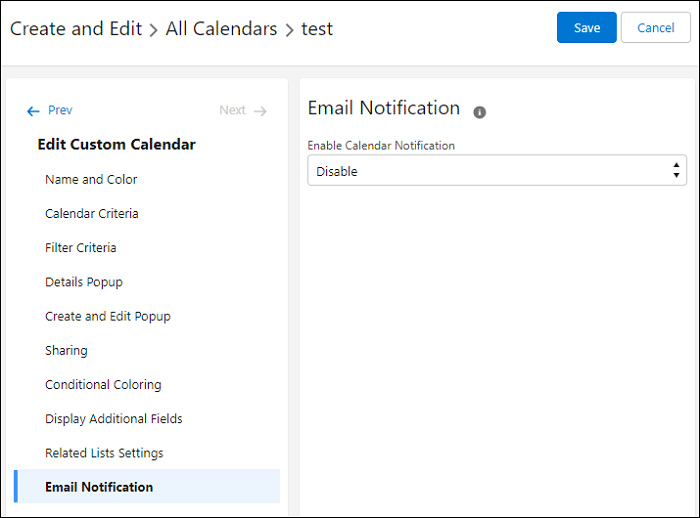
Follow these steps to configure email notification for the calendar, referring to the field descriptions as needed:
- From the Enable Calendar Notification field, select a notification triggering event or accept the default value of Disable. If you select an event, the application displays an Add button and an Email Template field.
- If you selected an event, select an Email Template.
- Click Add to add recipients. The application presents a popup for you to enter recipient email addresses.
- If you clicked Add, enter recipient information and click Save on the Add Recipients popup.
- Click Save on the Create/Edit calendar wizard, as you have completed all the steps at this point.
Field descriptions
- Enable Calendar Notification: List of calendar event options to trigger an email. Options include:
- Disable: Do not send any notifications from this calendar.
- On Create: Send a notification when an event is created on the calendar.
- On Update: Send a notification when an event is updated on the calendar.
- On Create and On Update: Send a notification when either a create or an update to an event occurs.
- Add button: Displayed if you select a notification event and enables you to add recipient.
- Email Template: Displayed if you select a notification event and enables you to select an email template.
*** This completes the steps to create a calendar using the calendar wizard. ***
Edit an Existing Calendar
The calendar wizard is essentially the same for both creating a calendar and editing an existing calendar. The label on the panel of configuration steps changes depending upon whether you are creating or editing.
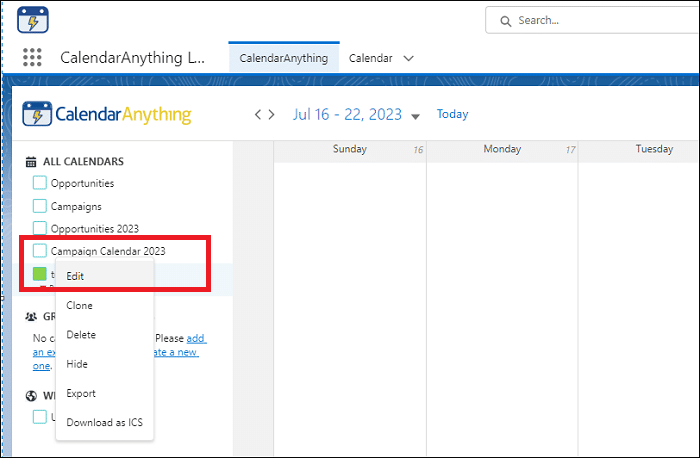
To access the calendar wizard for editing, right click the calendar to be edited and select Edit.
The wizard pages contain a menu of configuration steps on the left and fields to configure the selected step on the right. The Name and Color step is selected by default.
Only system administrators and calendar owners can edit an existing calendar.
To edit an existing calendar, follow these steps:
- On the CalendarAnything menu, under All Calendars, right-click the name of the calendar you want to edit.
- From the context menu, select Edit. The Edit Custom Calendar wizard is displayed for the selected calendar.

- Select each step as needed and make the necessary updates. Refer to the following links as needed for help on configuring the calendar wizard steps.
- Click Save when you are finished.
Create and Edit Entries
You can create new Salesforce records and edit existing ones directly on the CalendarAnything LWC interface. To enable this feature, check the Allow Editing checkbox in the Calendar Criteria step of the create/edit custom calendar wizard.
Drag and Drop Entries
You can change the date fields of your Salesforce records from the CalendarAnything LWC interface by dragging and dropping. To enable this feature, select the Allow Editing checkbox in the Calendar Criteria step of the create/edit custom calendar wizard.