Using the Salesforce form to Create and Edit Calendar Records
If your business has requirements that go beyond our out-of-the-box features, reach out - we offer custom development services for CalendarAnything to meet your unique needs.
CalendarAnything LWC users can opt to use the Salesforce Create and Edit popup to create calendar records. This option can be set on a calendar-level basis.
Follow these steps to configure a CalendarAnything LWC calendar to use the Salesforce Create and Edit popup.
- If you want to update an existing calendar to use the Salesforce form:
- Right-click the calendar name on the left panel of the CALWC calendar page.
- Select Edit from the context menu.
- Skip to step 3.
- If you are creating a new calendar:
- Right-click All Calendars on the left panel of the CALWC calendar page.
- Select New Calendar from the context menu. The Create Custom Calendar wizard appears.
- Fill in the required information on the Name and Color step of the wizard.
Note: If you are new to calendar creation, refer to Create, Edit, and Share Calendars.
- Click Next to reach the Calendar Criteria step.
- On the Calendar Criteria step, scroll to the Advanced field and click to expand it.
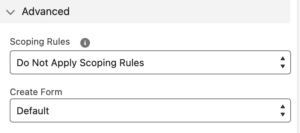
- Click the Create Form field arrow to expand the options.
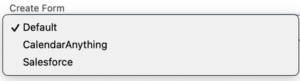
- Select Salesforce.
- If you are creating a new calendar, complete the remaining required calendar creation steps.
- Click Save.
- Enable the calendar to use the Salesforce Create and Edit popup as follows:
- Navigate to CalendarAnything Settings > Advanced.
- Ensure that the Quick Creation Mode Select option is selected.
Important! A calendar configured to use the Salesforce Create and Edit popup will not display the Salesforce popup unless the Quick Creation Mode Select option is selected. Remember to refresh the browser after changing this option, so that the calendar page will reflect your changes.