Exposing Related List Fields for use in Calendar Setup
If your business has requirements that go beyond our out-of-the-box features, reach out - we offer custom development services for CalendarAnything to meet your unique needs.
A Related List establishes a connection between a primary data object and a child data object. Child Relation Fields are selected from a Related List and have a label used to select the fields in calendar setup. Child Relation Fields can only be created by a system administrator.
In this article:
- How to Create Child Relation Fields (Admin)
- How to Nest Child Relation Fields-place one set within another (Admin)
- How to Display Child Relation Fields in Calendars
Use Case! A technical support team creates Case records to document, manage, and track software support tickets. Together with each event, the team manager wants to also see invited persons (users, leads, contacts) and resources such as conference rooms associated with the event.
How to Create Child Relation Fields (Admin)
Child Relation Fields can only be created by a system administrator. These steps show you how to create Child Relation Fields. The selections are based on the example use case. Your selections would be based on your own use case.
- Click the CalendarAnything settings icon (gear). The Settings menu appears.
- Select Admin Settings > Child Relation Fields. Any existing Child Relation Fields are listed.
- Click Add.
- Select Case from the Object field.
- Select Event from the Child Related Object field.

- Click the Edit icon on the row with your newly created Child Relation Fields. A popup appears for you to select fields.
- Enter a Label. This label will be selected by calendar users to show the Child Relation Fields.
- In the Sorting Field, you can specify a field to sort by when multiple rows relate back to a parent row.
- To show multiple rows in table format on the calendar Details Popup, select the Show Table checkbox.
- To display labels as column headings when using a table format, select the Show Field Labels checkbox.
Note: This checkbox is only enabled if the Show Table checkbox is selected. - To limit the number of rows displayed, enter a number in the Limit field.
- Select one or more fields from the Available panel and click the right-pointing arrow to move them to the Selected panel.
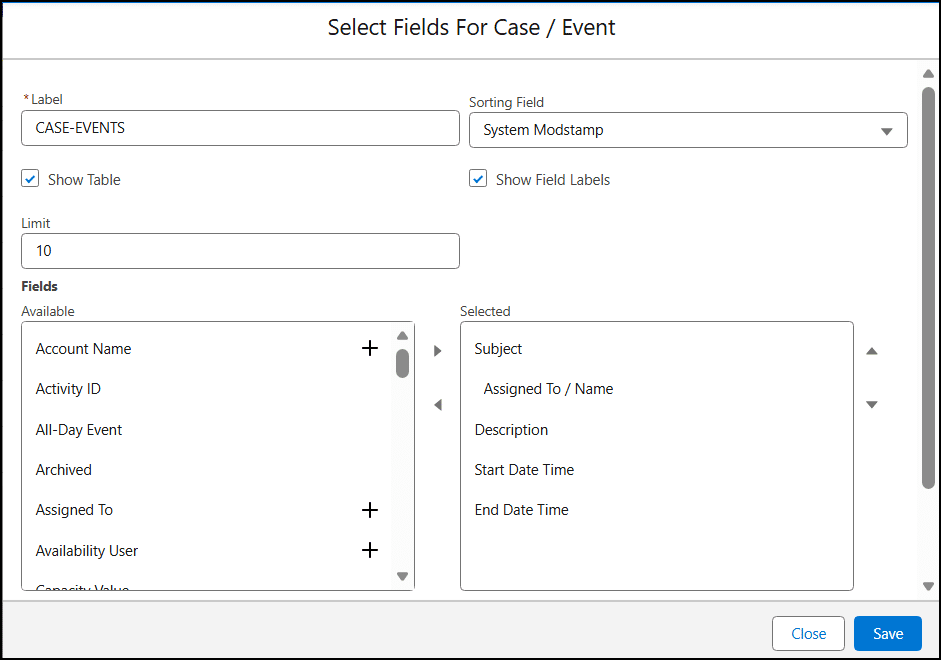
- Click Save.
How to Nest Child Relation Fields-place one set within another (Admin)
You can embed Child Relation Fields within other Child Relation Fields. This configuration is referred to as nested Child Relation Fields.
For this example, there are already Child Relation Fields for Event / Event Relation. For the example use case, the manager wants to see Events and Related Events together. To make this possible, you would follow these steps:
- Click the Edit icon for the Event / EventRelation Child Relation Fields.
- Make note of the Label.
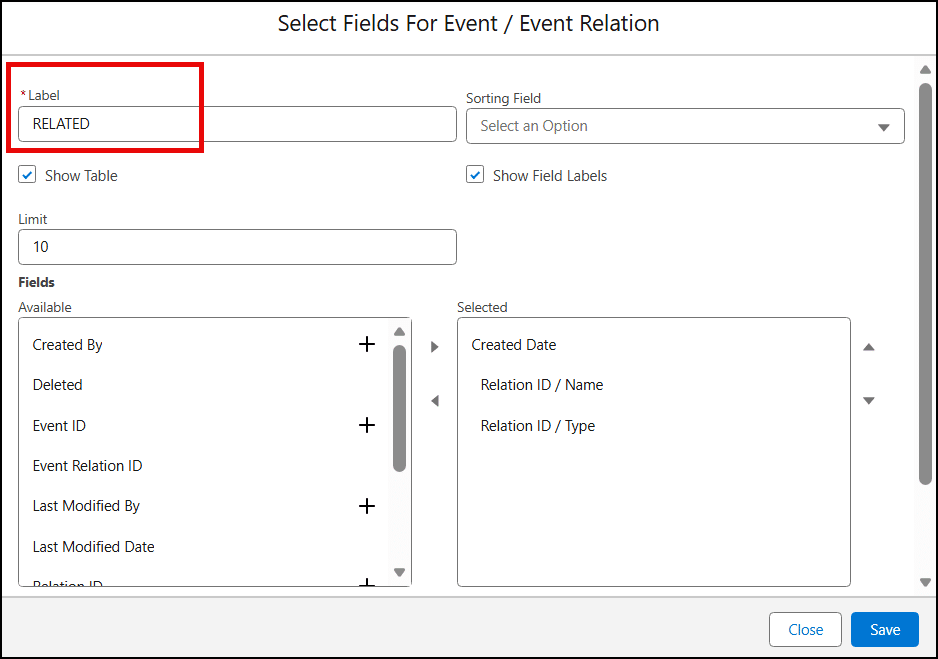
- Click Close to exit.
- Click the Edit icon for your recently created Case / Event Child Relation Fields. The Child Relation Fields details are displayed.
- On the Available panel, find and select the label for the Event / Event Relation Child Relation Fields.
Note: Labels for Child Relation Fields are always highlighted. - Click the right-pointing arrow to move your selection to the Selected panel.
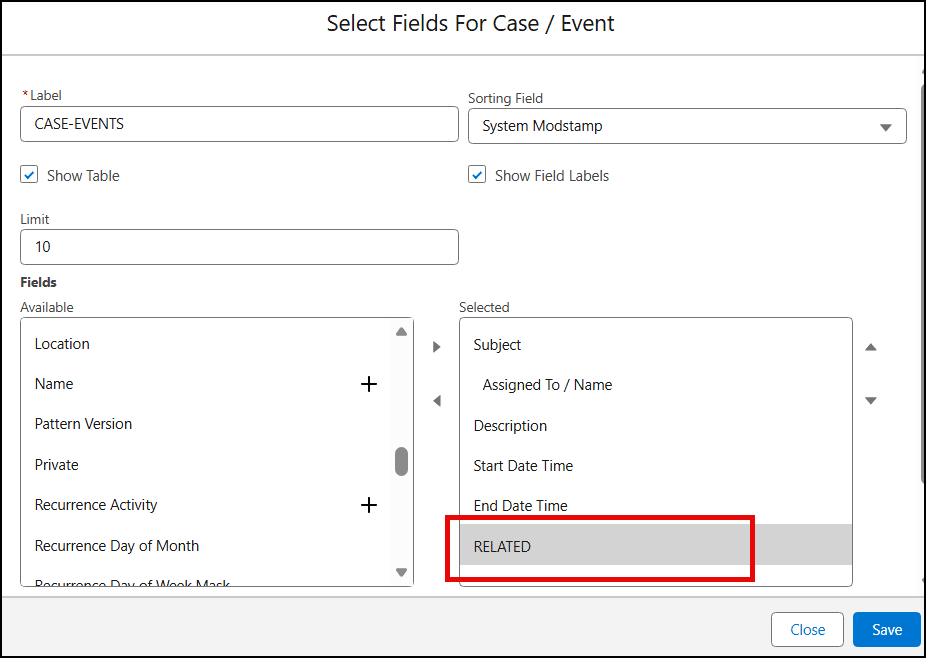
- Click Save.
How to Display Child Relation Fields in Calendars
Once the system administrator has exposed the child relation fields, they can be displayed on the calendar.
To display Child Relation Fields in the Details Popup, follow these steps:
- Right-click the calendar name on the sidebar and select Edit from the context menu.
- On the calendar setup wizard, select the Details Popup step.
- Select the label given to the Child Relation Fields by the system administrator and move it to the Selected panel.
- Click Save.
To show Child Relation Fields as Additional Fields on the calendar, follow these steps:
- Right-click the calendar name on the sidebar and select Edit from the context menu.
- On the calendar setup wizard, select the Display Additional Fields step.
- Select the label given to the Child Relation Fields by the system administrator and move it to the Selected panel.
- Click Save.