Time Zone Management in CalendarAnything LWC
If your business has requirements that go beyond our out-of-the-box features, reach out - we offer custom development services for CalendarAnything to meet your unique needs.
By default, CalendarAnything shows information based on the user’s local timezone—the server timezone. The server time zone is associated with the machine and cannot be changed by admins or users.
The Time Zone Selector feature enables users to apply a different time zone to CalendarAnything operations performed on their device.
In this article:
Using the Server Timezone
To use the server timezone when using CalendarAnything, follow these steps:
- Go to CalendarAnything General Settings.
- Select Advanced.
- Find and select the Use Server Timezone setting.

- Click Save.
If there are no selected timezones in Admin Settings > Timezone, you will be able to select from all timezones. If there are selected timezones in Admin Settings > Timezone, only those timezones will display as options.
Time Zone Selector
The Timezone Selector feature enables users to select a different time zone to be applied while performing CalendarAnything operations on their device.
How to Enable the Timezone Selector
Follow these steps to enable the Timezone Selector:
- Go to CalendarAnything > General Settings.
- Select Advanced.
- Find the Display Timezone Selector setting, and make sure the checkbox is selected.
- Click Save.
Example Timezone Selector Use Case
Assume, for example, that you are on the East Coast in New York and want to invite someone from the West Coast in Los Angeles to a meeting. To do this, you would follow these steps:
- On the sidebar, change the Timezone field from Eastern Daylight to Pacific Daylight.
- Click a timeslot on your calendar to create a new record.
- From the Select Calendar popup, select the calendar.
- Select a Subject.
- Populate the new record with required data. Enter 11:00 AM as the Start Date Time.
- Click Save.
- Change the Timezone back to Eastern Daylight. The calendar displays the new meeting in your time zone. And, when the recipient views the meeting invitation using their default time zone, the meeting time will be displayed in that time zone.
Limiting Timezone Selector Options – Admins Only
By default, all time zones appear in the Timezone dropdown. Admins can limit the timezones displayed in the dropdown, making it easier for users to find the time zone needed. To do this, follow these steps:
- In CalendarAnything, go to Settings > Admin Settings > Timezones. The Timezones configuration page appears.
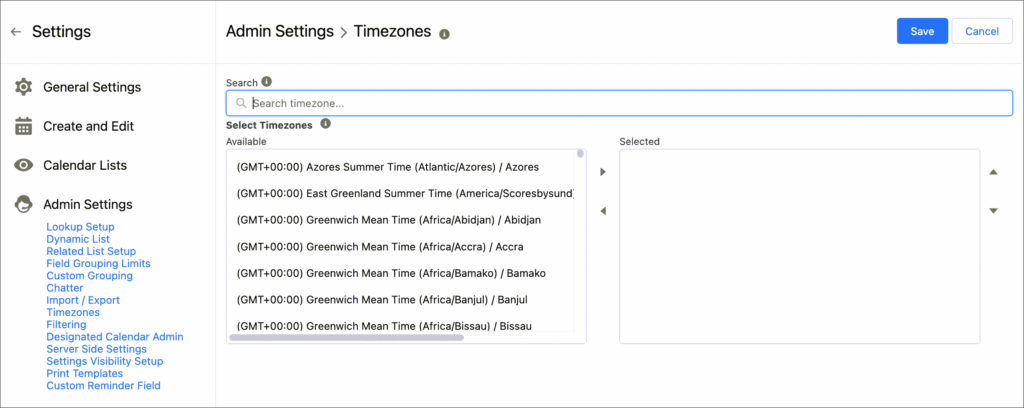
Tip: To see fewer timezones on the Available panel, enter a filter value in Search.
- Select the time zones that you want to make available on the Timezone dropdown and move them from the Available panel to the Selected panel.
- Click Save.