Admin Settings | Classic
In this article, you will learn how to:
- Change the calendar tab label
- Change ownership of calendars
- Designate a calendar admin
- Change display settings visibility for your users
How to change the calendar tab label
CalendarAnything is a Salesforce “managed package” which does not allow tabs to be renamed the same way you can rename other tabs in your organization. However, you can rename the tab using Translation Workbench by following the directions below:
If you are not already designated a translator:
Note: If you are, skip this step.
Go to Setup in Salesforce, then click on Translation Workbench > Translation Language Settings.
Make your language active, if it is not already. Then click Edit Identify Translators for this Language and select the user you want to designate. Then click Save and follow the rest of the steps below.
If you are already designated a translator:
Go to Setup and navigate to Translation Workbench > Override.
![]()
Select package CalendarAnything, your Language, and Setup Component as “Web Tab.”
For Calendar, double click the empty cell under the column Custom Tab Label Override and set a new name. Save.
Change ownership of calendars
Different calendars created in CalendarAnything App are stored in an object called CA_Calendar. To access the CA_Calendar object, create a custom object tab. Follow these steps to create a custom object tab.
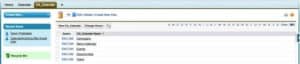
Clicking on the tab shows all calendars stored in the CA_Calendar object as shown above. In order to change the ownership of a calendar, click on the calendar name.
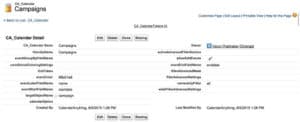
The above screen will open. Change the Owner field in the top right.
If there are many calendars, it may be inefficient to have to change the Owner field one by one. In that case, export the data of the CA_Calendar object into an Excel file in .csv format, change the fields as necessary, and upload/update the excel file back into Salesforce using the Salesforce Data Loader.
Designate a calendar admin
CalendarAnything allows you to designate a calendar admin to users without View All/Modify All permissions in their profile.
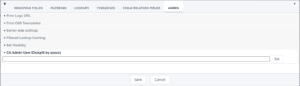
To assign a user as a designated calendar admin, open My Calendars > Display Settings and go to the Admin tab. Navigate to Select CA Admin User IDs and add the user’s Salesforce ID. Click Set and then Save.
Change display settings visibility for your users
This enables admin users to control which display settings should be made available to their users. To find this section, navigate to My Calendars > Display Settings, go to the Admin tab and then go to Set Visibility.
![]()
Here you will see four options:
Change Display Settings visibility: This setting allows admins to set visibility settings from read-only to advanced. It also allows admins to select display settings for profile and role levels. This option works in conjunction with global settings.
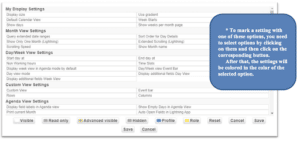
Set Global Settings: This setting allows admins to set default display settings for all users. Global settings only apply to users who don’t have a record in CA_UserSettings object.
Note: These settings can be changed on profile, role, and user levels. These settings will be overwritten by a Visualforce page or additional user settings in the CalendarAnything mobile component.
Profiles: Set settings at the profile level.
Roles: Set settings at the role level.
All settings marked as profile or role will be available only in the Profiles or Roles sections, and will disappear from standard display settings. Each display setting can only be selected as a profile or role setting.
Note: User settings set in a Visualforce page, defined in URL parameters, and CalendarAnything Mobile Lightning component properties will always overwrite any display settings configuration.