Migrating CalendarAnything Classic to CalendarAnything LWC
If your business has requirements that go beyond our out-of-the-box features, reach out – we offer custom development services for CalendarAnything to meet your unique needs.
This article guides you through the process of migrating from CalendarAnything Classic to CalendarAnything LWC. Information is segmented as follows:
- Best practices
- Before you begin
- How the import process works
- Step-by-step migration process
- Post-migration testing
Migration from CalendarAnything Classic to CalendarAnything LWC should be performed by a system administrator.
For CalendarAnything LWC pricing information, refer to CalendarAnything Pricing FAQ.
Best practices
- Develop a user-acceptance test plan that includes comparing Classic calendars to LWC counterparts to ensure they contain the same data and function correctly.
- Silverline strongly recommends that you install CalendarAnything LWC into your Sandbox environment and perform the migration to the Sandbox. Doing so enables you to conduct post-migration testing and resolve issues prior to upgrading to Production. You can easily migrate from Sandbox to Production once you are ready.
- Before using the migration (Help) tool, determine whether inactive users should be excluded from the migration.
Before you begin
Before you begin migrating from CalendarAnything Classic to CalendarAnything LWC, follow these steps:
- Secure a user license for CalendarAnything LWC.
- Download and install the latest version of CalendarAnything LWC into your target environment (see Best practices).
- Add yourself as a system administrator in the newly installed LWC application.
- Assign yourself the CalendarAnything LWC Default Permission Set.
How the import process works
The Help page, accessible under CalendarAnything > Settings, contains a series of Import buttons to “migrate” objects and selected data from CalendarAnything Classic to CalendarAnything LWC.
| Important! | Help page imports do not copy objects; they create counterpart objects on LWC and then import object data. Therefore, note the following:
|
Step-by-step migration process
Perform the follow steps in the listed order to migrate your CalendarAnything Classic objects to CalendarAnything LWC. Performing steps out of order may cause migration errors.
Migrate Admin Settings
Admin Settings must be manually recreated in CalendarAnything LWC. Follow these steps to enter CalendarAnything Classic Admin Settings into CalendarAnything LWC:
- In your browser, open CalendarAnything Classic.
- In a separate browser tab, open the newly installed CalendarAnything LWC application.
- In Classic, navigate to Admin Settings.
- In LWC, navigate to Admin Settings.
- For each category of Admin Settings in your Classic application:
- View the category.
- If settings have been configured in the category, recreate them on the LWC application using the same exact names.
Migrate Standard Calendars
| Note! | The presence of a New ID value indicates that the calendar has already been migrated. |
Next, perform the following steps to migrate Classic calendars to LWC:
- Open CalendarAnything LWC.
- Navigate to CalendarAnything Settings.
- Click Help on the Settings menu. The Help page appears.
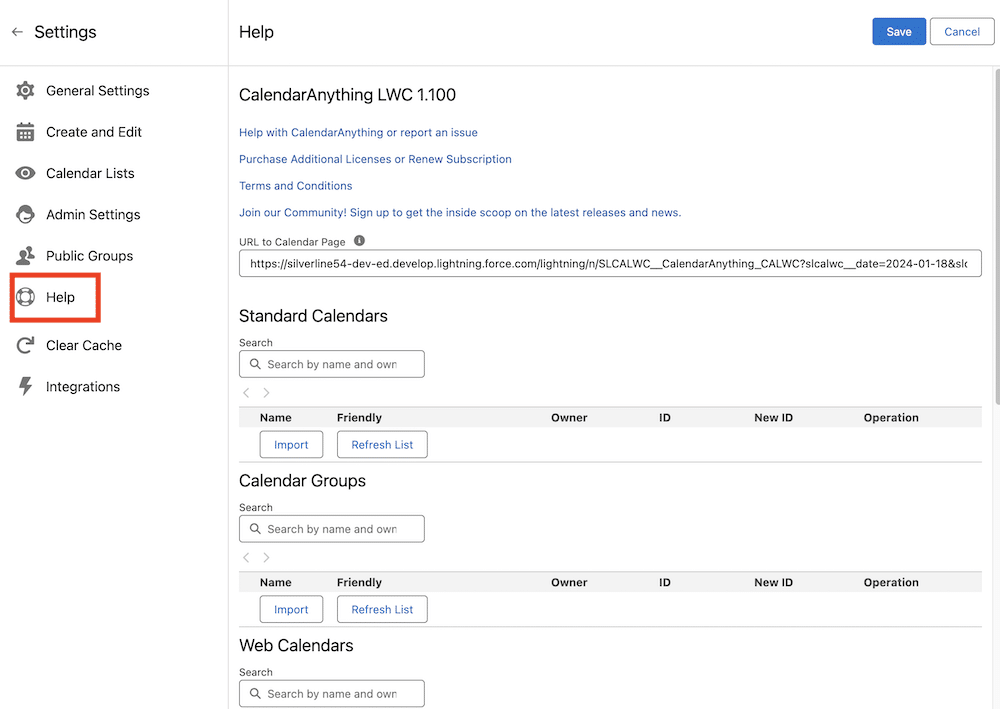
- On the Help page, go to the Standard Calendars section and click Refresh List. The list of standard calendars expands.
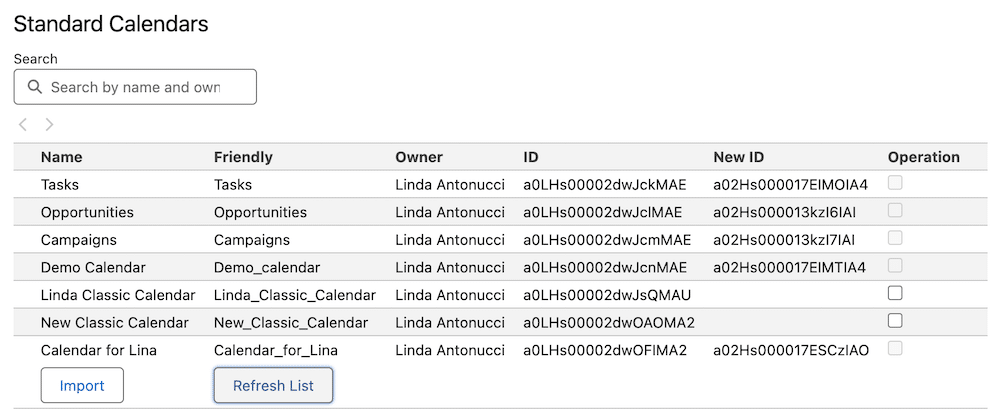
- To migrate all standard calendars that are available for migration, double click the Operation column heading—the column with checkboxes. Otherwise, select individual checkboxes.
- Click Import. A completely successful import results in a New Id appearing for all selected calendars. Check for migration errors if there are calendars that were selected for import but did not receive a New Id.
Migrate Calendar Groups
- Go to the Calendar Groups section and click Refresh List. The list of calendar groups expands.
- Either click the Operation column heading to select all calendar groups, or select individual checkboxes.
- Click Import. A completely successful import results in a New Id appearing for all selected calendars. Check for migration errors if there are calendar groups that were selected for import but did not receive a New Id.
Migrate Web Calendars
- Go to the Web Calendars section and click Refresh List. A list of any web calendars expands.
- Either click the Operation column heading to select all web calendars, or select individual checkboxes.
- Click Import. A completely successful import results in a New Id appearing for all selected calendars. Check for migration errors if there are web calendars that were selected for import but did not receive a New Id.
Migrate User Settings
- Go to the User Settings section and click Refresh List. A list of user settings expands.
- Either click the Operation column heading to select all user settings, or else select individual checkboxes.
- Click Import. A completely successful import results in a New Id appearing for all selected user settings. Check for migration errors if there are user settings that were selected for import but did not receive a New Id.
Migrate Permission Sets
- Go to the Permission Sets section and click Refresh List. A list of permission sets expands.
- Either click the Operation column heading to select all permission sets, or else select individual checkboxes.
- Click Import. A completely successful import results in a New Id appearing for all selected permission sets. Check for migration errors if there are permission sets that were selected for import but did not receive a New Id.
Create Lightning and Digital Experience pages to replace Visualforce pages
CalendarAnything LWC does not use Visualforce pages. You must create an LWC Lightning page or a Digital Experience page for each Classic Visualforce page.
Note: For complex custom Visualforce pages, reach out to the Silverline team for assistance. Otherwise, follow these steps:
- Open one tab with CalendarAnything Classic and another tab with CalendarAnything LWC.
- Select a Visualforce page to be migrated.
- In LWC, navigate to Salesforce Setup, to search for and select Lightning App Builder.
- Click Add new. Give the new Lightning page the same name as the Classic Visualforce page. The API Id generated for the new LWC page will be different from the API Id of the Classic Visualforce page.
- Manually enter Classic Visualforce page properties into the new LWC Lightning page.
Note: Refer as needed to CalendarAnything LWC URL and Component Parameters and Create, Edit, and Share Calendars. - Repeat steps 2-5 for each Visualforce page to be migrated.
Post-migration
- Resolve any object migration issues.
- Manually add permissions for the new “migrated” objects on LWC.
- Have users perform User Acceptance Testing.
- After User Acceptance testing has passed, migrate from the Sandbox to Production. Note! If you migrated only part of your data for the migration to the Sandbox, you must change your process to migrate all data.
- If Classic is to be deactivated after LWC is activated, disable Classic at this point. If Classic is to remain active, be sure to let users know they must manually recreate in LWC any changes made in Classic after this point.