Publishing CalendarAnything Mobile Component on Force.com
If your business has requirements that go beyond our out-of-the-box features, reach out - we offer custom development services for CalendarAnything to meet your unique needs.
By leveraging CalendarAnything Lightning Mobile Extension and Salesforce’s Force.com sites, you can create public-facing calendars for users who need to access calendars on their mobile devices.
In this article you will learn how to:
- Create a Lightning App
- Create a VisualForce page to be used on Force.com site
- Create a Force.com site page
- Create sharing rules for Guest Site User on your Force.com site
- Create and assign custom CalendarAnything permission set for a Guest User
1.Create a Lightning App
The CalendarAnything Mobile Extension is a Lighting component that can be displayed on a force.com site.
Note: A System Administrator or user with developer experience should help with the set up.
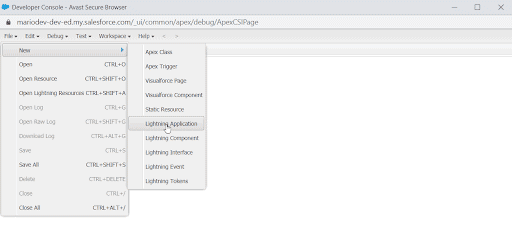
To create a lighting app, navigate to Salesforce and click on the gear icon in the top right corner. Then choose “Developer Console” from the dropdown.

Where to go in SF
The Dev Console
Click “File” > New > Lightning Application
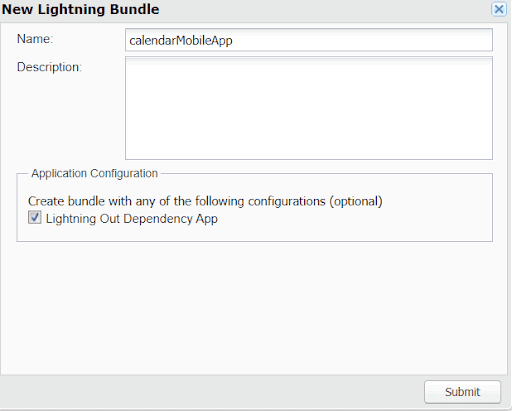
Name the application “calendarMobileApp” and make sure to check the “Lighting Out Dependency App.”
That creates something that looks like::
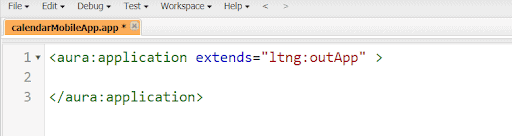
Remove everything and copy/paste the following:
<aura:application access="GLOBAL" extends="ltng:outApp" implements="ltng:allowGuestAccess" />It should look like this:

Save by going to File > Save.2. Create a VisualForce Page that our site will load
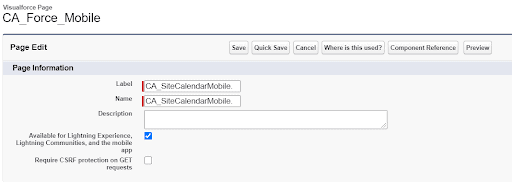
To create a VisualForce Page, navigate to “Set Up.” VisualForce Pages > New
Fill in the fields in the Page Information section. Make sure to check the “Available for Lightning Experience, Lightning Communities, and the mobile app” checkbox.
Below is a code sample for the site. In this example, we include Calendar IDs, but replace them with the IDs of the calendars you need to display and enable on your site when you copy and paste. Copy from <apex:page> to </apex:page>
<apex:page >
  <apex:slds />
  <apex:includeLightning />
  <div id="calLightning" class="wrapper"></div>
  <script>
  var calendarApi = null;
  // Create custom app and expose it to VisualForce
  $Lightning.use('c:calendarMobileApp', function () {
  // add some settings
  let userAdditionalSettings = {
    displayTimeZone: true,
    dayModeArea: '0_1',
    readonly: {
      move: false
    }
  };
  $Lightning.createComponent(
    'SLCALE:CA',
    {
      calendar: "a024T00000257LDQAY, a024T00000257LFQAY",
      //These are just example IDs, should be replaced with your CalendarIDs
      enabled: "a024T00000257LDQAY, a024T00000257LFQAY",
      //These are just example IDs, should be replaced with your CalendarIDs
      view: 'Agenda',
      // The default start view mode, in this example defaulting is Agenda.
      showModeSelector: true,
      userAdditionalSettings: JSON.stringify(userAdditionalSettings),
      useCAForm: true,
      useCADetail: true,
      showIcoCreate: false,
      showIcoCalendars: false,
      height: '600px',
        readonly: {
          move: false
        },
    // executes after calendar is fully loaded
    fReady: function (oApi) {
    calendarApi = oApi;
    // for calendar API method (set dynamic filters, custom buttons, etc);
    }
   },
  'calLightning', // id of div you want to put new Lightning element
(cmp) => {
// callback for create element
//(NB calendar load event is not equal to this event)
// to execute something after calendar is loaded use fReady
console.info('created');
}
);
});
</script>
</apex:page>
3. Create a Force.com site page
To make your CalendarAnything public, you must create a Force.com site page. This can be an existing page or a new one. To set up your Force.com site, refer to Salesforce’s Setting Up Salesforce Sites.
Once on the site set up, replace the Active Site Home page with the VisualForce page we just created
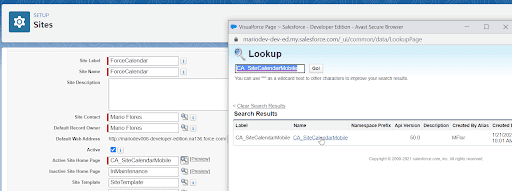
Save and your Site is ready to be published.
If your site is brand new, then you will need to configure Sharing Rules as well (Step 4).
4. Create sharing rules for Guest Site User on your Force.com site
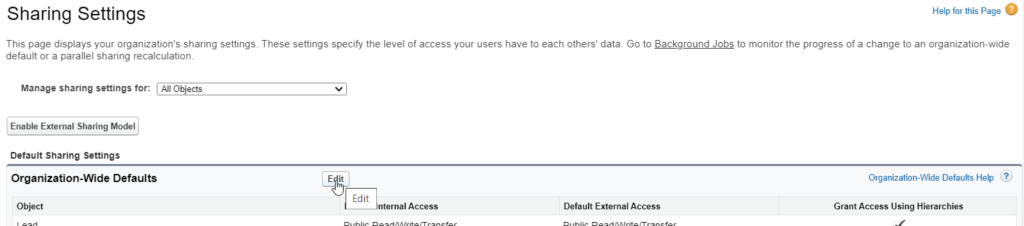
First, go to the gear icon on the top left of your page and then click on Set Up. Once there, click on Sharing Settings.

In Organization Wide Defaults, click on “Edit”
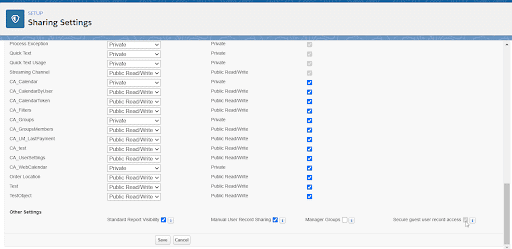
Then, turn the “Secure guest user record access” on.
Scroll all the way to the bottom to find this option.
In order to support the visibility of the calendar and the data exposed by CalendarAnything, your system admin must create sharing rules for all objects exposed on a Force.com site.
For example, to publish a Force.com site with an event calendar:
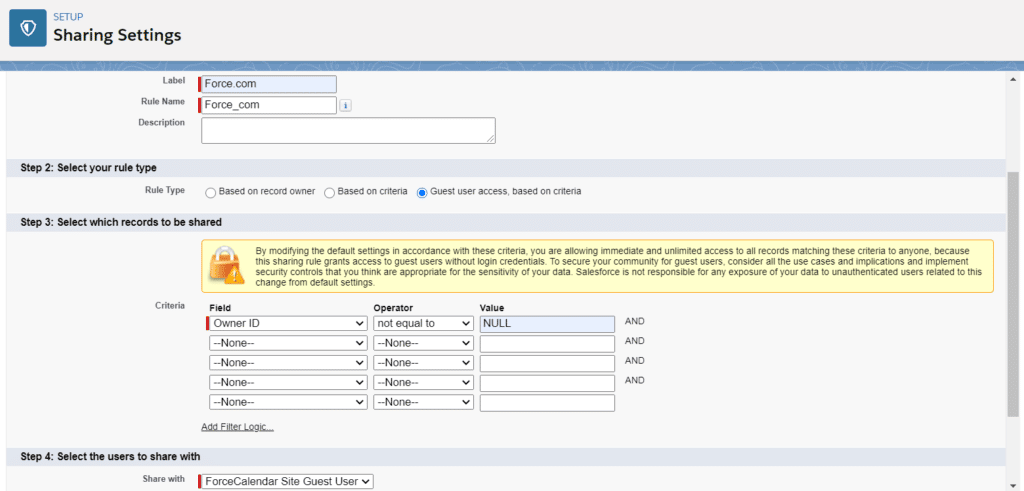
Create a sharing rule for CA_Calendar object
Fill in the Sharing Rule label. The criteria defines what will be shared with your site user and depends on your use case. In this example, we will create a rule that gives the Guest Site user access to all calendars. Please make sure you are sharing with the right Guest Site user.
Once shared, the Guest Site user can access the calendars but not the records displayed on the calendar. You will have to replicate the process for each object that feeds into the calendar.
5. Create and assign custom CalendarAnything permission set for a Guest User
Click here for step-by-step instructions on how to create and assign a custom CalendarAnything permission set for a Guest User.