Putting Color into Your Calendars
If your business has requirements that go beyond our out-of-the-box features, reach out - we offer custom development services for CalendarAnything to meet your unique needs.
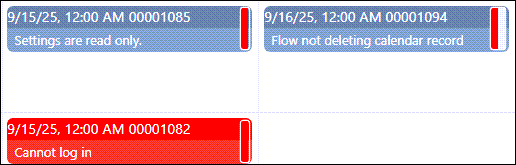
CalendarAnything’s Conditional Coloring feature enables you to emphasize critical information on your calendars. For example, the color red on the Support Team calendar below immediately alerts the calendar user to escalated and high priority tickets.

Note: The color legend filter on the calendar sidebar (not shown in the above image) shows the condition associated with each color. Refer to Color Legend Filter in this article.
How Conditional Coloring Is Applied
Conditional Coloring is applied based on lookup field values. The calendar above uses the Case object, which contains the lookup field named Status. The calendar is configured with a Conditional Coloring entry that applies the color red to records with a status of Escalated.
Conditional Coloring can be configured by manually assigning condition colors or it can be configured for dynamic, automatic color assignment. Manually assigning colors works best when the number of assignments is not too large.
-
To manually associate conditions with colors for a calendar, follow these steps:
- Right-click the name of the calendar on the sidebar to access calendar setup.
- Select the Conditional Coloring step.
- Click Add. A new add row appears.
- Select a Field Name.
- Select an Operator. Depending upon the operator, you may see a field for you to enter a value. The Conditional Coloring logic compares this value to the lookup field value.
- If a value field is present, enter or select the value.
- Leave the default Color or click the Color box to bring up a popup to select a different color. If you use the popup, click anywhere outside of the popup to close it.
- Click the wrench icon to bring up the Advanced Conditional Coloring Settings popup.
- If you want to give the condition a custom label that will show on the sidebar color legend, enter a label in the Custom Label field.
- If you want to add a texture (pattern) to the color, select a texture from the Color Texture field.
- For each additional color assignment, repeat steps 3 thru 10.
- When finished adding rows, you can:
- Reprioritize multiple rows using arrow keys.
- Click X on a row to delete it.
- Check the Hide field labels if you want to hide field labels on the calendar records.
- Check Hide operator if you want to hide the operator name on the calendar.
- Check Use default calendar color as base color checkboxes as preferred. Note: When checked, the default calendar color serves as the primary color.
- Click Save when finished.
Dynamic Conditional Coloring
To color code a large number of lookup values, you can configure a calendar to use Dynamic Conditional Coloring and let the application do it for you. Dynamic Conditional Coloring automatically applies a permanent color code when it encounters a new value in a lookup field for which Dynamic Conditional Coloring is enabled.
-
To configure Dynamic Conditional Coloring for a calendar, follow these steps:
- Right-click the name of the calendar on the sidebar to access calendar setup.
- Select the Conditional Coloring step.
- Remove any existing color assignments for the lookup field you are about to configure with dynamic coloring.
- Select a Field Name. Note: Only lookup fields can be assigned dynamic coloring.
- From the Operator field dropdown, select Dynamic. If Dynamic is not an option, you have not selected a related lookup field.
- Leave the default Color or click the Color box to bring up a popup to select a different color. If you use the popup, click anywhere outside of the popup to close it.
Note: For Dynamic Conditional Coloring, this field is used in conjunction with the Color Field on the Advanced Conditional Coloring Settings popup. - Click the wrench icon to bring up the Advanced Conditional Coloring Settings popup.
- If you want to give the condition a custom label that will show on the sidebar color legend, enter a label in the Custom Label field.
- If you want to add a texture (pattern) to the color, select a texture from the Color Texture field.
- Click Save. The popup closes.
- You can manually assign colors to other lookup fields as long as they are not configured for Dynamic Conditional Coloring.
- When finished with color coding, you can:
- Reprioritize multiple conditions using arrow keys.
- Click X on a condition row to delete it.
- Check the Hide field labels if you want to hide field labels on the calendar records.
- Check Hide operator if you want to hide the operator name on the calendar.
- Check Use default calendar color as base color checkboxes as preferred. Note: This field determines the primary color of calendar records. When checked, the default calendar color serves as the primary color.
- Click Save when finished.
Related Article
Related Demo
![]()
Multilevel Conditional Coloring
By default, standard Conditional Coloring allows only one color per calendar record. A feature enhancement known as Multilevel Conditional Coloring enables you to color code up to three additional conditions per record. Additional colors appear on the right side of the calendar record.
The Multilevel Color Display setting must be set to Line or Corner to enable Conditional Coloring. If the setting has a value of Line, colors appear as vertical lines running the full-length of the record. If the setting has a value of Corner, colors appear in the upper-right corner of the record.
|
|
|---|---|
Line | Corner |
-
First, set the Multilevel Color Display setting to either Line or Corner as follows:
- Click the CalendarAnything gear icon.
- Under General Settings, select Advanced.
- Find the Multilevel Color Display setting and select either Line or Corner.
- Click Save.
Next, configure the Conditional Coloring step in calendar setup as follows:
- Right-click the name of the calendar on the sidebar to access calendar setup.
- Select the Conditional Coloring step.
- Click Add. An add row appears.
- Select a Field Name.
- Select an Operator. Depending upon the operator, you may see a field for you to enter a value. The Conditional Coloring logic compares this value to the lookup field value.
- If a value field is present, enter or select the value.
- Leave the default Color or click the Color box to bring up a popup to select a different color. If you use the popup, click anywhere outside of the popup to close it.
- Click the wrench icon to bring up the Advanced Conditional Coloring Settings popup.
- If you want to give the condition a custom label that will show on the sidebar color legend, enter a label in the Custom Label field.
- If you want to add a texture (pattern) to the color, select a texture from the Color Texture field.
- Click Save. The popup closes.
- For each additional color assignment, repeat steps 3 thru 10.
- When finished with adding color assignment rows, you can:
- Reprioritize multiple conditions using arrow keys.
- Click X on a condition row to delete it.
- Check the Hide field labels if you want to hide field labels on the calendar records.
- Check Hide operator if you want to hide the operator name on the calendar.
- Check Use default calendar color as base color checkboxes as preferred. Note: This field determines the primary color of calendar records. When checked, the default calendar color serves as the primary color. When unchecked and using Multilevel Conditional Coloring, the first matching condition color serves as the primary color. Leaving this option unchecked, in effect, provides one more color-coded condition available—the base color condition plus up to three additional.
- Click Save when finished.
Note! When multiple conditions apply to a record, the order in which they are processed can determine whether the entire record is colored or just the right line or corner. Additionally, if the Use default calendar color as base color checkbox is selected on the Conditional Coloring step, the default calendar color becomes the base color for all records.
Related Demo
![]()
Color Legend Filter
The Color Legend Filter enables you to filter calendar records by directly interacting with the color legend on the calendar sidebar without the need to enable the filter panel. To enable this filter, select an option from the Filter Using Color Legend setting. The option determines how the color legend applies filters that you select from the legend.

Related Article
Related Demo
![]()