Scheduling/Booking Available Resources
If your business has requirements that go beyond our out-of-the-box features, reach out - we offer custom development services for CalendarAnything to meet your unique needs.
Why You Might Need Availability Scheduling!
If managing your resource scheduling is complex, involves large numbers of resources, some of which must be available at the same time, and must quickly reflect unexpected changes, Availability Scheduling from CalendarAnything may be your solution.
In this article:
- Terms
- Overview
- Defining Availability
- Booking Availability
- Booking Extended and Multiple Appointments
- Options for Resources per Booking
- Setting Availability Minimums (Intersection Mode)
- Self-Maintained Availability Using Templates
- Integrating Your Public Calendars
Terms
- Resources: people, places, and things that can be booked or scheduled
- Availability Scheduling: CalendarAnything feature for resource booking management
- Availability calendars: CalendarAnything calendars designed for resource booking
Overview
CalendarAnything’s Availability Scheduling feature enables you to define Availability as one resource or a combination of resources. Resource data can be stored in standard Salesforce objects and custom objects.
The feature’s optional benefits include self-maintained resource availability, calendar-level choices for how to view available resources, and public calendar integration to exclude personal appointment times from availability.
Defining Availability
CalendarAnything’s Availability Scheduling feature enables your organization to define its resources and how they must be made available. Resources can be team members, medical practice physicians, locations, rooms, equipment, and so on. In some cases, more than one resource must be able to be booked simultaneously.
Single Resource Availability
Single resource availability is presented as one resource per time slot. As an example, the calendar below shows time slots when team members can be booked for meetings. The team manager can minimize back-and-forth scheduling by seeing at a glance when all or most team members are available.

Related Admin Setup Articles:
- CA LWC Availability Scheduling Admin Quick Start Guide
- CA LWC Availability Scheduling Admin Guide
- CalendarAnything Availability Timeslot Generation
Combined Resource Availability and Joint Mode
Availability can be defined as a combination of factors. Consider, for example, a medical practice with multiple clinics and multiple physicians, some of whom rotate among clinics. Patients who book appointments online must be able to select their physician and clinic location. This type of Availability is known as Combined Availability.
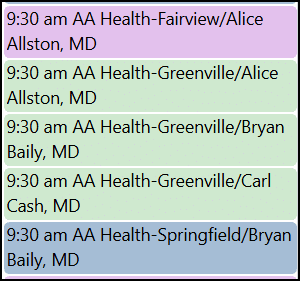
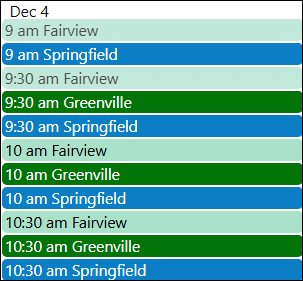
This image shows 9:30 am timeslots for a specific date on an example calendar. The calendar of an actual practice with many clinics and dozens of physicians could become crowded and difficult to navigate.
To prevent Availability calendars from becoming visually overwhelming, you can set Joint Mode. Joint Mode is located on the General step of calendar setup. By default, Joint Mode is set to Not Joined. Additional options include Location, Resource, or Location and Resource.
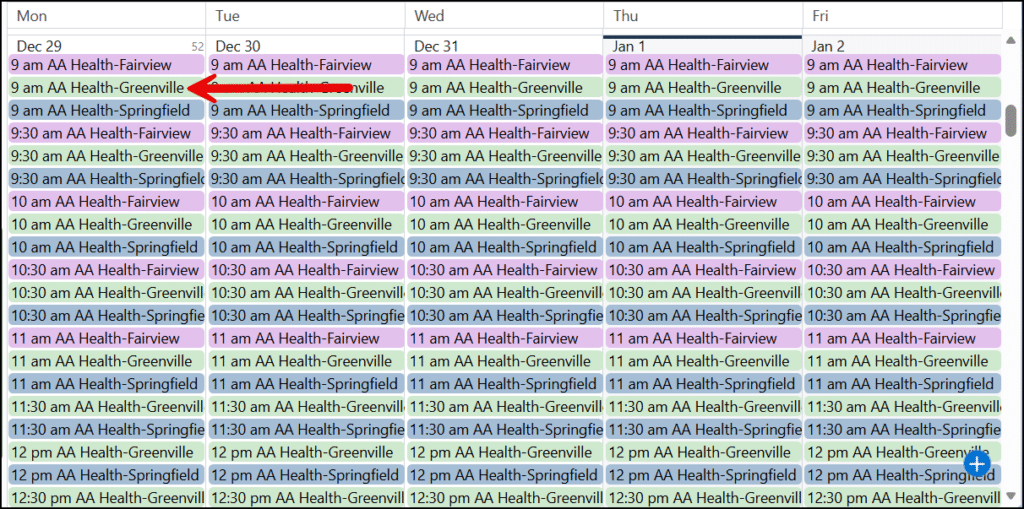
 The image to the right shows 9:30 am timeslots on the same calendar but after Joint Mode has been set to Location. Notice how the three Greenville timeslots have been grouped into one.
Joint Mode = Location
With Joint Mode set to Location, timeslots are grouped by location. After the user selects a location timeslot, all resources available at the selected timeslot and location will be presented on the booking popup. For example, clicking the 9:00 am Greenville timeslot will bring up a list of physicians available at 9:00 am in Greenville.
Joint Mode = Resource
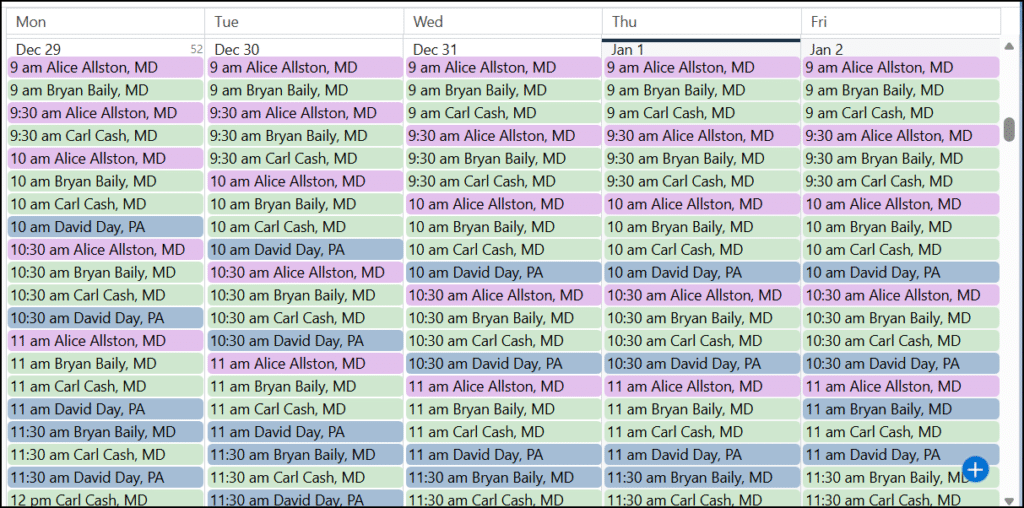
With Joint Mode set to Resource, timeslots are grouped by resource. After the user selects a resource for booking, all locations at which the selected resource can be available at the selected timeslot will be presented on the booking popup.
Joint Mode = Location and Resource
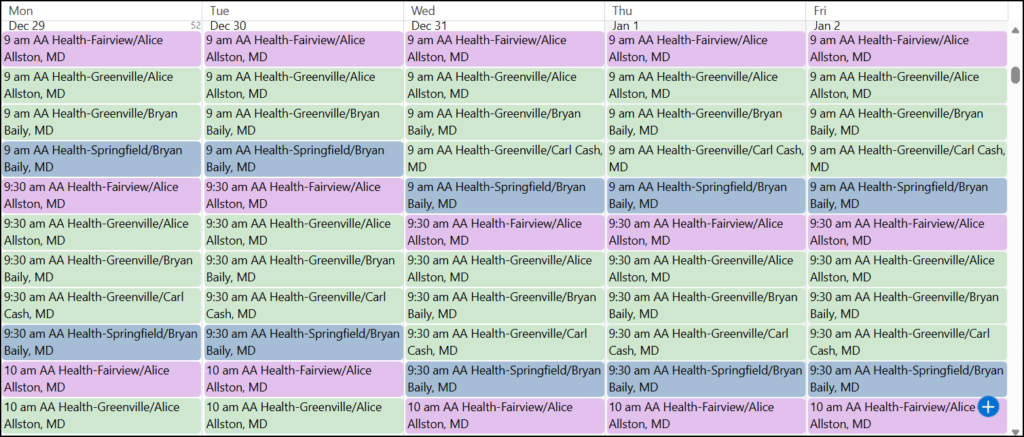
With Joint Mode set to Location and Resource, timeslots are grouped by location and resource. After the user selects a combined location and resource for booking, all locations that are available at the selected timeslot and all resources that are available at the selected timeslot will be presented on the booking popup.
TIP!
Related Admin Setup Articles:
- CA LWC Availability Scheduling Admin Quick Start Guide
- CA LWC Availability Scheduling Admin Guide
- CalendarAnything Availability Timeslot Generation
Booking Availability
Single resource availability is simpler to book. You select the timeslot with the desired resource and book it.
Booking combined resource availability configured with Joint Mode involves a booking popup. After you select a timeslot with the “primary” resource, the application displays a popup for selecting one or more of the combined “secondary” resources.
Booking Single Resource Availability
To book a resource assuming the example calendar, you would follow these steps:
- Right-click the timeslot for the resource, date, and timeslot to be booked. A context menu appears.
- On the context menu, click Create Appointment. A popup appears for you to enter appointment details. Note: The popup fields vary depending upon configuration.
- On the popup, enter any additional information as required.
- Click Save. The application removes the timeslot from the calendar and creates the appointment.
Booking Combined Availability — Demo
Note: This demo is based on the example calendar configured with Joint Mode set to Location. Fields on your popups can vary.
Booking Extended and Multiple Appointments
Booking Slot Mode is an Availability calendar-level setting that enables you to select multiple timeslots and create extended appointment times. The setting contains these options:
- Current slot only: The application only processes one timeslot, the one on which the user right-clicks.
- Expanded current slot: Enables you to book multiple timeslots for the same location resulting in one longer appointment.
- Multiple slots: Enables you to book multiple separate appointments simultaneously.
- Multiple and expanded slots: Enables you to book both longer appointments and multiple separate appointments simultaneously.
-
Note: If you don’t have a suitable calendar, you can review the process to learn.
Setup:
- On the sidebar, right-click the Availability calendar name.
- Select Edit.
- Select the General step of calendar setup.
- Set Joint Mode to Location.
- Set Booking slot mode to Expanded current slot.
- Set Booking resource mode to One resource only.
- Click Save.
Booking:
- On the calendar, press and hold the ctrl button and select two consecutive timeslots with the same location on the same date. The selected timeslots become lighter.
- Click Create Appointment. Assuming there are multiple resources available, a popup appears for you to select a resource.

- Select a resource and click OK. The application saves the one-hour appointment and displays a status message.
-
Note: If you don’t have a suitable calendar, you can review the process to learn.
Setup:
- On the sidebar, right-click the Availability calendar name.
- Select Edit from the context menu.
- Select the General step in calendar setup.
- Set Booking slot mode to Multiple slots.
- Set Joint Mode to Location.
- Set Booking resource mode to Multiple resources for appointment.
- Click Save.
Booking:
- On the calendar, press and hold the ctrl button and select any two timeslots on the same date. The selected timeslots become lighter.
- Right-click and select Create Appointment. The booking popup displays resources available separately for each location selected.
- Deselect any resources not necessary for the appointment and click OK. The application creates a separate appointment for each unique time, location and resource combination selected.

-
Note: If you don’t have a suitable calendar, you can review the process to learn.
Setup:
- On the sidebar, right-click the Availability calendar name.
- Select Edit from the context menu.
- Select the General step in calendar setup.
- Set Booking slot mode to Multiple and expanded slots.
- Click Save.
Booking:
- On the calendar, press and hold the ctrl button and select two consecutive timeslots for one location and one timeslot for another location, for example:
- 9:30 am Location 1
- 10 am Location 1
- 1:00 pm Location 2
- Right-click and select Create Appointment. The booking popup displays resources available separately for each location selected.
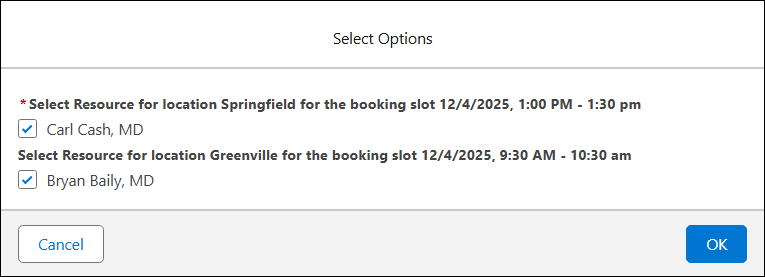
- Leave both resources selected as there is only one resource per location.
- Click OK. The application creates an extended appointment for Location 1 and a separate appointment for Location 2.
Options for Resources per Booking
Booking resource mode is an Availability calendar-level setting that provides options for resource booking, including the option to book multiple resources per appointment. The setting contains these options.
- One resource only: This option permits only one resource per appointment.
- Separate appointments for each resource: This option permits selection of multiple resources but automatically creates a separate appointment for each resource.
- Multiple resources for appointment: This option permits selection of multiple resources and enables multiple resources to be booked per appointment.
-
Note: If you don’t have a suitable calendar, you can review the process to learn.
Setup:
- On the sidebar, right-click the Availability calendar name.
- Select Edit from the context menu.
- Select the General step in calendar setup.
- Set Booking slot mode to Multiple slots.
- Set Joint Mode to Location.
- Set Booking resource mode to Multiple resources for appointment.
- Click Save.
Booking:
- On the calendar, press and hold the ctrl button and select any two timeslots on the same date. The selected timeslots become lighter.
- Right-click and select Create Appointment. The booking popup displays resources available separately for each location selected.
- Deselect any resources not necessary for the appointment and click OK. The application creates a separate appointment for each unique time, location and resource combination selected.
Setting Availability Minimums (Intersection Mode)
Imagine you are the manager of a large sales team. You need to schedule a meeting for a date and time that most sales team members can attend. You obviously don’t need to wade through timeslots for which not many members are available. You can address this issue by using the Intersection Mode setting in the General step of Availability calendar setup.
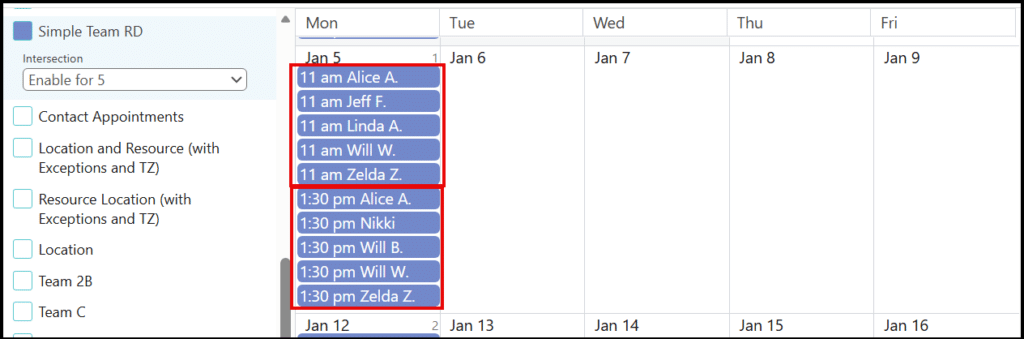
The presence of the Intersection field on the calendar sidebar indicates that the calendar’s Intersection Mode setting has been enabled. The setting provides options for choosing the minimum number of resources that must be available for a time slot to be displayed. You can Disable the setting from the sidebar or select an available option.
In this example, the Intersection option is Disabled on the sidebar, so the Intersection Mode is ignored.

In the example below, the Intersection option is set to show only timeslots for which at least five resources are available.
Related Intersection Mode Setup Article:
Self-Maintained Availability Using Templates
CalendarAnything enables you, if you are a resource, to maintain your own availability as well as exceptions, such as for vacations and illness, using Availability templates. These templates populate the Availability calendars to which they are associated.
-
The steps below show an example of steps to maintain availability.
- Right-click the availability calendar and select Set Availability Template.

- Depending upon whether a calendar is configured with single or combined resource availability, you will have one or two dropdowns for selecting resources. If you are maintaining your own availability, make sure your name is selected in the User dropdown.
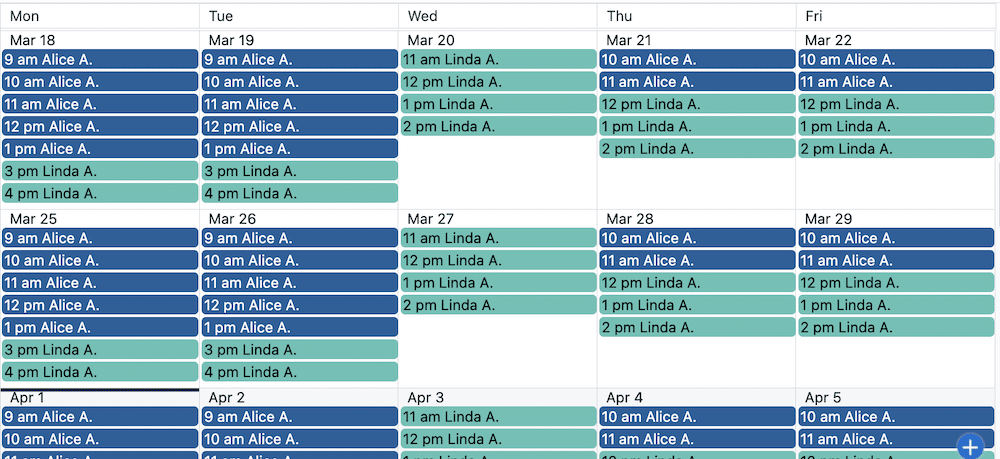
- Click individual timeslots or drag your cursor from the selected timeslot down to where you want to end your availability. The application shades all affected timeslots and places a 1 in each of them.
- Click Apply (the checkmark icon).
- Close the template by clicking the X in the upper right corner. You’ll see the updated Availability calendar.
Setting Availability Exceptions
If your calendar is configured to enable exceptions, people resources can update their availability for vacation, illness, and so on.
- Right-click the name of the Availability calendar and select Set Availability Template.
- Depending upon how availability is configured, one or two resource drop-down fields are displayed. In this example, the only availability factor is user, so there is only one.
- Select your name from the User field if it is not already selected.
- Because the template reflects only one week, not a particular week, you must indicate the dates for which your exceptions apply.
- Click the + sign next to the Period field to add an exception period.
- Click the calendar icon on Availability Exception Start.
- From the popup, select the first date on which the exceptions will apply.
- Click the calendar icon on Availability Exception End.
- From the popup, select the last date on which the exceptions will apply.
- Clear the timeslots for your unavailable days and times within the exception period.
- Click Apply. (the checkmark icon).
- Close the template. The Availability calendar shows the updated availability
- Right-click the availability calendar and select Set Availability Template.
Integrating Your Public Calendars
A calendar showing availability of people resources does not, by default, omit timeslots for personal commitments logged on public calendars. CalendarAnything has developed an optional privacy-respecting process that does not load a time slot to your Availability calendar if that time slot is booked on your public calendar.
Related Public Calendar Integration Articles:
- True Availability Integrating Google and Outlook Calendars (Demo)
- Ensure Accurate Availability by Excluding Public Calendar Appointments (Admin)
_____________________________________________________________________________________________________