CalendarAnything Features – Classic
In this article you will learn about:
- Conditional coloring
- Filter panels/filter sets
- Grouping
- Printing
- Global search
- Chatter, invitee, and attachments
- Time zones
Related Articles:
Conditional Coloring
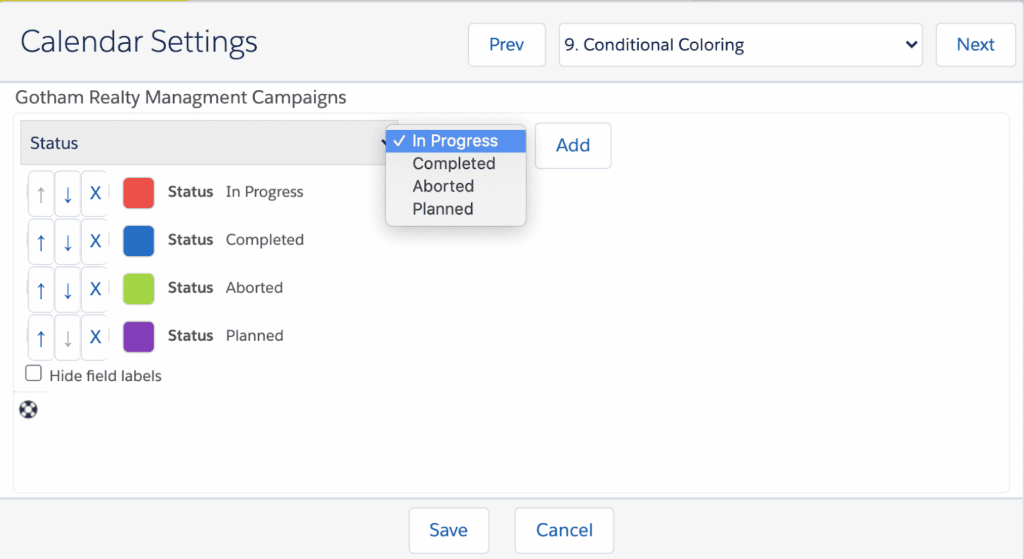
Conditional coloring allows users to assign multiple colors to a single calendar based on a list of fields. This feature eliminates the need to create multiple colored calendars pulling from the same object using the same field for filter criteria.
To access the conditional coloring feature, click the Edit button on a given calendar and go to Step 9.
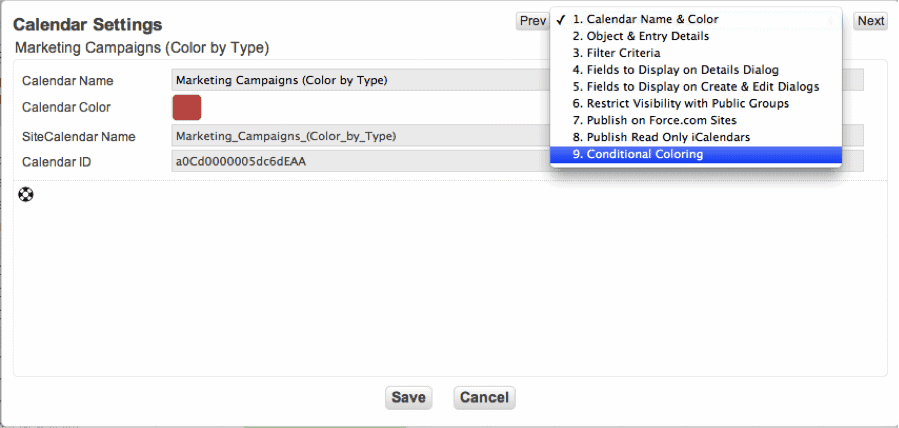
In the example below, the calendar is conditionally colored by Type.
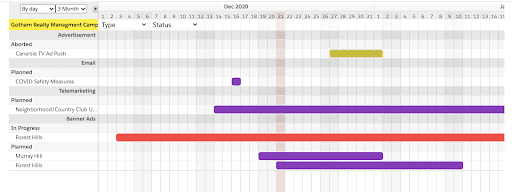
Below is the resulting calendar in Gantt view:
Filter panels/filter sets
Filter panels and filter sets easily filter a list of displayed records. It’s a great way for managers and executives to slice and dice data on a calendar view.
Administrators can specify which fields should be included in the Filter Panel and even save a collection of specific filters as a Filter Set.
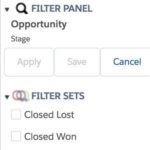
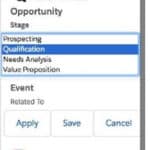
Filter Panel
A filter panel is a section of CalendarAnything UI that displays a list of fields predefined by the CalendarAnything admin to filter their calendars.
To enable this view go to My Calendars > Display Settings, click Layout Settings, and select the Display Filter Panel checkbox. This can be done with User Additional Settings as well on the custom Visualforce page.

To define additional filters, from the Calendar page go to My Calendars > Display Settings and click on the Filtering tab.
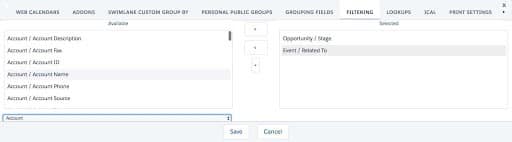
Move fields from the Available column to Selected and click Save. This creates a CA_UserSetting record with namespace “filteringFields”. CA_UserSetting sharing should be set to Public Read/Write.
To apply your filters, use the Filter Panel on the left side and click on the relevant field. Add in a value or select from the available options and click Apply.
 This will filter down the records based on the selected values. Users can save this filter selection and create a filter set, a saved collection of filters defined in the filter panel. We’ll talk about what those look like below.
Filter Sets
To enable this view, from the calendar page, go to My Calendars > Display Settings, click Layout Settings, and select the Display Filter Sets checkbox.
Global Filter Sets can be created by users with ModifyAllData permissions. Global filter sets should be available to all users (CA_UserSettings sharing should be set to Public Read/Write). Global filter sets can be cloned by any user and saved as a user-specific filter set.
Filter Sets can be created by any user. These filter sets will be visible only to the user who created them. They will be stored as a filter set record in CA_UserSettings.
The user can edit, clone, delete, and rename the filter set or make it the default: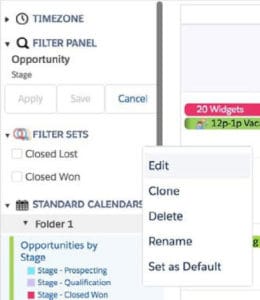
Whenever a user loads or refreshes the page, they’ll see the default filter set. This does not include “calendar refresh” using the Refresh button in My Calendars.
To change the default setting, click Remove as Default in the right-click dialog If that option is selected, it will remove that record and future page loads/refreshes will not enable that filter set.
Visualforce page predefined filter sets
Define Filter sets on theVisualforce page. These filter sets will not be stored in CA_UserSettings. They will be visible only to users who have access to the Visualforce page and can be cloned.
Grouping
You have the ability to differentiate your data by grouping by field criteria. You can group by:
Printing
CalendarAnything users can print CalendarAnything calendars. Select the My Calendars button, and then select the Print option.
For the Custom view, printing always captures a screenshot of the currently selected calendar(s) in your view.
For all other views, capture a screenshot of the currently selected calendar(s) by checking the Print as Image checkbox in the Layout Settings tab in Display Settings. The print screen will display, allowing users to print directly to a printer or save as an image file.
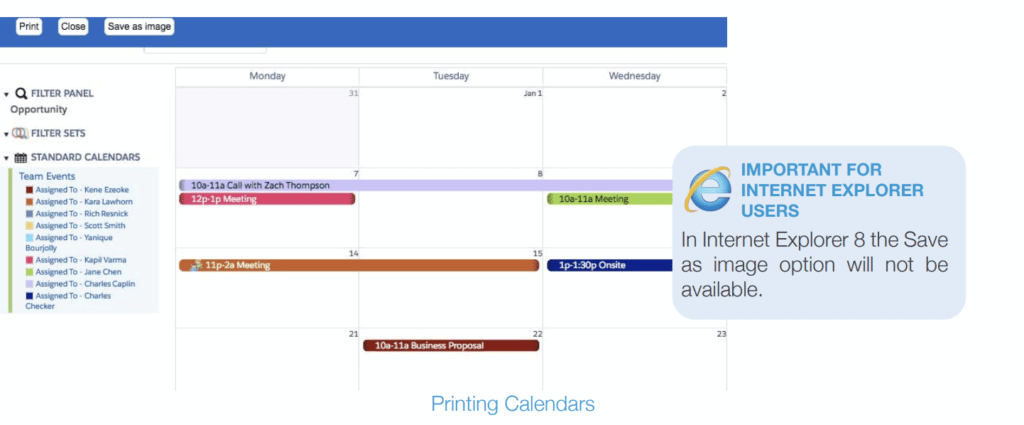
If the Print as Image checkbox in Layout Settings is unchecked, the calendar views will be printed as following:
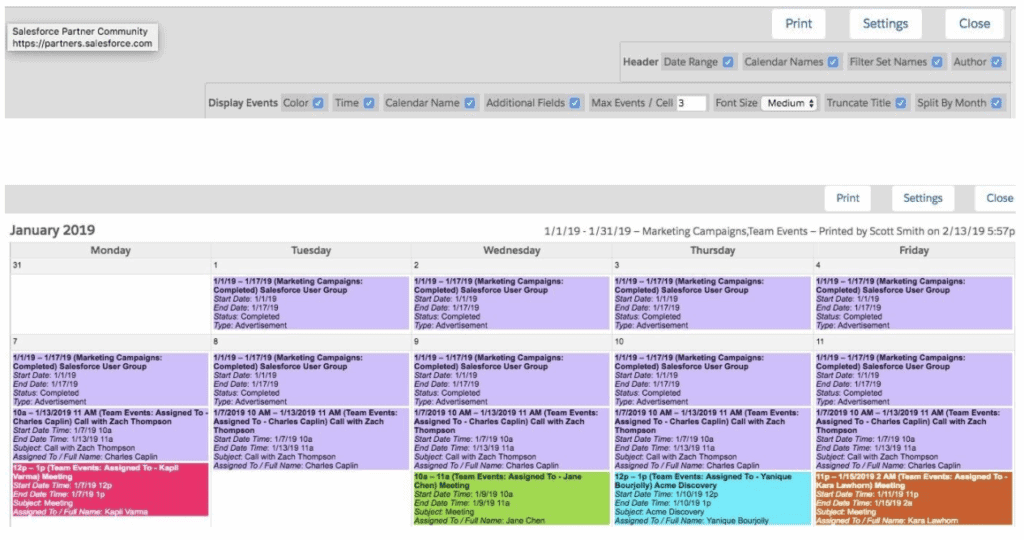
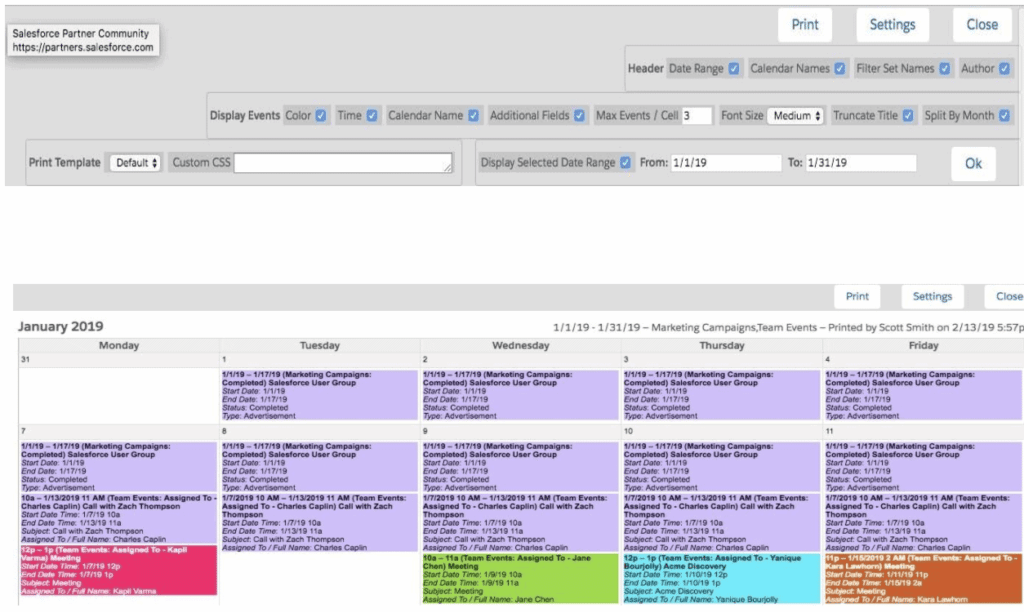
For Day, Week, Month, Agenda, and Swimlane, the print view will show/hide different calendar/event details (such as calendar names, filter set names, calendar author’s name, event titles, additional fields, event details, font size, event bar color, maximum events/cell, and other parameters for the selected date range) based on the print settings:
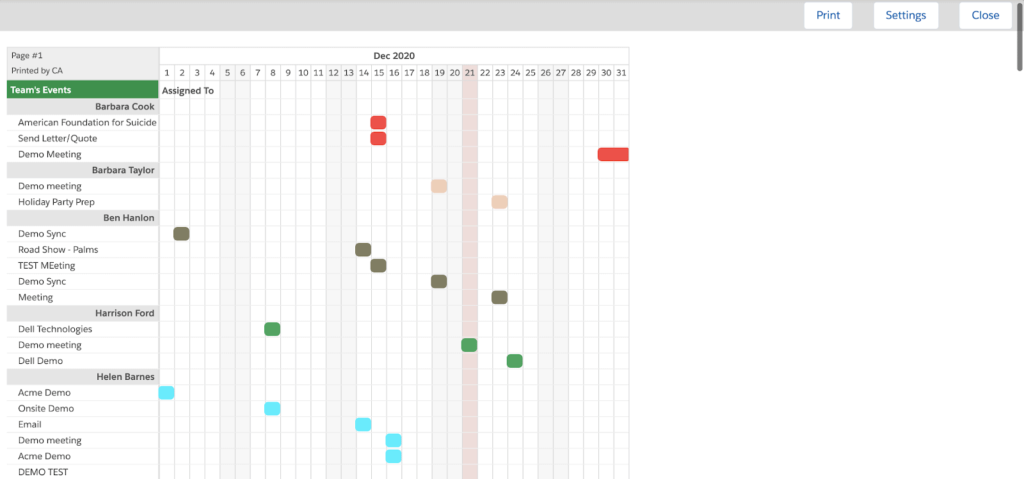
For Gantt, the print view will show screenshots of Gantt view broken into pages by calendars or by date depending on the selected print settings:

All views will use the local settings. Records displayed are sorted by time. Any recurring tasks/events will have the Recurring icon.
Selecting Printed by {User Name} on {Date and Time} will print your calendar on the first page of the print view.
Multi-Day Event (All Day or Timed) will appear on all days it falls on in Day, Week, and Month print view.
Day view
Day print view displays a series of stacked events with all-day events at the top, followed by hourly time boxes. Day view printing range is based on the display settings for the current user and will only print items starting within working hours. It will look similar to the standard calendar day view but take up the full width of the page.
Week view
Week view appears similar to the day view, grouping events by the day of the week and then by the hour. It also shows in a single list that spans the entire width of the page. Multi-day events display under their start day and show start/end date in addition to time.
Month view
Month view appears similar to the native Salesforce calendar month view. The row height for a given week expands to show all the events for that week. Each page has a header that shows the days of the week and the days.
Agenda View
Agenda view appears similar to week view, with days stacked one after another.
Swimlane View
Swimlane view appears similar to day view, with events grouped by user. Each user’s schedule will have the heading “Calendar for <Firstname> <Lastname>.”
Global search
Global search gives you the ability to search off any field on the calendar entry/Salesforce record.
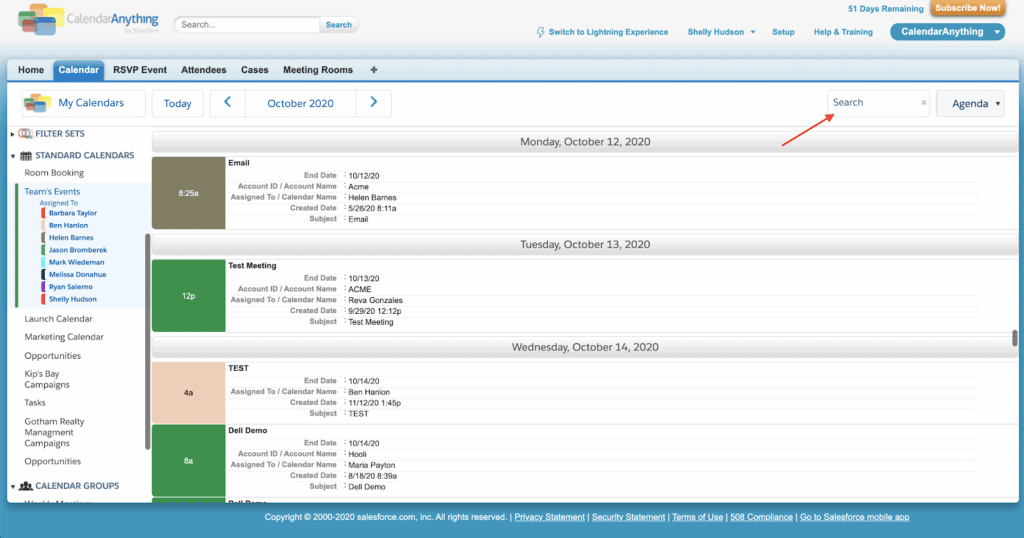
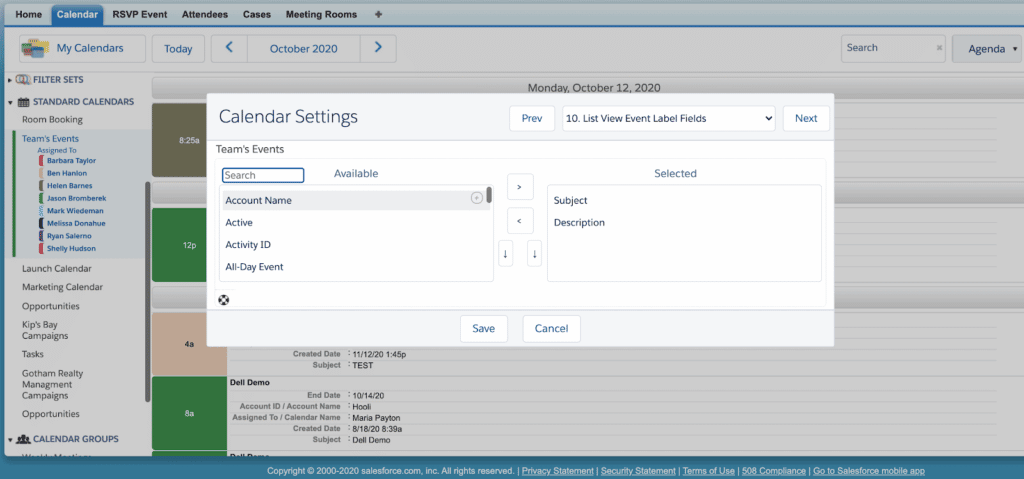
To enable this feature, go to Step 10 and move the field from Available to Selected.
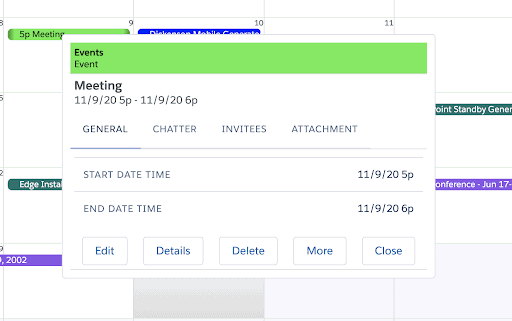
Chatter, attachment, and invitees tab
Three tabs have been added to the Details Dialog of a Calendar Event: Chatter, Attachment and Invitees.
- The Chatter tab allows users to see the Chatter posts on the event record. Users can also write Chatter posts from the tab itself.
- The Attachment tab displays a list of attachments with file extension and size. Users can add and delete attachments from the tab as well.
- Invitees allows you to invite users, leads, and contacts to an event.
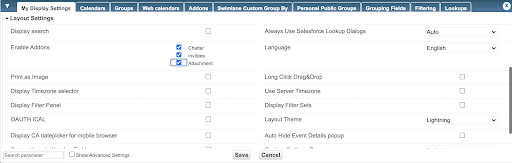
In order to use these tabs, go to My Calendars > Display Settings > My Display Settings and click Layout Settings. In the Enable Addons section, select the Chatter, Attachment, and Invitees checkboxes:
Then go to the Addons tab, click Chatter and choose Use Salesforce Tracking Feed for Objects or select the objects to limit chatter. See below:
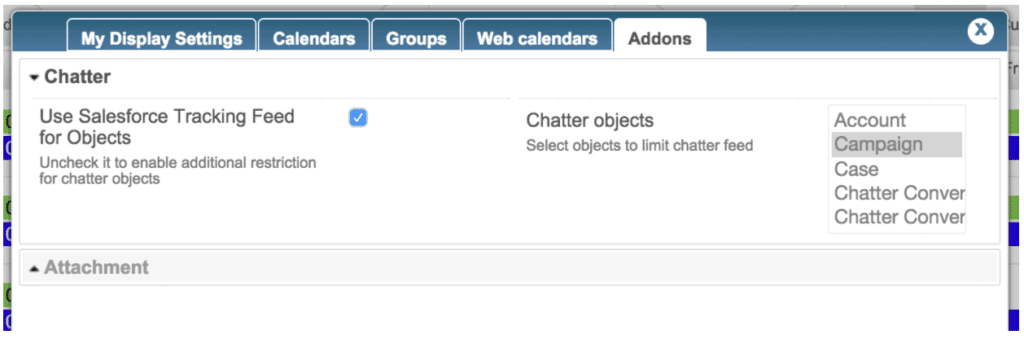
Finally, in Salesforce go to Setup. Navigate to Customize > Chatter > Feed Tracking and select the objects you are using to build your calendars.
Time zones
Time zone is one of the three local settings available on the user record and defines the current time of the user, as well as the overall time displayed in the application.
You can control the time zone CalendarAnything displays by using the time zone selector.
Go to My Calendars > Display Settings and navigate to the Layout Settings section. Mark Display Timezone selector and save. This selector appears in the left sidebar next to the calendar.
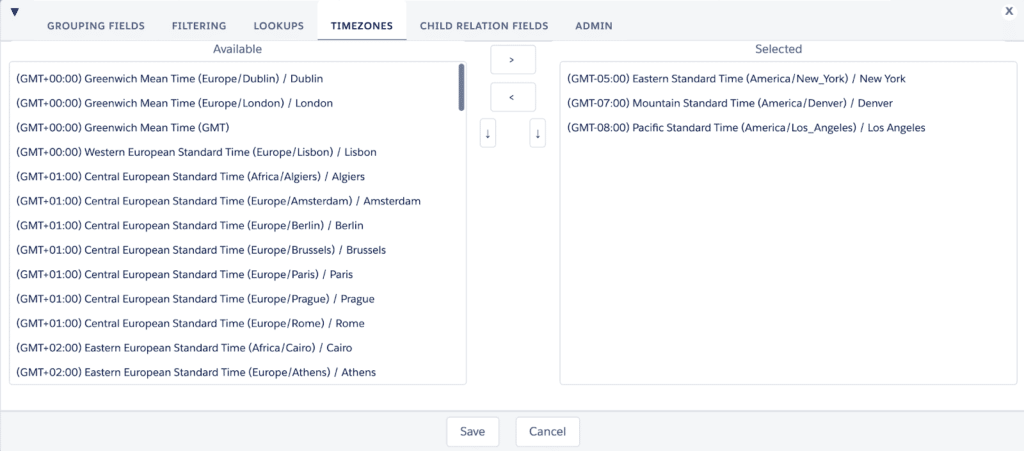
You can modify which time zone options show here by going to My Calendars > Display Settings, and navigating to the Timezones tab. Simply move over any time zones to the Selected group to allow them to appear as options.
If you make an event in a certain time zone, it always remains in that particular time frame, even if you change the display time zone.
Another thing to consider is daylight savings time (DST). If you are using a time zone that observes DST changes, that will be displayed in Salesforce depending on the time zone in your user settings.