CalendarAnything Views
If your business has requirements that go beyond our out-of-the-box features, reach out - we offer custom development services for CalendarAnything to meet your unique needs.
A view specifies which data to show on a calendar, how to organize the data, and how users can interact with the data. Some view settings allow additional options such as filtering and grouping.
CalendarAnything contains highly configurable default calendar views. Calendar users can customize these views further using view-specific General Settings. Note: Some view settings apply to more than one view.
In this article you will learn about:
- Changing the default calendar view
- Switching views
- Month view
- Day/Week view
- Agenda View
- Gantt view
- Swimlane view
- Kanban view
- Setting limits on available group-by fields (Admins only)
Related Articles:
Related Video:
![]()
Changing the default calendar view
To change the view that your calendars will have by default, follow these steps:
- Within CalendarAnything LWC, click the CalendarAnything Settings (gear) icon. General Settings appear by default.
- Click the field arrow on the Default Calendar View field. A list of views options appears.
- Select the view that you want as the default when you first bring up a calendar.
- Click Save.
Note: Override settings may affect your default calendar view.
Switching views
While you are viewing your calendar, you can easily switch to a different view. Just select a different view from the drop-down list in the field that shows the current view.

Month view
Month view displays calendar records for a selected month. The default month is the current month.
Example of a calendar in Month view.

Month View settings
Access: CalendarAnything Settings > General Settings > Month View
Setting Name | Definition |
|---|---|
Cell Height Expansion | Determines whether calendar cells in Month view will have fixed height or will adjust to the number of events per certain day. |
Request Extended Date Range | When checked, loads 120-day window on scroll instead of 60-day. Note that this setting is not recommended for organizations with a lot of data, as it can decrease your calendar performance. |
Choose Sort Order | Field to select the sort order for the + more Day details popup in Month View. |
Display Month | When checked, includes the name of the month when showing a day on the calendar. |
Display Only One Month | When checked, disables scrolling other months into view. |
Day/Week view
Day and Week views allow you to view calendar records for a selected day or week.
| Tip! | Within Day Grouping View, you can use grouping options available in Gantt, Swimlane, and Kanban views. Group by team member to see each team member’s day, make decisions at a glance, and drag/drop entries to update records. |
Example of a calendar in Day view

Example of a calendar in Week view

Day/Week View settings
Access: CalendarAnything Settings > General Settings > Day/Week View
Setting Name | Definition |
|---|---|
Start Time/End Time | Specifies hours displayed in the Day/Week views. Uses 24-hour clock settings (for example, 13:00 for 1:00 PM) |
Display Non-Working Hours | Field to choose whether the calendar should hide, display, or display in a different color the hours outside your set working hours, such as from 9 AM to 5 PM. |
Time Slots | Specifies whether Day/Week views timed area will show 5 min, 10 min, 15 min, 30 min or 60 min windows for events and appointments. |
Event Bar Display | Specifies whether the calendar will display All Day Only records, Time Only events, or a % ratio of both Day and Week views. |
Expand Event Bar On Hover | When checked, calendar user can hover over event bar to see details. |
Note: An additional setting entitled Grouping Users Title Fields is available to Day View. This setting is located under General Settings > Grouping Options and enables you to customize and extend labels of user-based groupings. The setting must contain the API field name and be in all lower case. Multiple values can be comma separated.
Agenda View
Agenda view shows calendar days that are listed vertically in chronological order. Records (events) are listed within each day. Clicking the right-facing arrow on a record row expands the information defined in Additional Fields.
Example of calendar in Agenda View

Agenda View settings
Access: CalendarAnything Settings > General Settings > Agenda View
Setting Name | Definition |
|---|---|
Display Empty Days | Whether to automatically remove days with no events from the calendar. |
Display Day of the Week | Whether to display the day of the week. |
Gantt view
Gantt view enables you to manage marketing campaigns, project plans, and schedules over an extended time period. Use the Gantt view time drop-down to change the date range filter. Collapse or expand time ranges to show data by day, week, month, or quarter. Display 3 months, one year, 3 years, 10 years, or data from all time.
Example of a calendar in Gantt view
(Click image to enlarge. While viewing image, click X in upper right of image to close.)

Before configuring Gantt view settings, ensure the grouping defaults are correct.
- Under All Calendars, right-click on the calendar.
- Select Edit. This brings up the Create and Edit wizard.
- Select Calendar Criteria on the wizard menu. This brings up the Calendar Criteria step details.
- Expand the Gantt & Swimlane section.
- Ensure that the Gantt Grouping Default and the Gantt SubGrouping Default fields contain the values required for your purposes. If necessary, update the fields and click Save.
- Return to Gantt view settings.
Gantt View settings
Access: CalendarAnything Settings > General Settings > Gantt View
Setting Name | Definition |
|---|---|
Default Time Grouping | Default grouping of records in Gantt view. Options: Hour, Day, Week, Month, or Quarter. |
Default Time Period | Default time period for which you want to include Salesforce records. Options: 1 Day, 1 Week, 1 Month, 3 Months, 6 Months, 1 Year, 3 Years, 10 Years, or All Dates. |
Respect Working Hours | When checked, maintains display of working hours only. |
Display Records From Hidden Working Hours | When checked, events scheduled outside of working hours will be displayed. |
Day Cell Width | Field to select the width in pixels for day split type. |
Week Cell Width | Field to select the width to use for week cells in Gantt View. Options are Small, Middle, and Large. |
Display Collapsed Grouping by Default | If checked, grouped items will not be collapsed by default. |
Hide Day Breaks in Collapsed View | Determines whether calendar shows breaks between events or shows a continuous row between first event and last. |
New Week Marker | Identify which day signals the start of a new week (Sunday, Monday, etc.) |
Expand Title Label | Determines whether to expand titles to their full length or to clip them at a specific length. |
Swimlane view
CalendarAnything’s Swimlane is similar to the Standard Salesforce Calendar Multi-User Day View. The Swimlane view includes:
- Ability to show records from any object
- Ability to group records by any specified object, including user
- Support for horizontal and vertical scrolling through records
- Option to view data by selecting Hour, Day, or Week from the drop-down menu
Example of a calendar in Swimlane view

When configuring the Swimlane view, keep in mind that:
- Users won’t see the list view, even if they’re added to it, if the calendar itself is not shared with them.
- If multiple calendars are enabled (selected), only fields that are common to both calendars will be available.
- The Entry label displays for every record by default.
- You can configure the calendar to display additional fields using the Create/Edit calendar wizard.
- All configured Swimlane grouping options are also applicable to Day and Gantt Views.
Swimlane View settings
Access: CalendarAnything Settings > General Settings > Swimlane View
Setting Name | Definition |
|---|---|
Auto-Populate Grouping Values upon Quick Creation | Determines whether the Assigned To field pre-populates with the selected user name when records are grouped by user list view. |
Continuous Scrolling | Scroll in Swimlane view without having to click through dates. |
Day Cell Width | Field to select the width in pixels for day split type. |
Default Time Grouping | Whether the default Swimlane grouping will be by Hour, Day, Week, Month, or Quarter. |
Expand Title Label | When checked, titles will be displayed in their entirety. When left unchecked, titles will be truncated or cut short. |
Display Start and End Date/Time | Determines whether to enable users to hide or show Start Date/Time and End Date/Time on event labels in Swimlane view. |
Display Date for All Day Events | Field to select whether to show a Date on the label of any single-day All Day events. |
Display Day of Week | Determines whether to show the Day of the Week when showing the date on the calendar. |
Display Group Filter | Determines whether group filters are displayed on the calendar. |
Note: An additional setting entitled Grouping Users Title Fields is available to Swimlane View. This setting is located under General Settings > Grouping Options and enables you to customize and extend labels of user-based groupings. The setting must contain the API field name and be in all lower case. Multiple values can be comma separated.
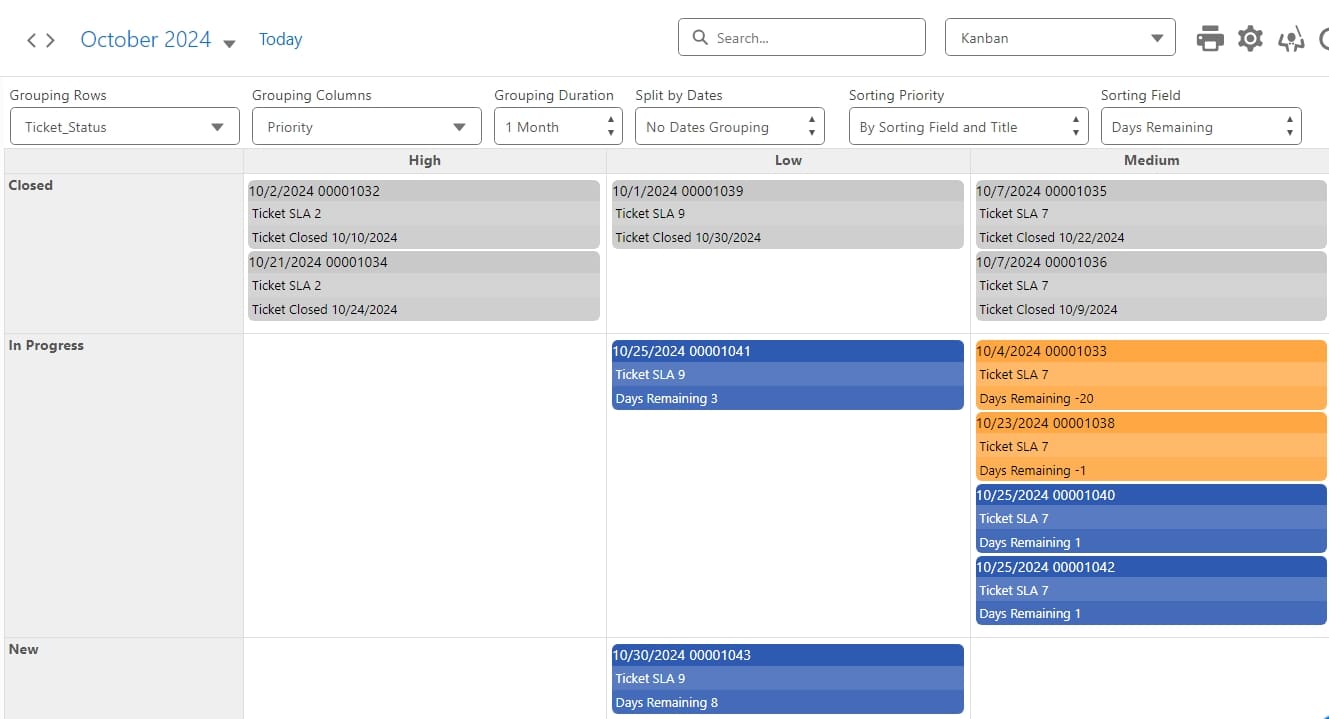
Kanban view
Kanban View provides multiple sorting and grouping options, helping you to see important information at a glance. This view also provides multiple options for updating records. When a record is updated, the Kanban View immediately reflects the change. For greater details on using Kanban view, refer to CalendarAnything Kanban View.
Example of a calendar in Kanban view.
Kanban View settings
Access: CalendarAnything Settings > General Settings > Kanban View
Setting Name | Definition |
|---|---|
Kanban Grouping Duration | Contains options to filter records by time period. Options include:
|
Kanban Split by Dates | Provides grouping options:
|
Kanban Grouping Interval | Contains options to set a date interval. Grouping Duration must be larger than Grouping Interval; therefore, the duration determines the interval options available. Options may include:
|
Setting limits on available group-by fields (Admins only)
Gantt, Swimlane, and Day Grouping views can be configured with a limited number of grouping fields. You do this by adding only those fields you do want to make available to calendar users.
To limit calendar grouping fields for Gantt, Swimlane, and Day Grouping views, follow these steps:
- Within CalendarAnything LWC, navigate to Settings > Admin Settings > Field Grouping Limits.

- To add a field as a grouping option, click Add.
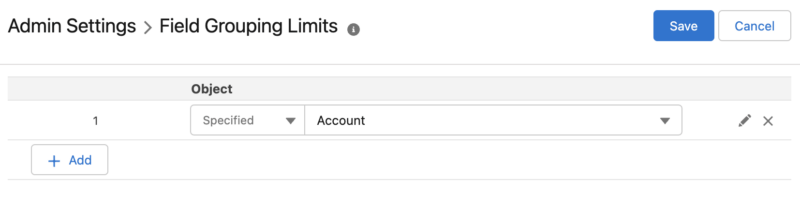
- Select the type of object.
- Select the field.
- Click Edit.
- Move fields from the Available panel to the Selected panel.
- When finished, click Save.