Admin Settings | LWC
If your business has requirements that go beyond our out-of-the-box features, reach out – we offer custom development services for CalendarAnything to meet your unique needs.
In this article:
- How to change the calendar tab label
- Change ownership of calendars
- Lookup Setup
- Dynamic List Setup
- Related List Setup
- Child Relation Fields
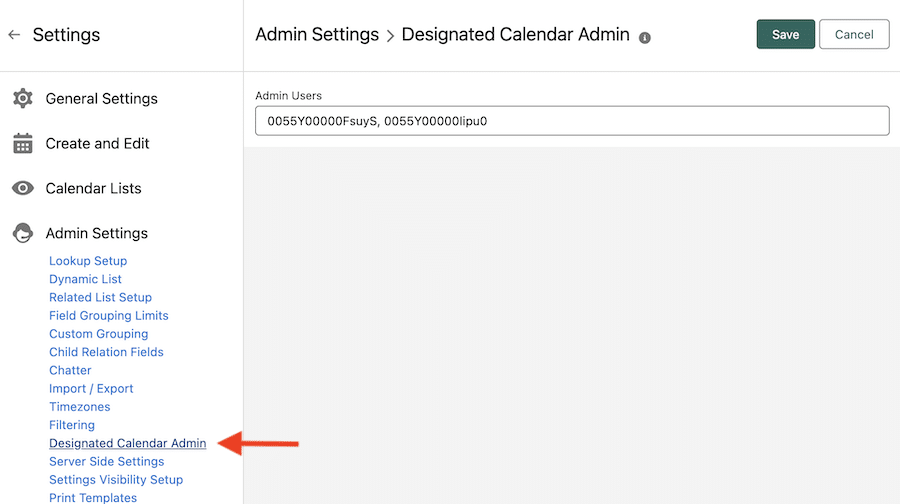
- Designate a calendar admin
- Change settings visibility for users
How to change the calendar tab label
CalendarAnything is a Salesforce “managed package” which does not allow tabs to be renamed the same way you can rename other tabs in your organization. However, you can rename the tab using Translation Workbench.
Before you begin
If you are not already designated a translator, make yourself one by following these steps:
- In Salesforce, navigate to Setup > Translation Workbench > Translation Language Settings.
- Click Edit on the row you want to update.
- On the Edit Language page, make your language active, if it is not already.
- Under Edit Identify Translators for this Language, select yourself from the Available list and click Add.
- Click Save and follow the rest of the steps below.
Use Translation Workbench to change the tab label
If you are already designated a translator (or after you have completed the steps above), follow these steps:
- In Salesforce, navigate to Setup > Translation Workbench > Override.
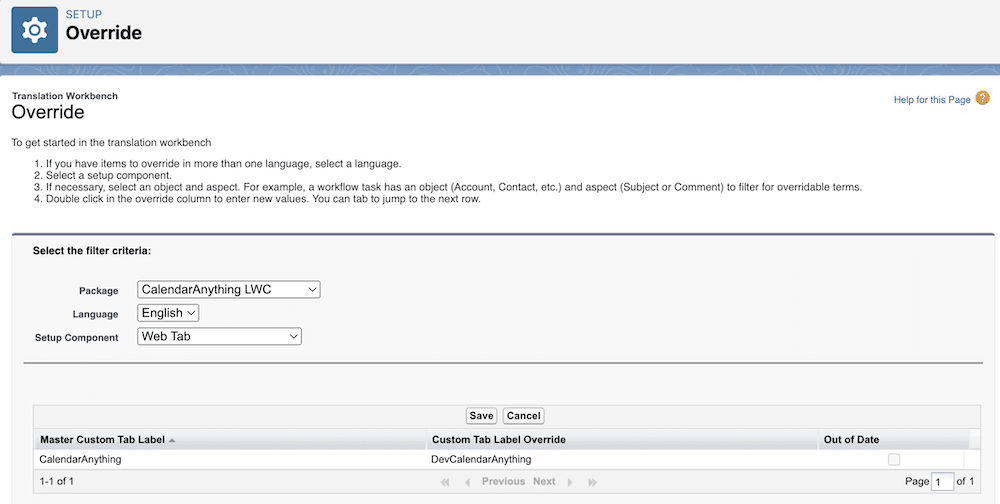
- On the Override page, select CalendarAnything LWC as the Package,
- Select the Language
- Select Web Tab as the Setup Component.
- Double-click the empty cell under the column Custom Tab Label Override and set a new name.
- Click Save.
Change ownership of calendars
Calendars created in the CalendarAnything LWC App are stored in an object called CA_Calendar. To access the CA_Calendar object, you must first have a custom tab configured with CA_Calendar as the Object. If you do not have this tab, follow the steps in create a custom object tab and then proceed with the steps below.
Make sure your custom tab is in view. Then follow these steps to change the owner of a CalendarAnything LWC calendar:
- Click the custom tab to display a list of CalendarAnything LWC calendars.
- On the calendar list, click the arrow on the row with the calendar to be given a new owner.
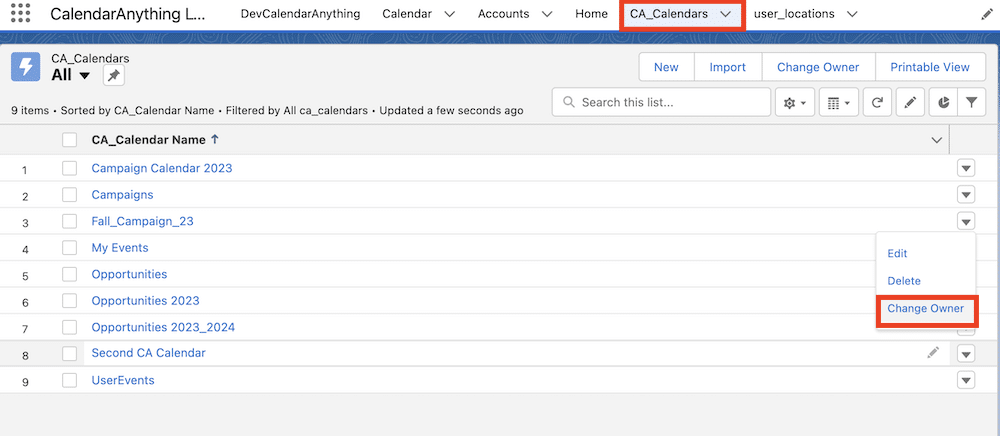
- From the drop-down list, select Change Owner. The Change Owner popup appears.
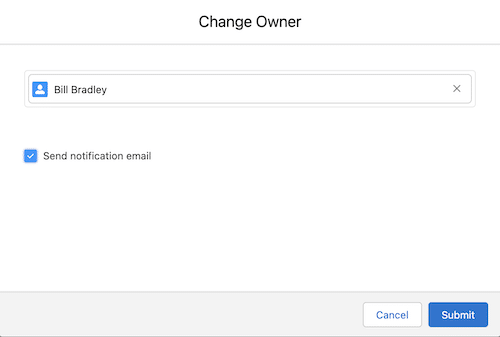
- On the Change Owner popup:
- Select the new owner.
- To notify the new owner, ensure that Send notification email is checked. Otherwise, ensure that it is blank.
- Click Submit.
If there are many calendars, it may be inefficient to change the Owner field one by one. In that case, export the data of the CA_Calendar object into an Excel file in .csv format, change the fields as necessary, and upload/update the excel file back into Salesforce using the Salesforce Data Loader.
Lookup Setup
CalendarAnything enables users to display additional fields in lookups and searches to help distinguish records that might otherwise appear as duplicates. For example, you may have many contacts with the name John Smith. Adding the account field to the lookup options helps users to select the correct John Smith.
Dynamic List Setup
Dynamic List is a feature that enables admins to create filters with complex logic at the Сalendar Settings level without any containers or customizations.
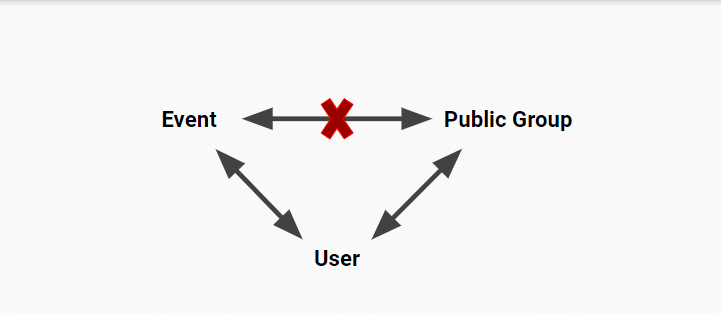
As you can see in the image above, there is no relationship between Event and Public Groups, but both of them have a relationship with User. It is not possible to Filter Events based on Members from Public Groups.
However, you can create a Dynamic list and use it as filter criteria in your Calendar. This will allow you to filter Events based on Members from Public Groups.
Related List Setup
A system administrator creates a Related List to define a relationship between a primary data object and a child object. If a calendar and a Related List have the same primary object, the Salesforce popup will automatically show a tab listing the Related List and any child records. Users can configure the Related List Settings step of calendar setup to show Related List information on the CalendarAnything Details popup.
You define a Related List using the Related List Setup option under Admin Settings.
Child Relation Fields
Fields from a child object in a Related List are known as Child Relation Fields. The System Administrator must expose individual Child Relation Fields to make them available for selection in the Display Additional Fields calendar setup wizard. You expose the child fields using the Child Relation Fields option under Admin Settings.
Designate a calendar admin
CalendarAnything allows you to designate a user as a calendar admin despite the user not having View All/Modify All permissions in their profile.
To assign a user as a designated calendar admin, follow these steps:
- Navigate to CalendarAnything Settings > Admin Settings > Designated Calendar Admin.
- Under Admin Users, add the user’s Salesforce ID separated by a comma.
- Click Save.
Change settings visibility for users
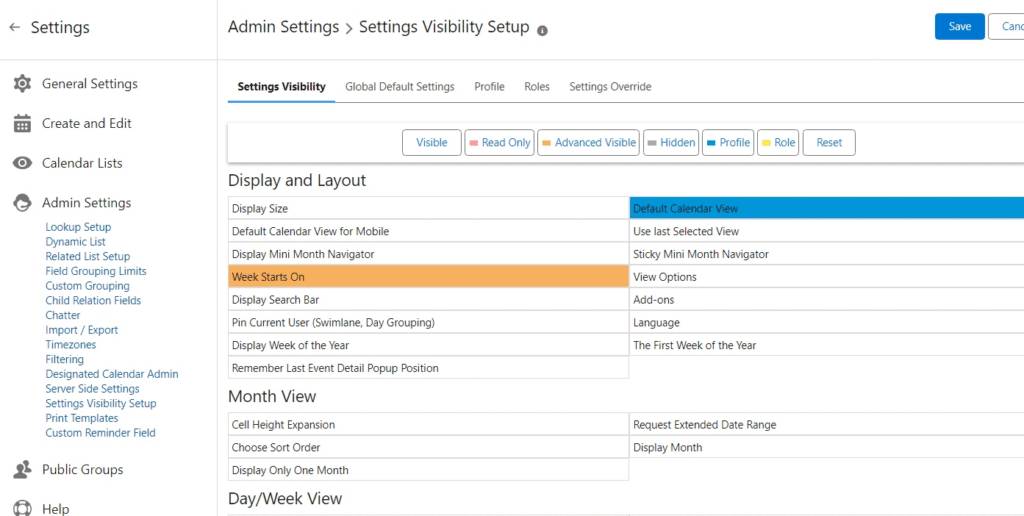
System administrators use the Settings Visibility feature to control which settings user can see in General Settings. Removing a setting from view prevents users from personalizing that setting and makes settings they can personalize easier to find.
To work with these settings, navigate to CalendarAnything Settings > Admin Settings > Settings Visibility Setup.
Settings Visibility Setup options
The following options appear as tabs:
- Settings Visibility: Provides a list of settings that can be selected for use with subsequent tabs.
- Global Settings: Enables you to update global defaults applied to first-time users who do not yet have a record in the CA_UserSettings object. Updates made here will not update settings personalized by users who already have a record in the CA_UserSettings object.
Note: You can use the Settings Override feature to lock down Global Default settings. - Profile: Enables you to update settings at the profile level and prevent users assigned to that profile from personalizing those settings on their user record.
- Roles: Enables you to update settings at the role level and prevent users assigned to that role from personalizing those settings on their user record.
- Settings Override: Enables General Setting overrides at the Organization-Wide (Global) default, profile, and role level. For details, refer to General Settings Override.
All settings marked as Profile or Role will be available only under the Profile or Roles tabs.