Display Additional Fields
If your business has requirements that go beyond our out-of-the-box features, reach out - we offer custom development services for CalendarAnything to meet your unique needs.
By default, CalendarAnything event records are displayed with one field—the Field Name selected on the Calendar Criteria step in calendar setup. Many options exist for displaying additional fields.
In this article:
- Enable Additional Field Display in General Settings
- Add Additional Fields in calendar setup
- Set Display Additional Field Quick Settings
Related Demo
Enable Additional Field Display in General Settings
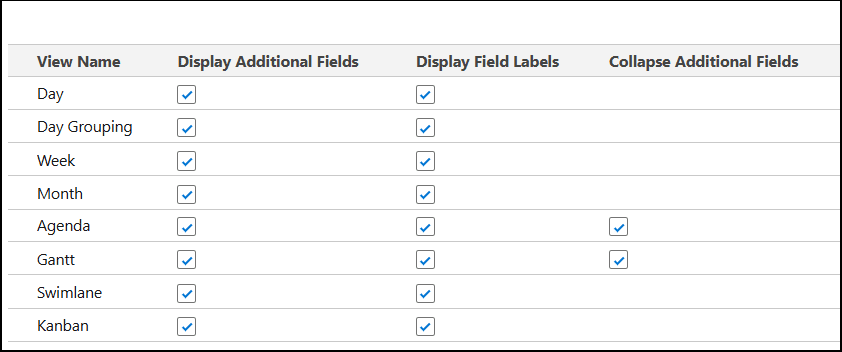
Whether Additional Fields show on a calendar depends upon the view being used and whether that view’s Display Additional Fields setting is selected. For example, the image below shows that all views are set to show Additional Fields as well as the labels for those fields.
To enable the display of Additional Fields by view, follow these steps:
- Click the CalendarAnything settings (gear) icon. The General Settings page appears.
- Scroll to the grid at the bottom of the page.
- For each view that you want to show Additional Fields, ensure that the checkbox is selected in the Display Additional Fields column for the view.
- For each view that you want to show Additional Field labels, ensure that the checkbox is selected in the Display Field Labels column for the view.
- When finished, click Save.
Add Additional Fields in calendar setup
The Display Additional Fields step of the Create and Edit calendar wizard (calendar setup) enables you to add fields that do not appear on the calendar by default. You can also add fields for search purposes but not show them on the calendar timeslots.
To add Additional Fields, follow these steps:
- Access calendar setup:
- On the sidebar, right-click the calendar name.
- From the context menu, click Edit. The Create and Edit Calendar wizard appears with a step menu in the left panel.
- On the step menu, click Display Additional Fields.
- To search for a field, enter the field name into Search Fields. Alternatively, scroll the Available panel.

- On the Available panel, click a field to be added, and then click the right arrow. The selected field appears in the Selected panel with the checkbox selected by default.
- To display the selected field on calendar timeslots, leave the check box selected. To add the field for search purposes but not show it on the timeslots, clear the check box.
- Repeat steps 4 and 5 for each Additional Field.
- When finished, click Save.
Set Display Additional Field Quick Settings
Clicking the conductor icon on the calendar menu brings up the Quick Settings popup for the current calendar view.
![]()
Quick Settings changes last only for the current browser session unless the user clicks Save as Default. Options to display Additional Fields and Additional Field Labels are available as Quick Settings for all calendar views.
Other Quick Settings affect calendar field display as well. For example:
- Cell Height Expansion gives more room to display additional fields.
- Display Month can be selected to show the month on calendar events in Month View.
- Event Bar Label Includes provides start and end time display options.