How Do I Customize My Calendar? – Classic
In this article you will learn how to customize:
Display Settings
Customize the calendar display settings to specify the week’s start day, Custom View settings, and font size.
To access the custom display settings, click the My Calendars button and select the Display Settings option.
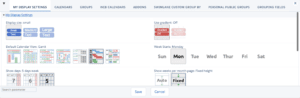
There, you can customize:
● Font Size
● Entry Label Gradient: when toggled on, allows the color of the calendar event to be grayed out
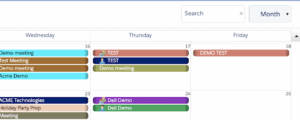
● Default Calendar View: specifies whether the calendar will always load in Day, Week, Month, Custom, Agenda, Gantt, or Swimlane views.
● Week Start Day: select which day of the week you would like the calendar week to show as the first day. (e.g Monday vs Sunday)
● Show Days: specifies whether the Month, Week, Day or Swimlane views will show five days, six days, or seven days at a time.
● Show weeks per month page: Automatic height allows for vertical scroll and will display all records in a given month. Fixed row height limits the number of records displayed on each row.
Special Settings
Special settings control the behavior of CalendarAnything in a browser.
To access Special Settings, click the My Calendars button and select the Display Settings option. On the My Display Settings tab, scroll down to the Special Settings section.
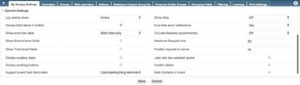
There, you can edit:
Log events show: controls the display of the CalendarAnything “log” at the top of the calendar page. Turn off the log display, enable the log display for all log events, or only enable the log display when there is an error message to display.
Show titles: controls the display of browser “detail” tags, which often slow down the application in certain browsers. Turn off the browser detail tag display (Off), limit the length of the display (Compact), show full browser tags (Detailed), show the fields selected in Step 4 of the calendar edit (Details Dialog) or the fields selected in Step 10 of the calendar edit (Full Agenda)
Display field labels in mobile: specifies whether or not to show field labels in Salesforce in mobile. Default is set to True, meaning that field labels will be shown in mobile by default
Auto hide error notifications: allows you to manually dismiss error messages displayed by CalendarAnything. The default is set to True, meaning that error messages are automatically hidden rather than having to manually dismiss error messages.
Show event bar label: controls the display of “Entry Start Time” and “Entry End Time” on timed entries for Day, Week, and Month View. Setting the Show event bar label to “No Start and End time” displays only Entry Name. Selecting “Start time only,” displays Entry Start Time and Entry Name. And choosing “Start and End time”, displays Entry Start Time, Entry End Time and Entry Name.
CA Labs features (experimental): this allows you to turn on/off some experimental features that may be added in future.
Show Second and Third level fields: controls if the fields from related objects will be shown on Step 2, 3, and 9 and if the “+” button that adds fields from related objects will be shown on Step 2, 4, and 10.
Maximum Request time: controls how long CalendarAnything will wait for a response from Salesforce, from 1 to 300 seconds. If CalendarAnything doesn’t receive a response in the time set, the page displays a timeout error. By default, Maximum Request time is set to 30 seconds.
Parallel requests to server: this controls the number of requests that can be sent to the server at the same time. The maximum number of requests that can be sent in parallel is 10. Use of this option can significantly improve calendar(s) load time. It is suggested to leave this setting at 10.
Display creating dates: controls the display of “Start Date Time” and “End Date Time” fields for entries in Edit mode. Checking the box means the fields selected as “Start Date Time” and “End Date Time” will be visible.
Load only last selected period: controls the loading process for calendars. Checking the box means that when scrolling through the dates, only the last selected date or date period will load. This option improves the calendar(s) load time.
Display scrolling buttons: controls visibility of up and down buttons on Agenda and Month views.

Special Settings options – Display scrolling buttons
Confirm delete: asks the user to confirm their decision before deletion. This applies to:
Deletion of event records (from event context submenu and from hover detail popup)
Deletion of calendars from calendars list and left panel
The default is set to false (checkbox is unchecked) meaning that the default setting will not provide a confirm delete popup.
Support Event/Task Reminders: controls the behavior of reminders for tasks and events on edit, drag and drop, and re-size.
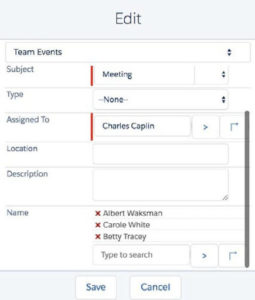
Multi Contacts in Event: allows the user to relate an activity to multiple contacts from the event create/edit popup.
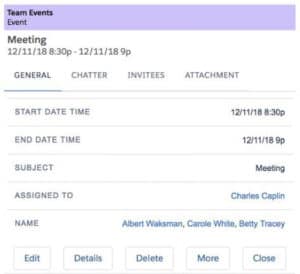
All added contacts can be displayed on the event details popup:
Layout Settings
Layout settings control which components display on the page.
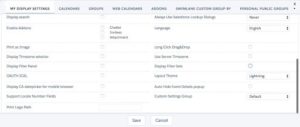
Display Search: controls whether or not the search box is present on the calendar page layout.
Always Use Salesforce Lookup Dialogs: controls what type of lookup dialog to use (a custom CA lookup or the standard Salesforce lookup). By default, this option is set to Auto.
Auto means that filtered lookups use Salesforce and all other lookup fields use custom CalendarAnything type-ahead lookups.
If set to Always, all lookup dialogs use Salesforce lookups.. If set to Never, all lookups use CalendarAnything type-ahead lookups and filtered lookups are unavailable.
For the CalendarAnything type-ahead lookups, you can also control display fields for the lookup object, and which fields will be available for search:
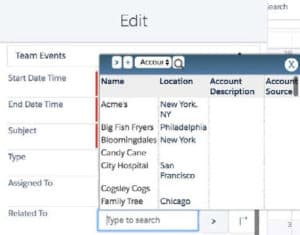 Fields displayed for the lookup Object
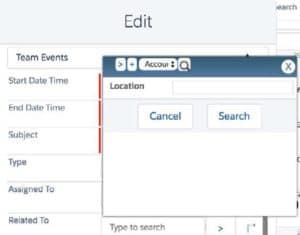 Fields available for Search
To set lookup fields, go to My Calendars > Display Settings and go to the Lookups tab. Select the lookup object and move fields you want to display as columns for CalendarAnything type-ahead lookups from the Available to the Selected section:

Set CalendarAnything type-ahead lookup fields
Checking the box makes that field available for search.
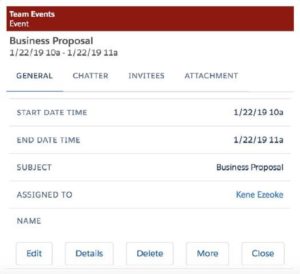
Enable Addons option controls the appearance of the Chatter, Invitees, and Attachment tabs on the event edit form. If checked, the user will see these tabs on the quick view details pop-up:
Fields displayed for the lookup Object
NOTE: Chatter and Invitees Add-ons don’t work for users who don’t have API enabled.
Language: allows you to select the language to display all UI elements.
Print as Image: provides the ability to print all views as images.
Long Click Drag & Drop: enables long click when creating/moving/resizing new record.
Display Timezone: allows you to change the timezone for all calendar events.

Use Server Timezone: controls if the current time indicator (marked with the red line) will use the server or local timezone.
Display Filter Panel and Display Filter Sets: controls if Filter sets and Filter panel shows on the left sidebar.
OAUTH ICAL: controls if the OAUTH or JVT authentication approach for iCal publishing.
Note: ICAL functionality is no longer available
Layout Theme: allows you to switch between the classic CalendarAnything UI and the Lightning styled version.
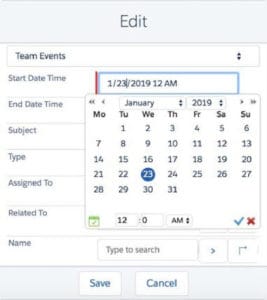
Display CA Datepicker: allows you to show the CalendarAnything datepicker instead of the standard iOS date picker on iOS devices for mobile browsers:
Auto-hide event details pop-up: if checked, this automatically closes the event details pop-up if the user switches to another view. Otherwise the pop-up remains open until the user hits its close button.
Support locale number fields: if checked, this allows the calendar to support different locale’s number formats.
Print Logo Path: adds a logo on the top of each page in Print view.
To enable this, insert the URL of the image in the blank space.
![]()