Embedding CalendarAnything | Classic
Embed a calendar on the Salesforce homepage, on specific records, or elsewhere to view calendars more easily. Relevant calendars on records drive insights by allowing visualization of data in user-friendly ways. This can also increase user adoption for CalendarAnything, making it more useful to your organization.
In this article you will learn how to:
- Embed CalendarAnything on the Salesforce homepage
- Create an embedded calendar on a record page with edit and create permissions
- Create a dynamic embedded calendar
- Embed CalendarAnything in Communities
Related articles:
- If you are looking to publish a public facing calendar through an external URL, you can do so through a Salesforce Force.com site. Learn how to create a public calendar on a Force.com site.
Embed CalendarAnything on the Salesforce homepage
Step 1: Create a Visualforce page
In Salesforce, go to Setup, then click on Develop > Visualforce Pages.
Click the New button to create a new Visualforce Page.
Type in a label, name (e.g. CA_Home), and description.
Check the Available for Salesforce mobile apps box, if applicable.
Copy and paste the following code in the Visualforce Markup tab:
<apex:page showHeader="true" showChat="false" sidebar="false">
<SLCA2:calendar namespace="SLCA2"
calendar=""
createable=""
urlparams=""
>
</SLCA2:calendar>
</apex:page>
Click the Save button.
Note: For setup instructions on building Visualforce tabs, click here.
Step 2: Add a custom component to the homepage
Go to Setup. Then click Customize > Home > Home Page Components.
In the “Custom Components” section, click the New button to create a new Visualforce area component.
Type a name for the component and select Visualforce Area for type.
Select Wide for the component position.
In the Visualforce Page list, select the Visualforce page name (e.g. CA_Home) you created in the previous step.
Enter the desired height (e.g. 500)
Click Save.
Step 3: Enable the custom component on homepage layout
Go to Setup. Then click App Setup > Customize > Home > Home Page Layouts.
Click on Edit next to the Dashboard Home Page Default page layout.
Check the box next to the custom component created in the previous step.
Click Next.
Arrange the component on the homepage.
Click Save.
Step 4: Update the clickjack protection setting
Go to Setup. Then click Administer > Security Controls > Session Settings.
Uncheck the Enable clickjack protection for customer Visualforce pages with headers disabled box.
Click Save to finish.
Create an embedded calendar on a record page with edit and create permissions
To embed a calendar directly onto an object record page, first create a Visualforce page.
To set, create, and edit permissions to the embedded calendar, you must set certain parameters.
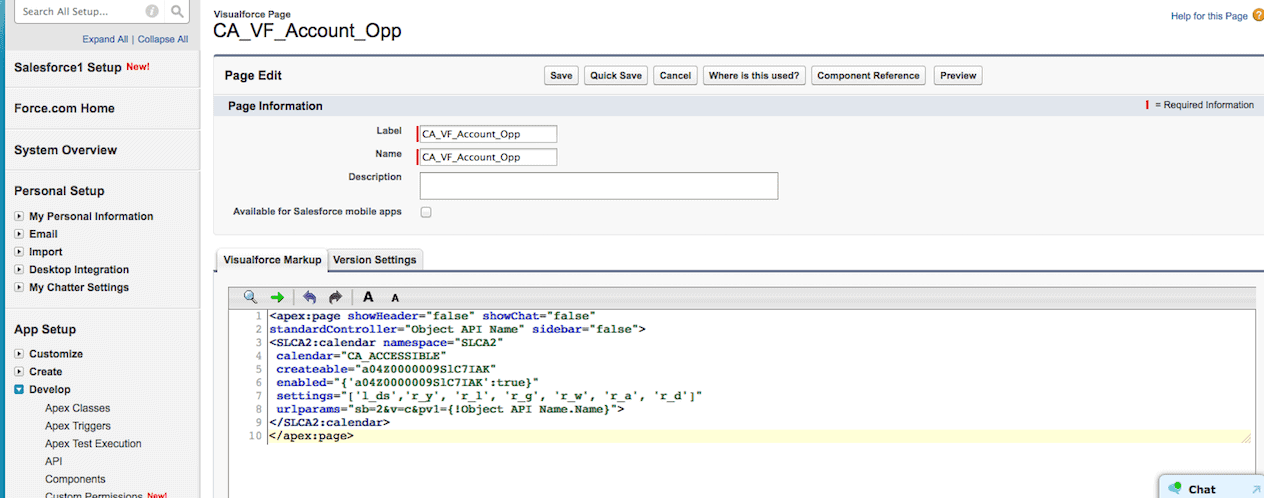
Copy and paste this Apex code directly into the Visualforce Markup:
<apex:page showHeader="false" showChat="false"
standardController="Object API Name" sidebar="false">
<SLCA2:calendar namespace="SLCA2"
calendar="CA_ACCESSIBLE"
createable="a04Z0000009SlC7IAK"
enabled="{‘a04Z0000009SlC7IAK‘:true}"
settings="[‘l_ds’,’r_y’, ‘r_l’, ‘r_g’, ‘r_w’, ‘r_a’, ‘r_d’]"
urlparams="sb=2&v=c&pv1={!Object API Name.Id}">
</SLCA2:calendar>
</apex:page>
The most important elements of the component are indicated in yellow text above. You will need to change these to reflect the calendar you would like to embed.
- The standardController=”Object” variable needs to match the object API name.
- Account, Lead, Contact, and other standard objects must have simple API names e.g., “Account” and “Contact.
- Custom objects must use the API name format “Custom_Object_Name__c” e.g. “Projects__c”, “Custom__c”.
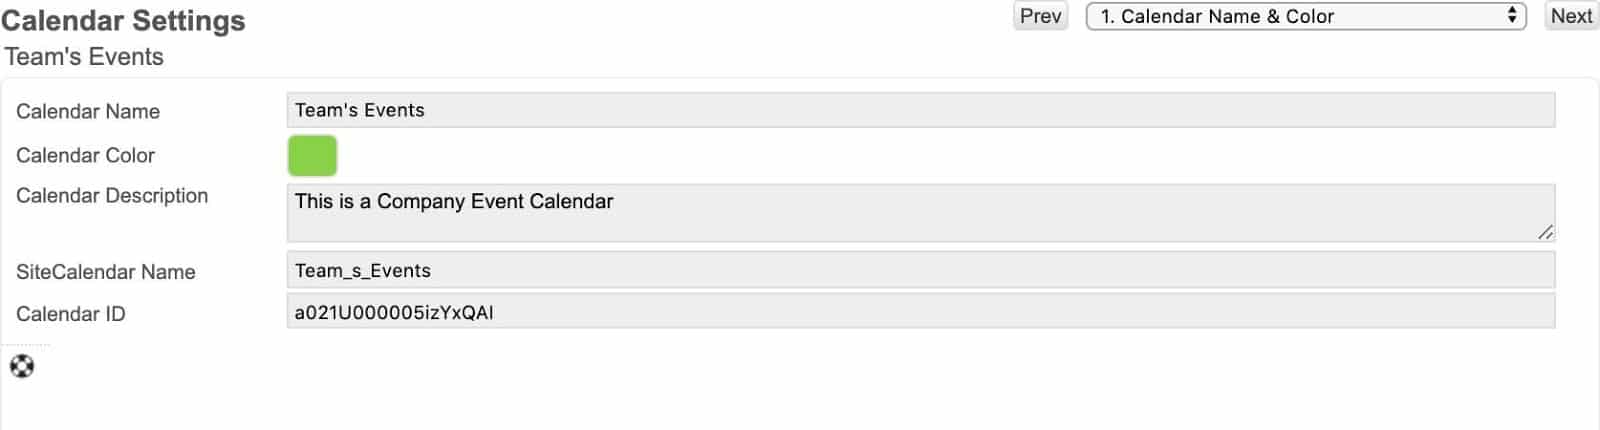
- The calendar=”CalendarID” variable needs to match the Calendar ID of the calendar that you want to embed.
You can copy this information from Step 1 of the Calendar Settings page in CalendarAnything. Each calendar has a unique ID.
Step 1: Create an object-specific Visualforce page
Go to Setup. Then click Develop > Visualforce Pages and click New.
Paste the Apex code into the Visualforce Markup section.
This will create a new Visualforce page. This page can then be added to the record page layout after a new section on the record page layout has been created.
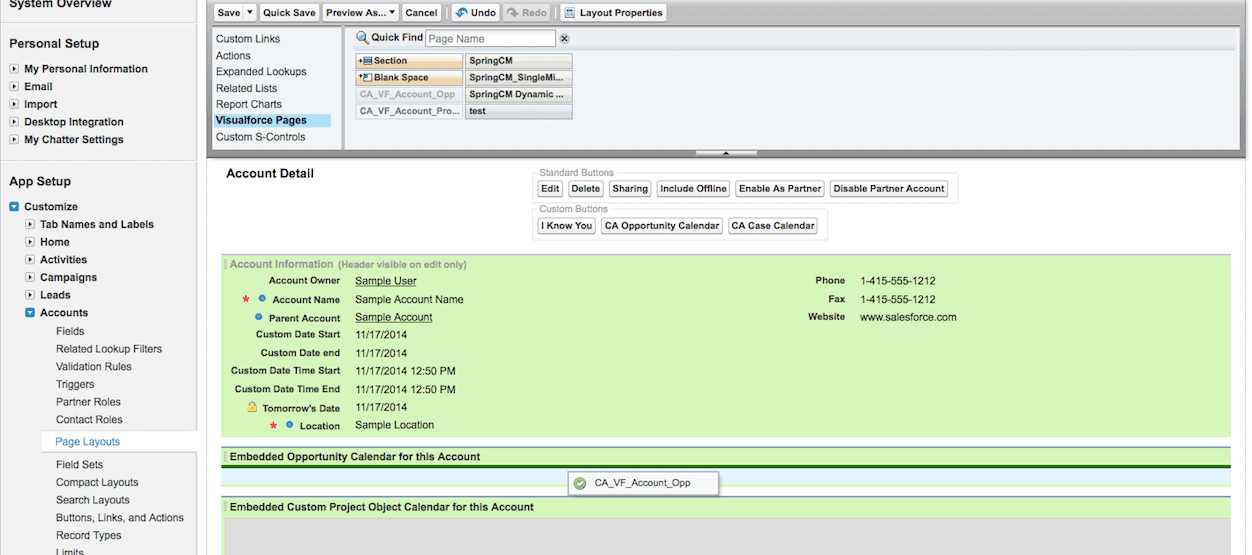
Step 2: Add the Visualforce page to the record page layout
On the record page, click Edit Layout in the top right corner of a record.
Create a new section for the embedded calendar on the page layout.
Drag the newly created embedded calendar Visualforce page and set the dimensions for the embedded calendar.
Creating dynamic calendars
Dynamic calendars allow users to view a CalendarAnything calendar related to the record by clicking a button on the page in Salesforce Classic.
In the example below, when viewing an Account record, click the Dynamic Opportunity Calendar button to open a CalendarAnything calendar displaying the Opportunities related to that Account record.

Setting up dynamic calendars is a two-step process. First, you must create the calendar you want to be dynamic, and then you must create the button to display it.
Step 1: Create a calendar to be used as a dynamic calendar
Create a calendar in CalendarAnything to use dynamically. Be sure the calendar will be visible to users accessing the dynamic calendar button. The filter criteria for dynamic calendars look different than a traditional calendar entry.
Note: You can only use a maximum of 29 filter fields per calendar.
Select the fields to use as filters and select the corresponding parameter value for each field.

Sample Dynamic Calendar Filter Criteria
Save and copy the Calendar ID.
Step 2: Create the button
Once you have determined which object(s) to create the button for, navigate to Setup in Salesforce, and go to the Customize section.
Select the object you would like to create a button for (Accounts, Contacts, Leads, Opportunities, etc), then select Buttons and Links.
In this example, a button will be created for Accounts.
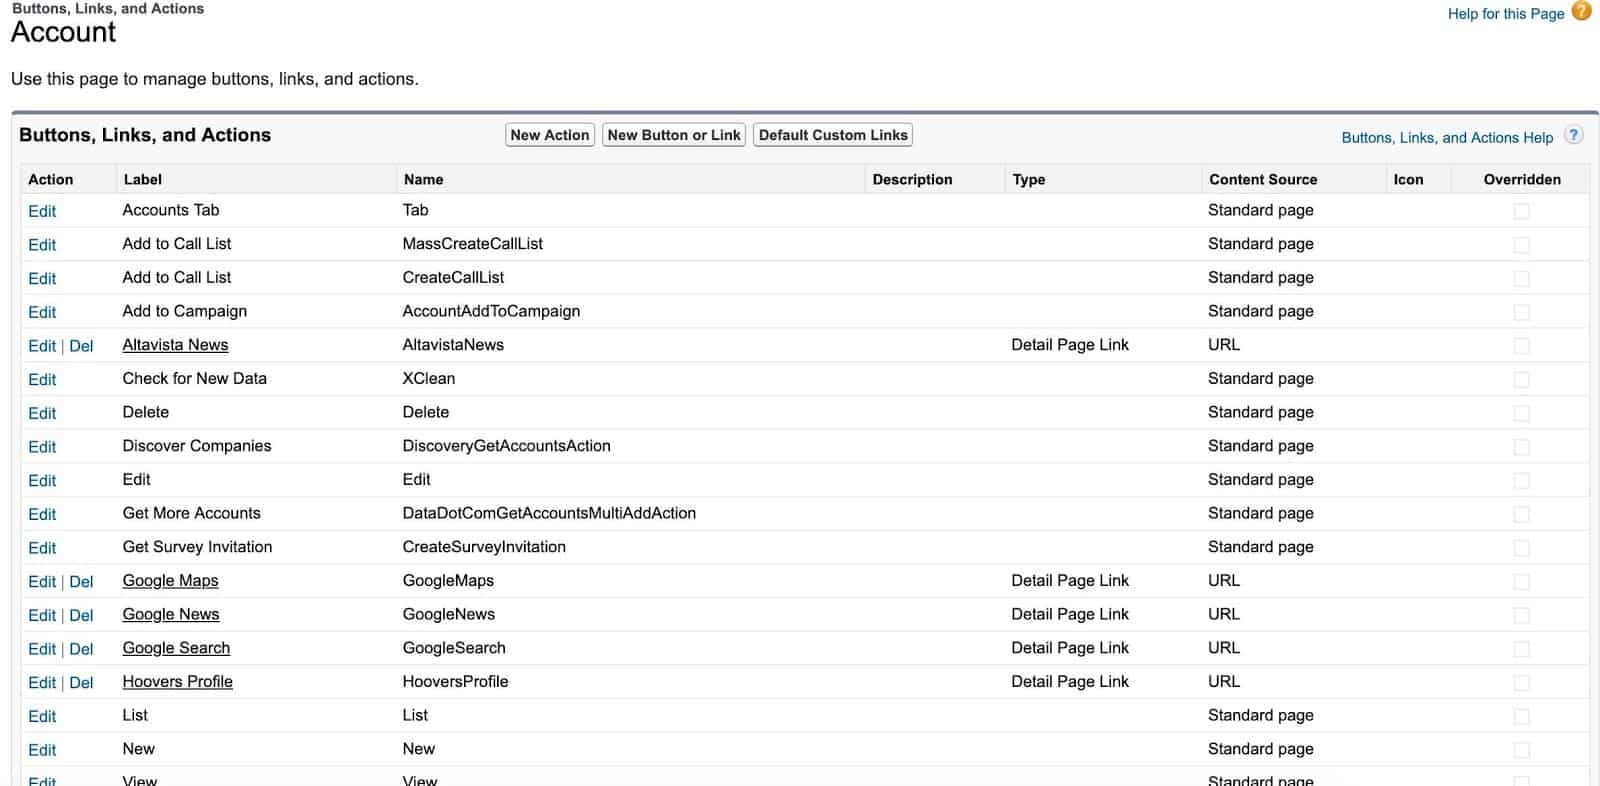
Click New under Custom Buttons and Links and enter a Label for the button.
Select Display Type as Detail Page Button.
For Behavior, we recommend Display in New window.
For Content Source, select URL.
In the formula box, use the template below to specify the calendar that will open when a user clicks on this button.
/apex/SLCA2 CalendarAnything?cid=CalendarIdTo use additional options in this URL button, simply add these additional parameters after the Calendar ID in the URL.
Finally, hit Check Syntax to make sure everything is in order. Click Save. The button will now display on your specified object page and will open a calendar matching the Calendar ID and set parameters.
Related Articles
CalendarAnything in Communities Visualforce page template
To use CalendarAnything in a Salesforce Community, create an embedded Visualforce calendar page using the following page code:
<apex:page sideBar="false" showHeader="true" cache="false">
<div style="position:relative;height:500px;" id="CA_INSIDE">
<script>
var fStartFunc = function(oAPI) {
oAPI.setFunc(‘externalLink’, function(sId, oEvt){
var bCommunity = document.location.href.indexOf(‘COMMUNITY‘) > 0;
if (!bCommunity){
window.open(‘/’ + sId);
} else {
window.open(‘/COMMUNITY/’ + sId);
}
return false;
});

jQuery(window).on(‘resize.CA’, function(){
var nH = jQuery(‘.bodyDiv’).height() – 50;
jQuery(‘#CA_INSIDE’).css({
“min-height” : nH + ‘px’
});
jQuery(‘#bodyTable’).css(‘height’, nH + ‘px’);

});
jQuery(window).trigger(‘resize.CA’);
}
</script>

<SLCA2:calendar date=""
view="month"
filter="{}"
calendar="CA_ACCESSIBLE"
settings="[]"
urlparams="site=1"
namespace="SLCA2"
readonly="{
edit : true,
create : true,
detail : true,
move : true,
hover : true,
contextEvent : true,
contextCalendar : true,
contextArea : true
}"
func="{
ready : fStartFunc
}"
></SLCA2:calendar>
</div>
</apex:page>
Simply replace the COMMUNITY sections with your community name. For example, if your community is called ‘mytestcommunity’ then simply replace the yellow sections with ‘mytestcommunity’.
Note: The community name is not the full URL to your community.
You can then create a Visualforce tab that can be used to access this calendar from within your community.