Filter Panel and Filter Sets in CalendarAnything LWC
If your business has requirements that go beyond our out-of-the-box features, reach out - we offer custom development services for CalendarAnything to meet your unique needs.
The Filter Panel and Filter Sets on the calendar sidebar enable users to filter records displayed on a calendar. CalendarAnything administrators create Filter Panels. Both admins and end users can create Filter Sets.
In this article
- How to create a Filter Panel (Admins only)
- Enabling the Filter Panel and Filter Sets
- Using the Filter Panel
- Saving Filter Panel criteria as a Filter Set
- Using Filter Sets
- Deleting a Personal Filter Set
- Global vs Personal Filter Sets
- Other Filter Set options
Related Demo:
How to create a Filter Panel (Admins only)
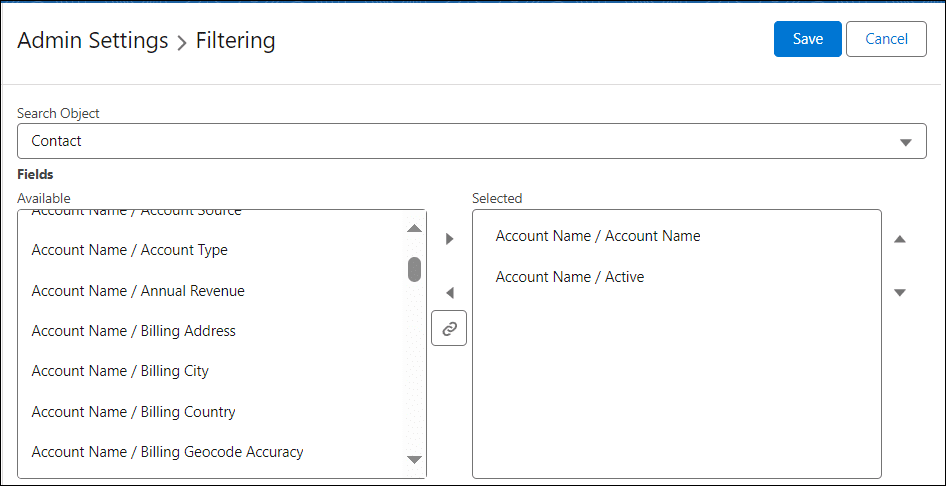
CalendarAnything administrators create the Filter Panels that appear on calendar sidebars. Follow these steps to create a Filter Panel:
-
On the Settings menu, click Admin Settings.
- Select Filtering.
- On the Filtering page, select a data object name. Two panels appear. If fields were already selected for the Filter Panel, the Selected panel will contain the selected fields.

- To add filters:
- Select filter fields from the Available panel and move them to the Selected panel as needed.
- Click Save. Once the Filter Panel has been enabled, the sidebar Filter Panel will show the added fields under their respective object names.
Enabling the Filter Panel and Filter Sets
Although default filter criteria may have been created by a CalendarAnything administrator, the Filter Panel and Filter Sets settings must be enabled before they will show on the sidebar. To enable Filter Panel and Filter Sets, follow these steps:
- On the Settings menu, under General Settings, select Filtering.
- Ensure that the checkboxes labeled Display Filter Panel and Display Filter Sets have a check mark.
- Click Save.

Using the Filter Panel
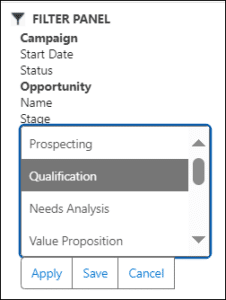
The Filter Panel contains a set of fields pre-selected by a CalendarAnything administrator for you to filter your calendar records. Fields are listed under the data object to which they belong. Keep in mind that the filter field you choose should be listed under an object that supplies data to the calendar in view.

Follow these steps to use a filter on the Filter Panel:
- Select the filter field. A context menu lists the available values for the field.
- Select the value by which to filter. The selected value becomes highlighted.
- Click Apply. The calendar view changes to show only records that meet the selected filter criteria.
- To undo the filter, click Cancel. The records that were removed from view are again displayed.
Saving Filter Panel criteria as a Filter Set
You can save commonly used Filter Panel criteria as a Filter Set. Thereafter, you can just apply the Filter Set instead of having to reselect the criteria.
To save Filter Panel criteria as a Filter Set, follow these steps:
- Select Filter Panel criteria.
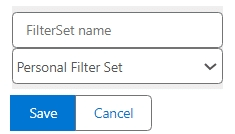
- Click Save. The following fields and buttons appear.

- Enter a name for the Filter Set.
- Select either Personal Filter Set or Global Filter Set. A Personal Filter Set will be yours only. A Global Filter Set can be used by other calendar users.
- Click Save. The Filter Set appears on the sidebar under the type of filter set selected.
Using Filter Sets
Filter Sets are saved with both a filter field and a filter field value. There is no need to select a value as you do when using the Filter Panel.
Learn how to use Filter Sets by following these steps:
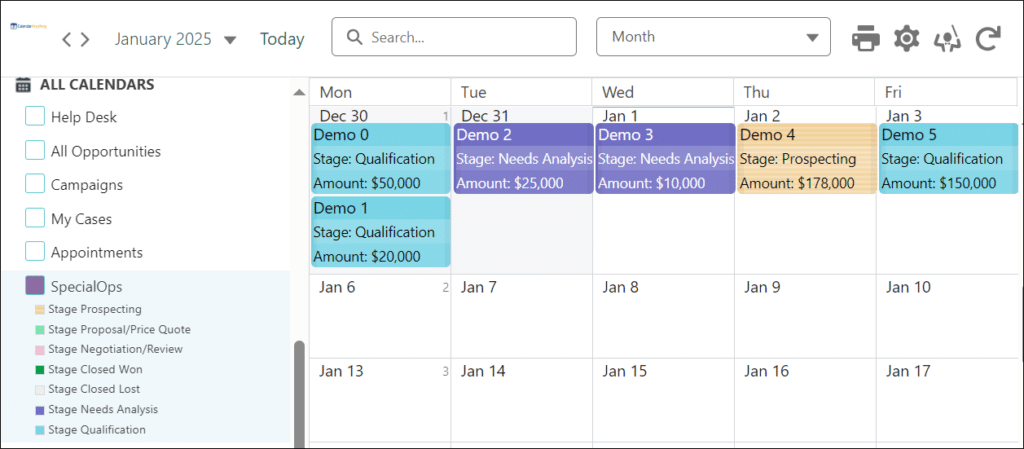
- Select the calendar from the sidebar to bring it into view.

-
Select a Filter Set name. The selection box preceding the Filter Set becomes shaded. The application rebuilds the calendar to show only records that meet the criteria of the selected Filter Set.

- If you want to filter by an additional Filter Set, select the name of that Filter Set as well. (You do not need to select an operator. The AND operator is selected by default.) The application rebuilds the calendar showing only records that meet the criteria of both selected Filter Sets.

- If you want to see records that meet either the first selected Filter Set or the second selected Filter Set, click the toggle icon between the AND operator and the OR operator. The application rebuilds the calendar showing records that meet the criteria from either of the selected Filter Sets. In the example below, the calendar shows additional records as a result of the OR operator selection.

- To undo a Filter Set selection, simply click its name again.
Deleting a Personal Filter Set
Follow these steps to delete a Personal Filter Set:
-
Right-click the Filter Set name. A context menu appears.
- Select Delete. The Filter Set is deleted.
Global vs Personal Filter Sets
CalendarAnything administrators can create Global Filter Sets available to all calendar users. Individuals can also create Global Filter Sets if they have ModifyAllData permissions. Global filter sets can be cloned by any user and saved as a user-specific (Personal) filter set.
Personal Filter Sets can be created by any calendar user and will be available only to the person who created them. They will be stored as a filter set record in CA_UserSettings.
Note! CA_UserSettings sharing should be set to Public Read/Write.
Other Filter Set options
 The user can Edit, Clone, Delete, and rename the Filter Set or make it the default. Whenever a user loads or refreshes the page, they’ll see the default filter set. This does not include “calendar refresh” (using the Refresh button). To change the default setting, click Remove as Default in the right-click dialog. If that option is selected, the application will remove that selection and future page loads/refreshes will not automatically enable that filter set.