Printing Calendars in CalendarAnything LWC
If your business has requirements that go beyond our out-of-the-box features, reach out - we offer custom development services for CalendarAnything to meet your unique needs.
CalendarAnything LWC enables you to print calendar views and provides optional settings to customize your output.
In this article:
Customizing the appearance of a printed calendar
Print mode settings and dynamic CSS style changes enable you to change the appearance of a printed calendar. The changes affect output only. They do not affect how calendars appear on CalendarAnything LWC application pages.
Print mode settings
While viewing a calendar in print mode, clicking Settings displays a menu of options for customizing output.
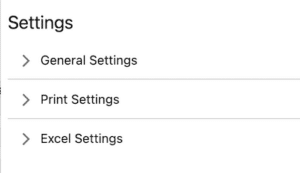 |
This image shows the collapsed settings menu for calendars not being viewed in Gantt View. Settings for Gantt View differ from the settings for other views. |
General Settings
- Dates – date range of calendar data to include for print or export
- Color – determines whether your events will be printed with color (true) or without color (false)
Print Settings
- Header
- Date Range – option to add information about the date range selected/included for print or export
- Filter Set Names – option to add information about the enabled filter sets
- Author – option to show the name of the person who printed the file
- Display Events
- Time – option to show or hide time in events
- Calendar Name – option to show or hide Calendar Name in events
- Max Events / Cell – option to set the maximum number of events to be shown in one cell (day). (Available for Month View only)
- Font Size – option to set font size. (Available for Month View only)
- Truncate Title – option to show title information on one line
- Split by Month – option to split the print file by month. (Available for Month View only)
- Template Settings
- Print Template – option to select existing template for styling your output
- Custom CSS – location to paste any customized CSS for styling your output (Refer to Customizing CSS.)
Excel Settings
- Export File Name – the name for the output file if you are exporting it to Excel
Gantt View Settings
The settings menu differs for Gantt view and contains the following settings:
Print Settings
- Phrase – text that will be shown in the table header.
- Print Layout – option to set layout (Landscape, Portrait)
- Size – option to set display size (Letter, A4, etc.)
- Print order – option to set Print Order for events (By calendars, By data).
Excel Settings
- Export File Name – the name for the output file if you are exporting it to Excel
Dynamic CSS style updates
You can temporarily change the CSS styling of specific calendar elements for printing purposes. For example, you may want to change the size and color of the calendar date text. To do this, you use the “inspect mode” feature of your browser.
Important! The "inspect mode" feature varies by browser. The example shown below uses Chrome. In Safari, the setting to show the developer menu in the menu bar must be set on. Then, when you right-click a web page element, the context menu will appear for you to choose Inspect Element. Also, the inspection panel may appear at the bottom, rather than on the side of your browser.
Inspecting and modifying calendar element CSS
In print mode, right-clicking a calendar element displays the CSS inspection panel. Changes made here take effect only when the calendar is printed. Follow the example steps below to get an idea of how to change CSS styling for calendar printing.
- With your selected calendar view displayed, click Print to open Print Mode.
- Right-click the calendar element (the date for this example) to be styled. A context menu appears.
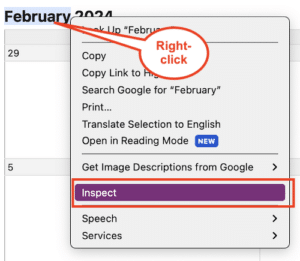
- Select Inspect. A divided inspection panel opens to the right of the calendar display.
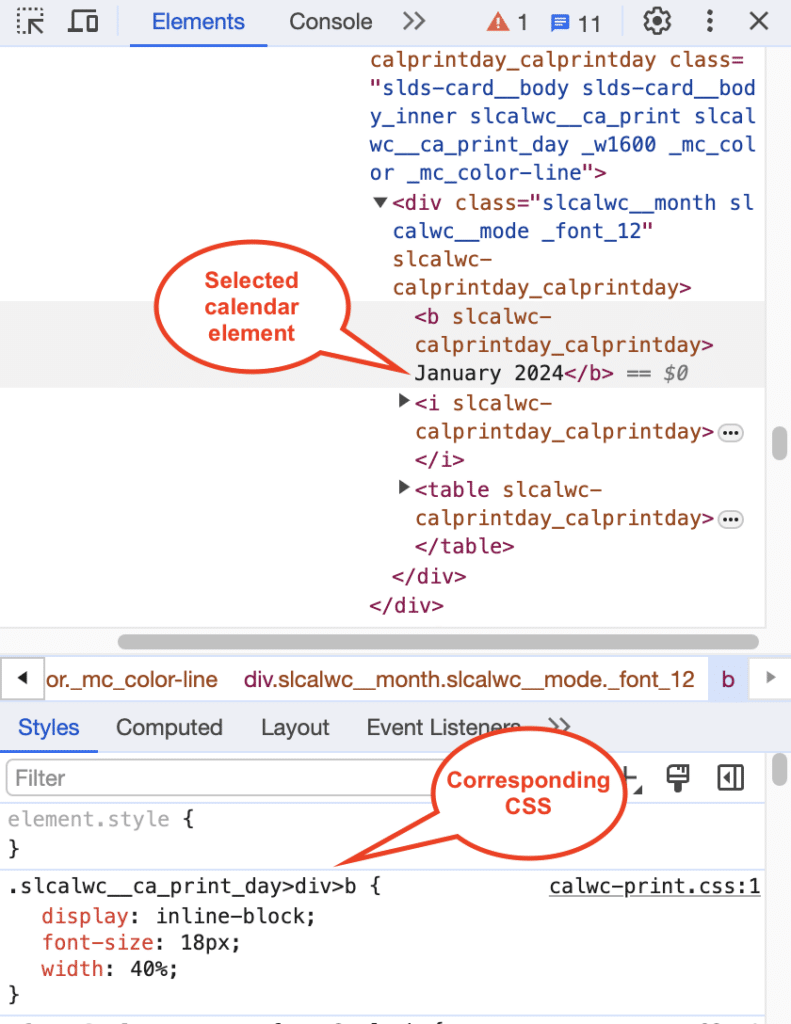
Element names and properties are specific to the context of this example. The steps below are provided as a guide.
- In the lower panel, directly change the font-size property from 18px to 30px.
- Add a blank line directly below the font-size property.
- Enter color: blue; (for this example).
- After you’ve made your changes, copy the element name and its CSS properties. For the current example, you would copy:
.slcalwc__ca_print_day>div>b {
display: inline-block;
font-size: 30px;
color: blue;
width: 40%;
} - Click Settings on the Print Mode menu.
- Paste the copied CSS into the Custom CSS field.
- Click Print on the print mode menu. The print preview popup appears.
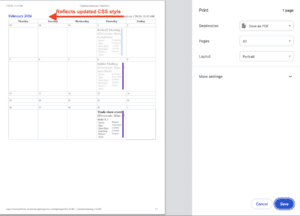
- To print, select a printer from the Destination field and click Print. To save the output to PDF, select Save as PDF from the Destination field and click Save. At the confirmation prompt, click Save.
Saving CSS style updates to a template
To save customized CSS to a template for future use, follow these steps:
- Go to CalendarAnything Settings -> Admin Settings -> Print Templates.
- Click Add.
- Enter a name for the template.
- Click Edit on the row with the new template name. A popup appears.
- Paste your copied CSS into the CSS Template field.
- Click Save. The popup closes.
- Click Save on the Admin Settings > Print Templates page.
Print preview mode
Clicking Print from Print Mode brings up Preview mode. This mode displays the calendar on the left and a print menu on the right.
Print Preview Menu Options
- Destination: Contains options to select a printer or save as a PDF.
- Pages: Contains two initial options—All and Custom. If you select Custom an example of custom range formats appears just below the Pages field.
- Layout: Contains Portrait and Landscape options.
- More settings: Clicking this brings up the following options:
- Paper size: Contains the following options:
- Legal
- Letter
- Tabloid
- A0 – A5
- Pages per sheet: Number of calendar pages to print per sheet of paper
- Margins: Contains the following options:
- Default
- None
- Minimum
- Custom: If you select this option, a border is displayed around the print preview for you to drag the margins where you want them to be.
- Scale: Contains the following options:
- Default
- Custom: Brings up a scrollable selection field to select or enter a number between 10 and 100. The print preview shows the effect of your selection.
- Options:
- Headers and footers: Option whether to print headers and footers
- Background graphics: Option whether to print any background images or colors on the calendar records (Refer to Printing background colors and images.)
- Print using system dialog: Option to bring up the system print dialog popup
- Open PDF in Preview: Option to open the PDF in Preview mode
- Paper size: Contains the following options:
Printing background colors
Calendars viewed in Print Mode appear with calendar event colors. When you click Print from Print Mode, the calendar is redisplayed in Print Preview without colors unless Background graphics is selected on the Print Preview menu. If your calendar colors do not appear in Print Preview, follow these steps:
- Click More settings on the Print Preview menu.
- Under Options, select the Background graphics checkbox. The Print Preview calendar image immediately includes calendar colors.
Printing a calendar
To print a calendar, follow these steps:
- In CalendarAnything LWC, enable the calendar you want to print using the left sidebar.
- Click Print.

The selected calendar appears in print mode. - To change print settings or select a print template, click Settings and use the settings menu as needed.
- Click Print when ready to print the calendar.

The Print Preview window appears.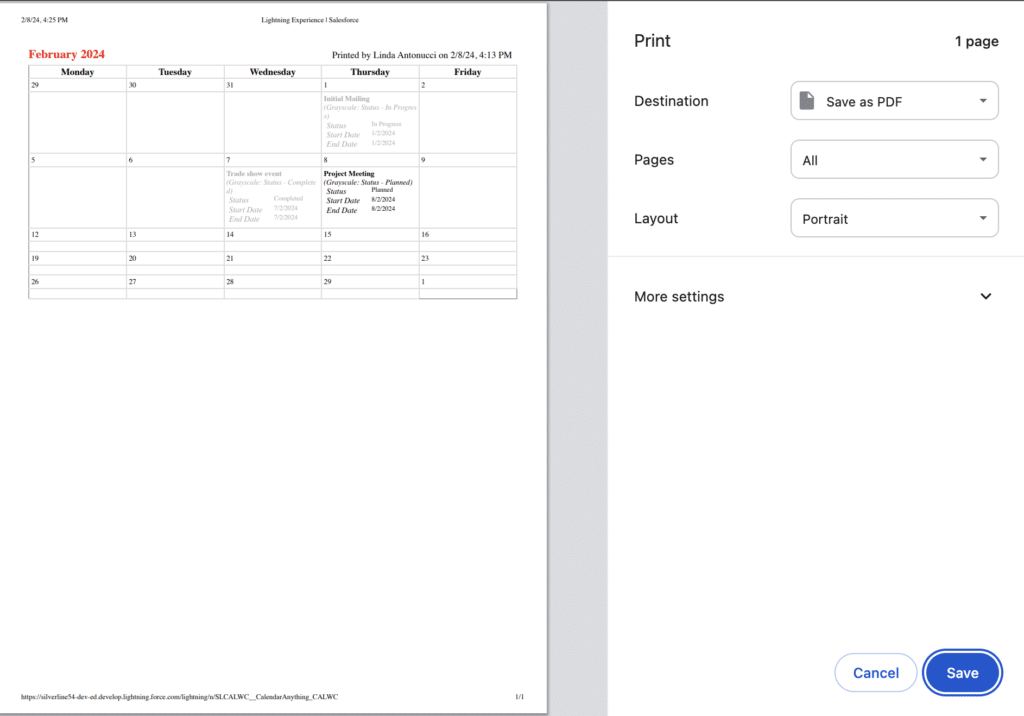
- Use the Print Preview menu as needed.
- From the Destination field, select a printer and click Print; or, select Save as PDF and click Save. At the confirmation prompt, click Save.