Troubleshooting FAQ – Classic
- I can’t create a new event on the calendar
- I’m missing the sidebar
- Only admins can see CalendarAnything
- Calendar shows the ID instead of name
- My Records filter on a child object
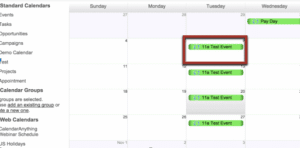
- Group events show up multiple times on calendar
- Calendars time out when trying to load
- There are duplicate recurring events and tasks
- I can’t save changes when adding public groups to selected area of Step 6
- I can’t see events shared on a calendar
I can’t create a new event on the calendar
First, make sure the Default CalendarAnything Permission is set or you have configured the profile with the appropriate settings to create events using CalendarAnything:
If that is the case, and it’s still not working, then:
- Hover over the calendar. Click the dropdown and click Edit.
- Go to Step 2.
- Make sure to check the Editable box.
Your user should be able to create events now.
I’m missing the sidebar
If you can’t see your calendar sidebar, as in the image below:
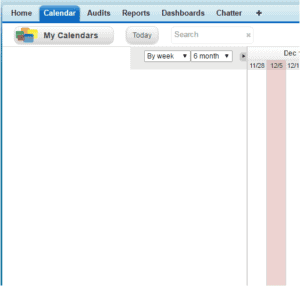
Your admin must give you the CalendarAnything Default Permission Set on your user page.
Only admins can see CalendarAnything
First, make sure to deploy all objects.
Next, make sure all profiles for users who need access to CalendarAnything are custom profiles that have all the necessary object access.
They need:
Read, create, edit, and delete access to all objects beginning with CA_
Apex class access to all classes starting with SCLA2
Visualforce page access to all pages starting with SCLA2
At minimum, read access to the objects that the calendars are based on, including related lookup objects if they are used in formulas or displayed fields
This can alternatively be accomplished by assigning the Default CalendarAnything Permission Set, which comes with the application, to the affected user(s).
Calendar shows the ID instead of name
If your calendar looks like this:
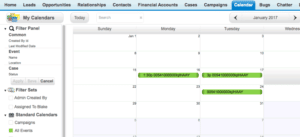
But you want it to look like this:
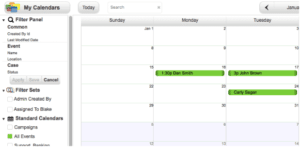
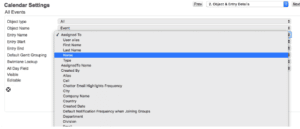
Hover over the relevant calendar in the left sidebar, click the down arrow, and then select Edit. Go to Step 2 of the calendar’s edit screen and use a different field for Entry Name:

If you don’t see the field you want in that drop-down, go to My Calendars > Display Settings and click on the Special Settings section. Then check the fields for Show Second level fields and Show Third level Fields.
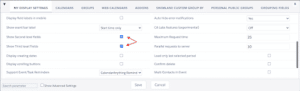
Now you will be able to see a full list of related fields for each lookup field/related object.
If the field you want to use doesn’t exist, create it using a formula field. For example, if activities did not have a “Name” field, create the “AssignedTo Name” formula field on the Activity object.
Save this field as visible to all users but not on any page layouts to use this field as the entry name in CalendarAnything.
For custom objects, make a custom field on that object with the related fields that you wish to display.
My Records filter on a child object
If you are trying to use the My Records option on the Filter Views page of a calendar and it is not filtering out records created by other users, make sure that the object the calendar is visualizing is not a child object in a master-detail relationship.
If it is a child object, you will need to use the Add Search Criteria button to filter by a different field, such as “Created By,” because the My Records option filters by the owner field, which child objects do not have.
Group events show up multiple times on calendar
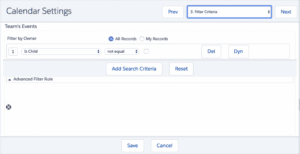
In order to show just the group event related to the primary contact, add a filter to the calendar where “Is Child” is not true. This means it must be unchecked.
Calendars time out when trying to load
Timeout issues can occur when CalendarAnything needs to search through an excessive number of records from an object to display.
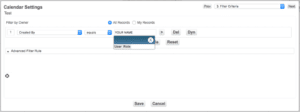
Reduce the number of records for this by using the filter settings on Step 3 of the calendar edit.
For example: Adjusting the filter to only show those records created within this year will greatly reduce the number of records CalendarAnything must search, reducing load time.
There are duplicate recurring events and tasks
When you create a recurring series of tasks/events in Salesforce it enables a recurrence section where you get additional fields – frequency, start date, end date, etc. Based on the selections in the above fields, Salesforce creates the same amount of recurring tasks/events in a series. For example, if the frequency is set to 4 in the series it will create a series of 4 tasks/events. However, in the backend Salesforce creates a total of 5 tasks/events, one recurrence parent and another 4 recurrence child tasks/events.
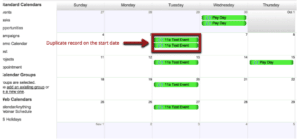
The duplication issue is that the start date will display two records – one parent and one child.
That means that when users add a recurring event or task with a series that repeats (e.g. once a week, every weekday, etc.) the event or task duplicates on the start date. This occurs when the user creates the recurring event/task directly from the calendar.
The remaining events/tasks in the recurring series all appear as expected on the calendar.
Solution:
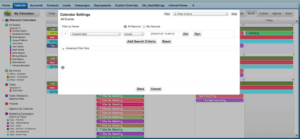
A workaround for this issue is available. In short, you can eliminate the duplicate record on the first day of a recurring series by adding a filter criteria to the calendar where the “Recurrence Type” field does not equal all of the options. To do this:
Access the Edit menu for the calendar.
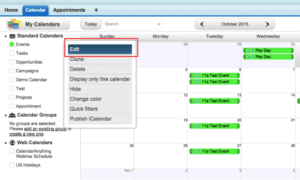
Go to Step 3. Filter Criteria in the calendar settings.
Add the following filter criteria:
Recurrence Type not equal (select all of the options). You must multi-select the filter criteria.
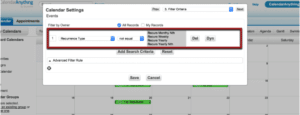
Save your changes and verify that the duplicate record has been deleted on the start date.
I can’t save changes when adding public groups to selected area of Step 6
In this situation, check the Org Wide Default Settings for Sharing. The CA_Calendar object must be set to Private in order for public group sharing to work properly.
You can change this by going to Setup in Salesforce. Navigate to Administer > Security Controls > Sharing Settings.
I can’t see events shared on a calendar
Events and Tasks are Salesforce Activity objects. Activities have two sharing settings under the Organization-Wide Sharing Defaults: “Private” and “Controlled by the Parent”.
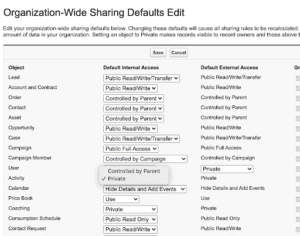
Make the Activity sharing “Controlled by Parent” if the user has access to the event’s parent (i.e. account) to gain access to that account’s events.
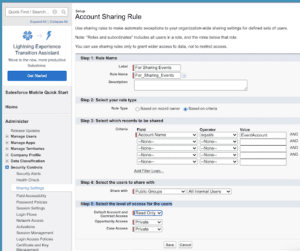
Create a dummy account in Salesforce used for sharing events, with a name that makes sense for your users. Go to Setup in Salesforce. Then navigate to Administer > Security Controls > Sharing Settings, scroll down to Account Sharing Rules and click on the New button.
Step 1: Rule Name
Give the new rule a label, name, and description.
Step 2: Select your rule type
For the type pick Based on criteria.
Step 3: Select which records to be shared
Account Name equals (Dummy Account Name)
Step 4: Select the users to share with
Now pick who should see your data. It can be a user, a role, or a group.
Step 5: Select the level of access for the users
Give the appropriate access. It should be at least “Read Only.”
Finally, click Save. You can now make sure that the events you want to make visible are related to your dummy account.